Sponsored

New A-Pillar Light Brackets + Exclusive Ranger6G Discount Code

OP
OP
AdventureLab

AdventureLab

Diamond Sponsor
First Name
Brit
Joined
Mar 14, 2025
Threads
48
Messages
864
Reaction score
1,246
Location
St George, UT
Vehicle(s)
'24 RR
Install is super easy. I didn't prop up the hood or trim anything. I have hood struts, so maybe that made it a little easier to support. Just loosened one side at a time and slipped the brackets in.

Only "difficulty" is that I needed a deep socket for the hood bracket due to the length of the bolts protruding.
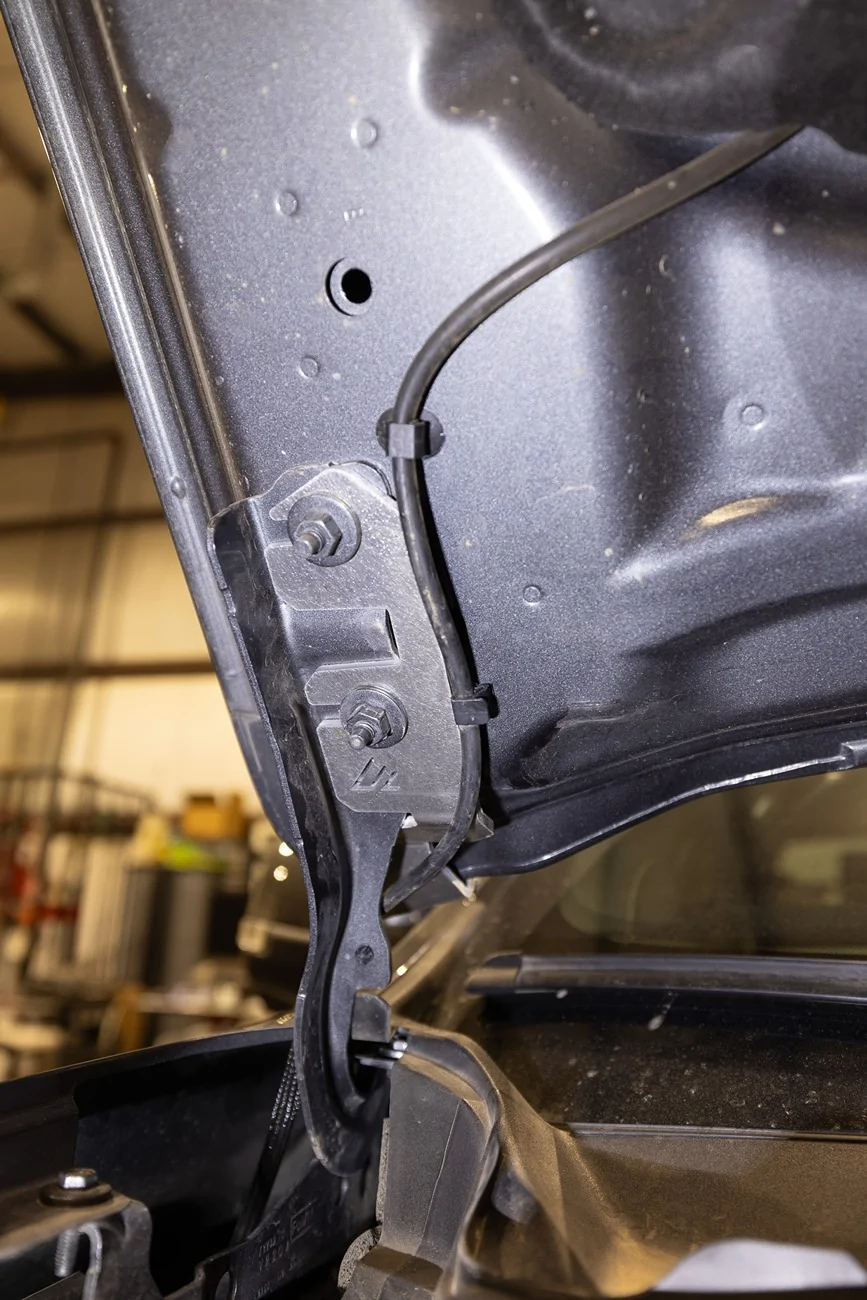
Thanks! Yes, nothing special for installation.

Should be about 18 ft lbs for the torque on those nuts.
Sponsored


Midlifec

Active Member
First Name
Gary
Joined
Mar 19, 2025
Threads
0
Messages
42
Reaction score
24
Location
Livonia, Michigan
Vehicle(s)
2025 Ranger Raptor.
Occupation
Retired
Tips for future installers:
Witness marks on hinge and hood to ensure proper alignment as hood slides down on bolts. Not a huge problem because hood is light.
Remove water hose clip by middle of hinge as it interferes with installation.
18 ft lbs or 216 in lbs was proper torque.
 
OP
OP
AdventureLab

AdventureLab

Diamond Sponsor
First Name
Brit
Joined
Mar 14, 2025
Threads
48
Messages
864
Reaction score
1,246
Location
St George, UT
Vehicle(s)
'24 RR
Tips for future installers:
Witness marks on hinge and hood to ensure proper alignment as hood slides down on bolts. Not a huge problem because hood is light.
Remove water hose clip by middle of hinge as it interferes with installation.
18 ft lbs or 216 in lbs was proper torque.
Thanks for sharing that! Much appreciated.

You shouldn't have to remove the water hose clip, or at least we didn't have to do that on our truck.

G18A4050.webp
 

Midlifec

Active Member
First Name
Gary
Joined
Mar 19, 2025
Threads
0
Messages
42
Reaction score
24
Location
Livonia, Michigan
Vehicle(s)
2025 Ranger Raptor.
Occupation
Retired
Thanks for replying. I removed the hose clip because I left both nuts on to keep the hood on the hinges. In retrospect one would have been enough. I was able to reinsert the hose clamp this morning.
 

Sponsored
OP
OP
AdventureLab

AdventureLab

Diamond Sponsor
First Name
Brit
Joined
Mar 14, 2025
Threads
48
Messages
864
Reaction score
1,246
Location
St George, UT
Vehicle(s)
'24 RR
Thanks for replying. I removed the hose clip because I left both nuts on to keep the hood on the hinges. In retrospect one would have been enough. I was able to reinsert the hose clamp this morning.
Oh, great! Glad it helped.
 

el_sabio

Well-Known Member
First Name
Randall
Joined
Oct 6, 2024
Threads
16
Messages
190
Reaction score
259
Location
Tennessee
Vehicle(s)
24 Ranger XLT FX4
Was about to pull the trigger but on your site I saw pics with a bracket for both ditch lights and forward facing lights. That's what I"m after, but I don't see the option on the order form.

1762977712756-qz.webp

1762977727499-zl.webp
 

Sauce

Well-Known Member
Joined
Apr 30, 2025
Threads
45
Messages
505
Reaction score
425
Location
Northeast
Vehicle(s)
2025 Ranger XLT FX4
Was about to pull the trigger but on your site I saw pics with a bracket for both ditch lights and forward facing lights. That's what I"m after, but I don't see the option on the order form.

1762977712756-qz.webp

1762977727499-zl.webp
I used the AAL bracket and then bolted the Morimoto double bracket on top of it. Works perfectly. I know AAL said they were thinking of fabricating a similar double bracket, which would be nice, but the setup is pretty clean as-is and functions perfectly.
 

el_sabio

Well-Known Member
First Name
Randall
Joined
Oct 6, 2024
Threads
16
Messages
190
Reaction score
259
Location
Tennessee
Vehicle(s)
24 Ranger XLT FX4
I used the AAL bracket and then bolted the Morimoto double bracket on top of it. Works perfectly. I know AAL said they were thinking of fabricating a similar double bracket, which would be nice, but the setup is pretty clean as-is and functions perfectly.
Ah, thanks for the tip on the bracket to add!
 

Sponsored

Sauce

Well-Known Member
Joined
Apr 30, 2025
Threads
45
Messages
505
Reaction score
425
Location
Northeast
Vehicle(s)
2025 Ranger XLT FX4
Here we go!


Let me know if this works and I'll get it added to the site. The separation between the outer hole and the next closest hole is 75mm.
I dont have mine to measure, but it is actually kind of nice to be able to rotate the Morimoto bracket so that you can position the lights with more flexibility. Mine is set up with the back light tucked behind the front one slightly.
 
OP
OP
AdventureLab

AdventureLab

Diamond Sponsor
First Name
Brit
Joined
Mar 14, 2025
Threads
48
Messages
864
Reaction score
1,246
Location
St George, UT
Vehicle(s)
'24 RR
I dont have mine to measure, but it is actually kind of nice to be able to rotate the Morimoto bracket so that you can position the lights with more flexibility. Mine is set up with the back light tucked behind the front one slightly.
That's why I put the angle on it, so they could be recessed a little. It may not be as noticeable since the model doesn't have the quarter panel in it.


Top