
Sponsored

ARB under seat air compressor

Raptor Family

Well-Known Member
First Name
Jeff
Joined
Apr 2, 2025
Threads
6
Messages
164
Reaction score
276
Location
Dallas, Texas
Vehicle(s)
‘25 Ranger Raptor, ‘97 Jeep Cherokee, ‘24 Lexus NX450h+
Occupation
retired
tempImageFFFvv1.webp
tempImagejpi8p2.webp
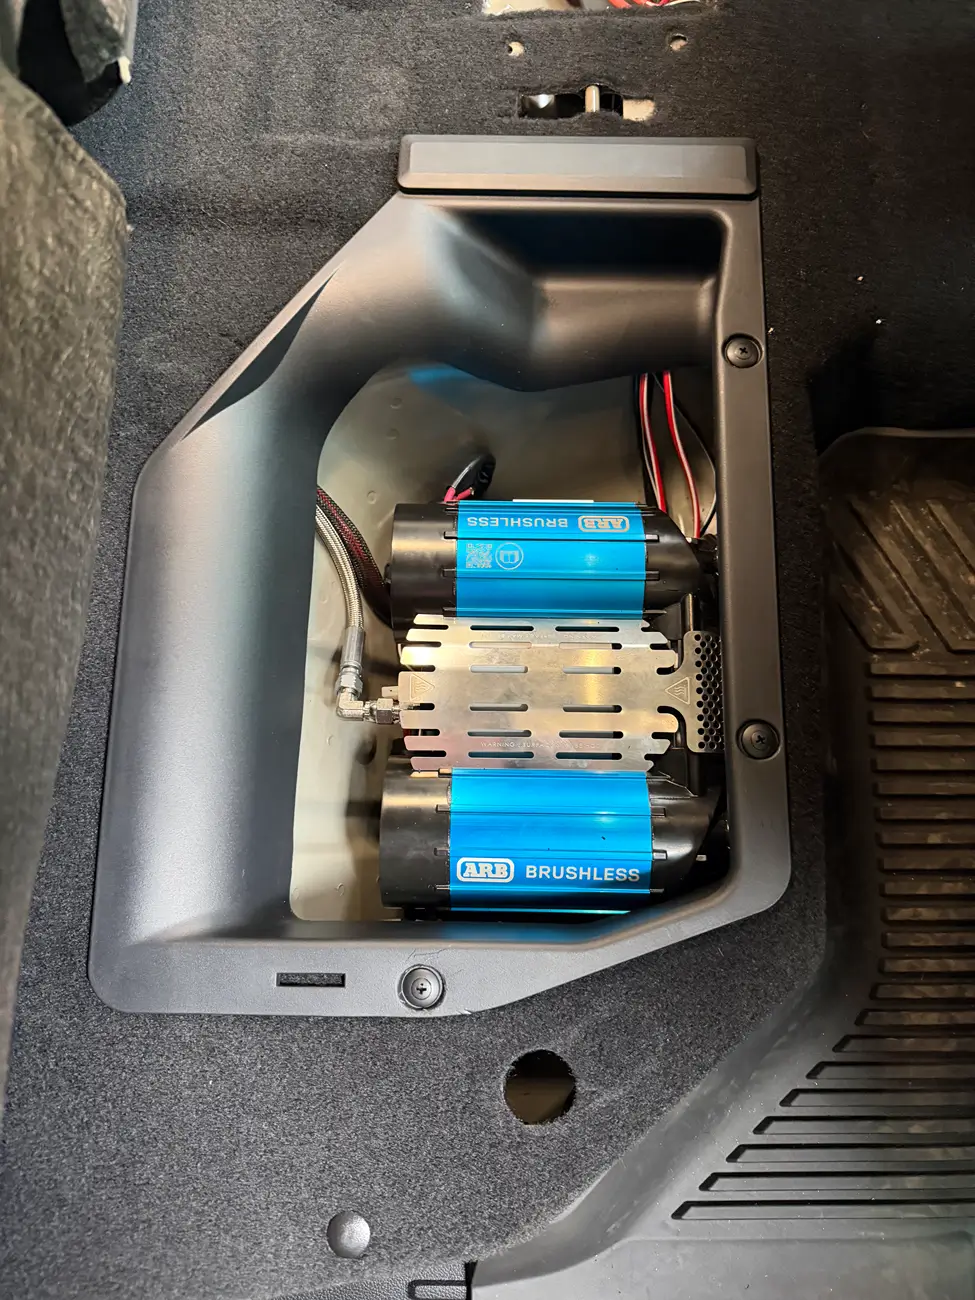
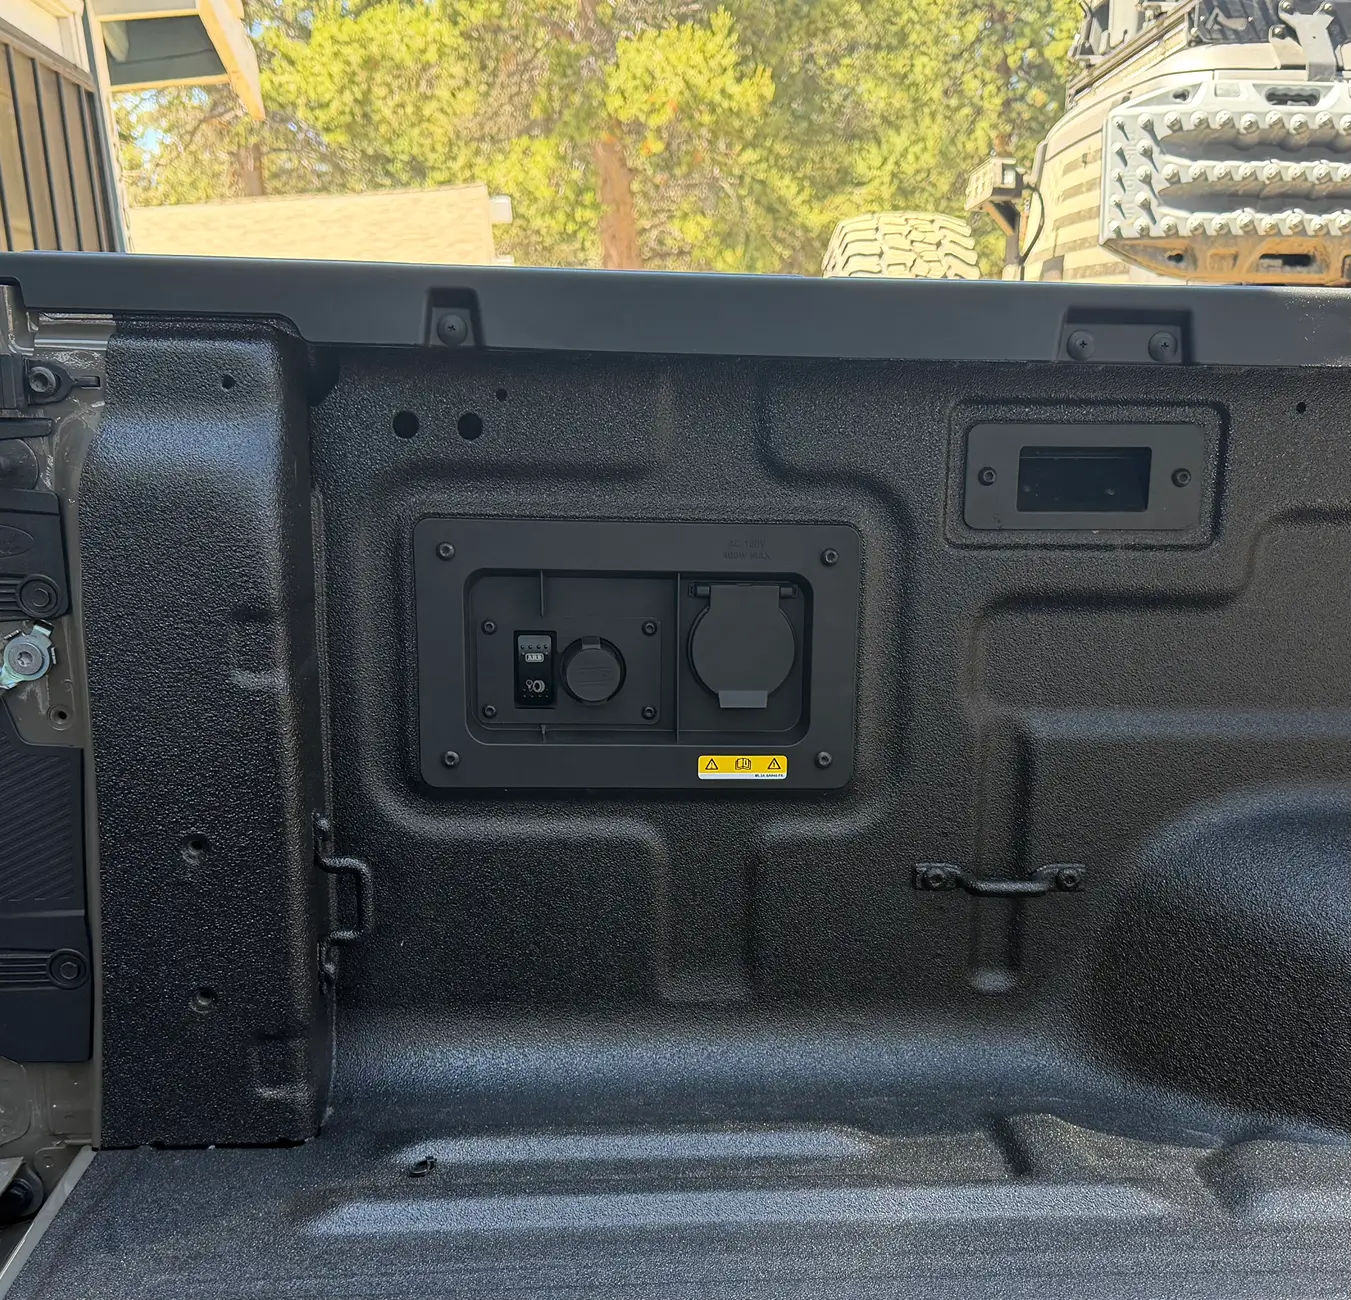
I did see the kit you referenced and thought about going that route. However, I wanted to go with the new ARB Brushless compressor, plus I didn’t like the location of the air chuck. So, I did something similar…I went with the brushless compressor and mounted it in the same location, but I ran the air chuck and switch to the rear of the bed. So, far I like it and it is working well for my needs.
Your mounting ingenuity saved money and allowed the better compressor as compared to the premade kit.
The location of your switch is where I was going to put mine—did you use an upfitter switch to feed it? So you can control it from the cab switches (primary), and view the fault codes and second shut-off from bed? Is your truck a 25 or 26 model—I ask because it appears as if no factory 12v receptacle was on the panel. I have 25 with no 12v either, but I just bought a new panel for $82 with the receptacle and if you look closely at the wire harness/ connector by my air tank pic—you see I have a purple and black wire which the new panel has a pigtail that plugs into it. Some trucks are still pre wired for it even though they don’t have it on the panel.
Ford Ranger ARB under seat air compressor IMG_3510
Sponsored


Raptor Family

Well-Known Member
First Name
Jeff
Joined
Apr 2, 2025
Threads
6
Messages
164
Reaction score
276
Location
Dallas, Texas
Vehicle(s)
‘25 Ranger Raptor, ‘97 Jeep Cherokee, ‘24 Lexus NX450h+
Occupation
retired
Excuse my ignorance. What is this air compressor used for? Tires?
Yes, airing up tires when returning back to the street from off roading with lowered air pressure. Also, for Pneumatic tools, blowers, fill-up air mattresses—and for me, I wanted an air powered Train Horn.
 
OP
OP
BBS & RR Nation
First Name
Bill
Joined
Jun 28, 2026
Threads
2
Messages
22
Reaction score
10
Location
Central Ohio
Vehicle(s)
2025 Bronco Badlands Sasquatch
Occupation
Retired
tempImageFFFvv1.webp
tempImagejpi8p2.webp
I did see the kit you referenced and thought about going that route. However, I wanted to go with the new ARB Brushless compressor, plus I didn’t like the location of the air chuck. So, I did something similar…I went with the brushless compressor and mounted it in the same location, but I ran the air chuck and switch to the rear of the bed. So, far I like it and it is working well for my needs.
Very nice. What was the cost if you don't mind answering.
 

Pwaicon

Member
Joined
May 25, 2026
Threads
1
Messages
8
Reaction score
5
Location
South Lake Tahoe
Vehicle(s)
26 Ranger Raptor, 22 Bronco Badlands, 24 Lincoln Nautilus, 19 Lincoln Navigator
Your mounting ingenuity saved money and allowed the better compressor as compared to the premade kit.
The location of your switch is where I was going to put mine—did you use an upfitter switch to feed it? So you can control it from the cab switches (primary), and view the fault codes and second shut-off from bed? Is your truck a 25 or 26 model—I ask because it appears as if no factory 12v receptacle was on the panel. I have 25 with no 12v either, but I just bought a new panel for $82 with the receptacle and if you look closely at the wire harness/ connector by my air tank pic—you see I have a purple and black wire which the new panel has a pigtail that plugs into it. Some trucks are still pre wired for it even though they don’t have it on the panel.
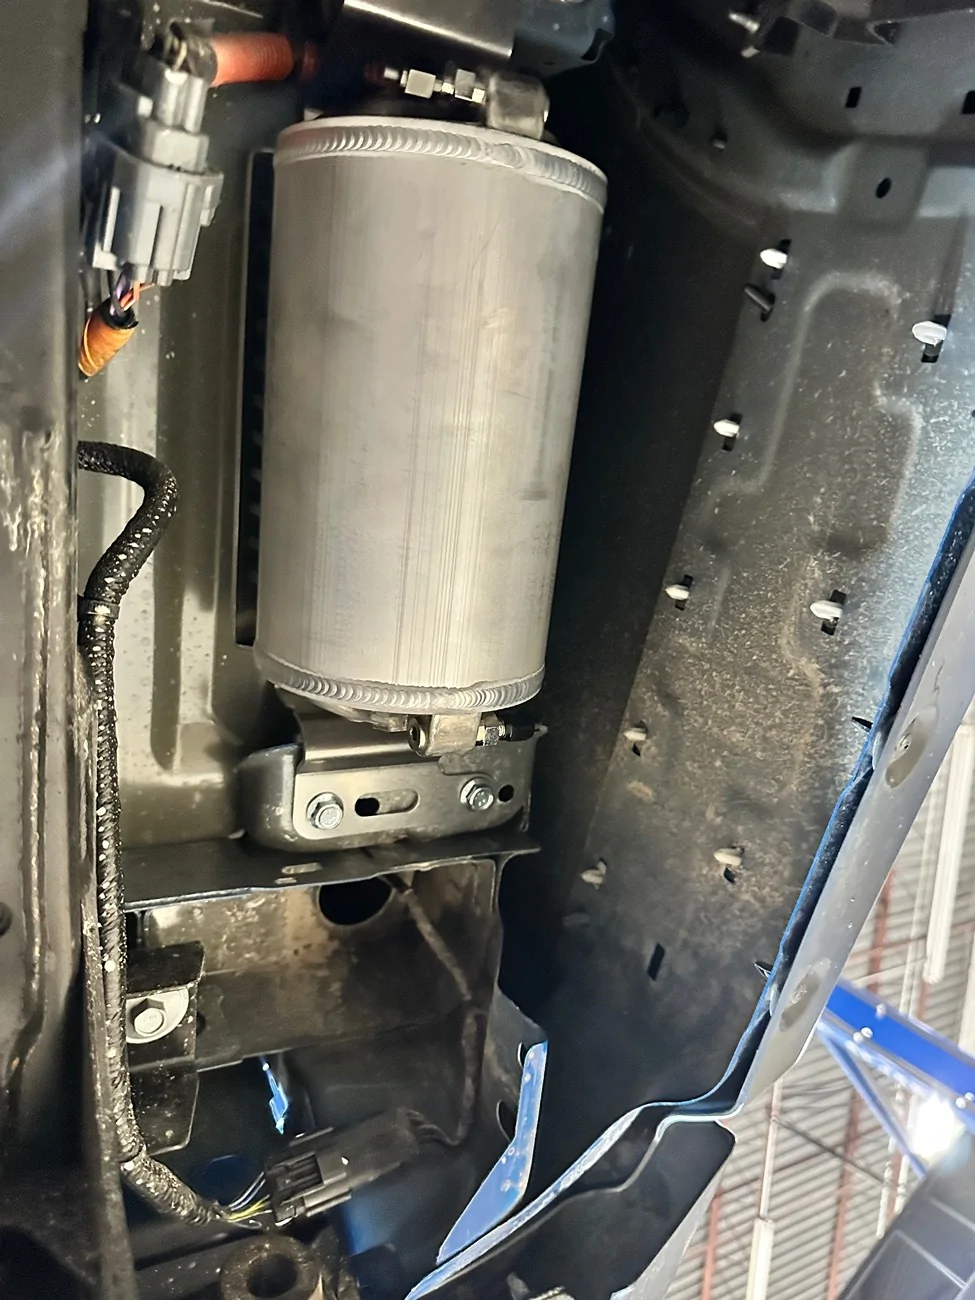
IMG_3510.webp
No, I decided not to use an upfitter switch as I already have plans to use them for other accessories. I have a 26 RR and I did tap into the wiring harness you have pictured for the 12v that goes to the switch and is only powered up when the truck is on.

On another note, I like the setup you are going with and if I had known the SDHQ mount was available I probably would have picked one up even though I really wouldn’t have needed it for my application…it looks well made.
 

Pwaicon

Member
Joined
May 25, 2026
Threads
1
Messages
8
Reaction score
5
Location
South Lake Tahoe
Vehicle(s)
26 Ranger Raptor, 22 Bronco Badlands, 24 Lincoln Nautilus, 19 Lincoln Navigator
Very nice. What was the cost if you don't mind answering.
Thank you and I don’t mind answering how much it cost. With the compressor and the various ARB parts it was around $1,243. I already had the wiring and other parts needed to install…but I would say it would have been around $100-$150 in other parts and materials to complete the install. So, it was about $1,400 with everything included. Which was slightly more that the Agile Offroad Kit, however; I was able to go with the brushless compressor.

Here is a list of the ARB parts I needed to purchase:
  • ARB Universal Switch Bracket (ARB-3501050)
  • ARB Hose Coupling Dust Cap (ARB-0740113)
  • ARB Fitting (ARB-0740110)
  • ABR Fitting (ARB -740104)
  • ABR Fitting (ARB -740102)
  • ARB High-Flow Hose (ARB-0740206)
  • ARB High-Flow Hose (ARB-0740203)
  • ARB Remote Hose Coupling (ARB-0740111)
 

Sauce

Well-Known Member
Joined
Apr 30, 2025
Threads
46
Messages
529
Reaction score
453
Location
Northeast
Vehicle(s)
2025 Ranger XLT FX4
theres a spot made for it inbetween the fender, and the pan. thats the 8 dimples on the passenger side are for. drill em out. add a bracket, wiring. done. 1 of the 2 rear aux wires on the raptors is even labels compressor for it. problem is getting the full kit in North America. People B.T.(Before Trump) on here were buying the brackets from aussie land and making their own wiring harnesses and putting the dual in the ford designed location.
I bought the mount to install mine in the passenger side bed wall (where it is intended to be mounted), but ultimately decided not to do it for a few reasons:

1. It was going to be a big struggle to get it into that spot. Not impossible, but very challenging (exceeded my pain tollerance), and would be a huge pain to service if it ever needed it. Super tight fitment, exhaust in the way, etc...
2. The passenger side bed wall is basically the farthest possible wire run from the battery. I actually reached out to some of the companies who make plug and play harnesses for the compressor and they said that that long a run was going to be out of spec (let alone a pain to do a clean run). I think it was SDHQ I spoke with (maybe Blaze too). The compressor draws a lot of power and they basically said it wasn't a safe run with the wire gauges they were using. The drivers side bed location shortens the wire run pretty significantly.
3. I would have needed to get pretty creative with the chuck location. Either drill another hole in the bed wall for it, have a long run for air to the drivers side panel, or mount it elsewhere.
4. I didn't really want to drill holes in the bed wall due to potential corrosion, resale, etc... This wasn't a huge factor in the decision, but it was another reason not to do it.

I like the drivers side bed wall mount location too, but ultimately I decided to just mount it onto the molle panel in the bed. Its super clean, tucked away over the wheel arch, and I haven't regretted it at all since I installed it.

For what its worth - if you decide you want to install it on the passenger side bed wall, you could make the mount (or have it fabricated). All it does is reinforce the bed wall (from the inside of the bed) to support the compressor. Its nothing special. Here's the one I had:
https://ausmotion.com/product/arb-compressor-mount-ranger-ra/
Sponsored

 
Last edited:


Top