mtesni
Well-Known Member
I'll grab a set of t-slot rails once you have them ready. Currently have a RetraxPro XR on the truck but have a Retrax EQ sitting in the box if you need measurements of anything.
Sponsored

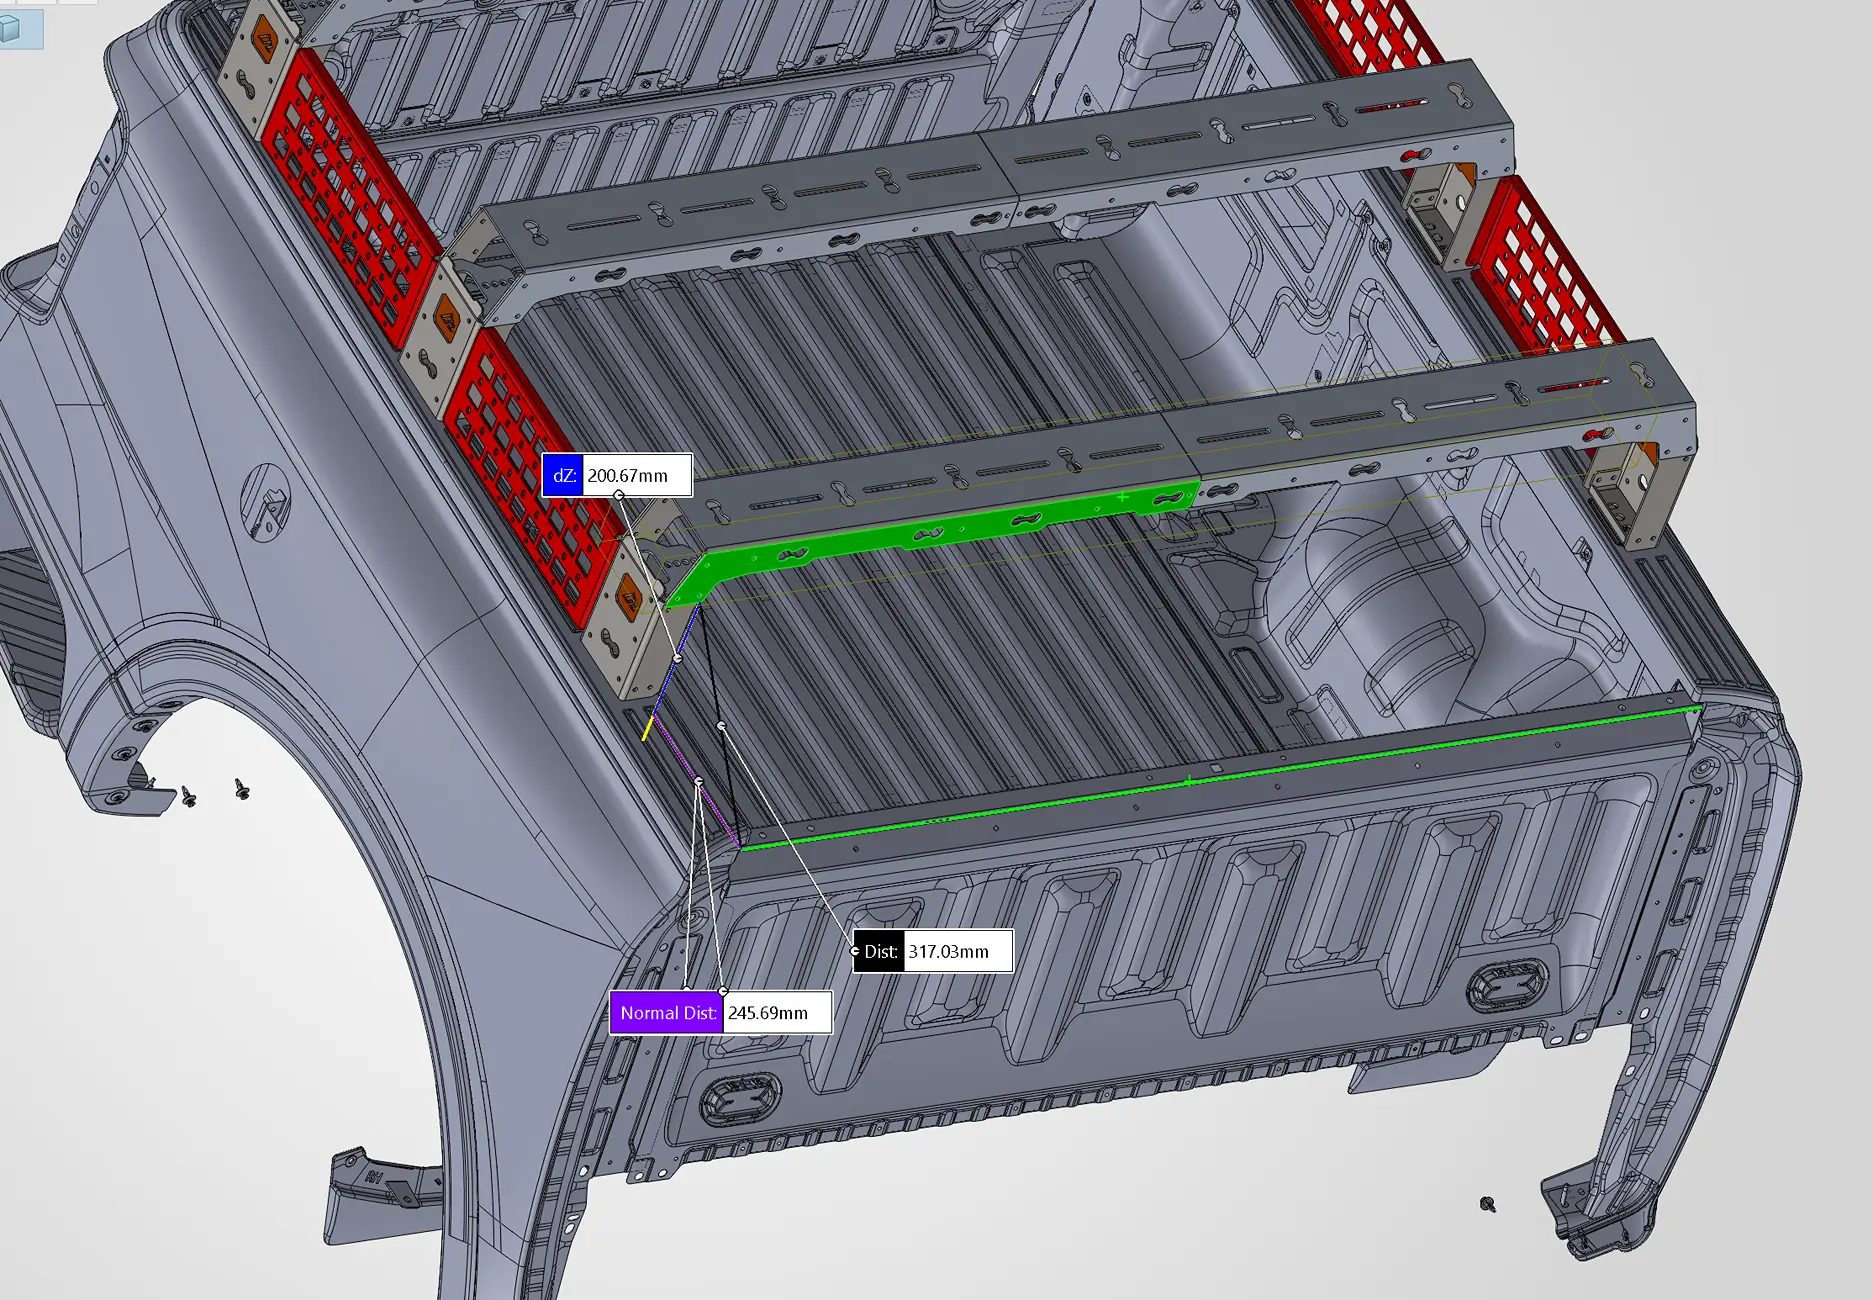
Unfortunately, I don't have a rack installed on our truck to measure right now, but the distance from the front edge of the forward RAIL to the front-most edge of the bed is about 245mm (~9.65").How much space is between the front rack and the the rear window? Can you confirm that a connecting piece isn't needed between the front and rear crossbars or uprights? Can Standard T-slot adapters be used to mount things on the crossbars? Any plans to make a higher upright so that the crossbars are aligned with the roof of the cab?
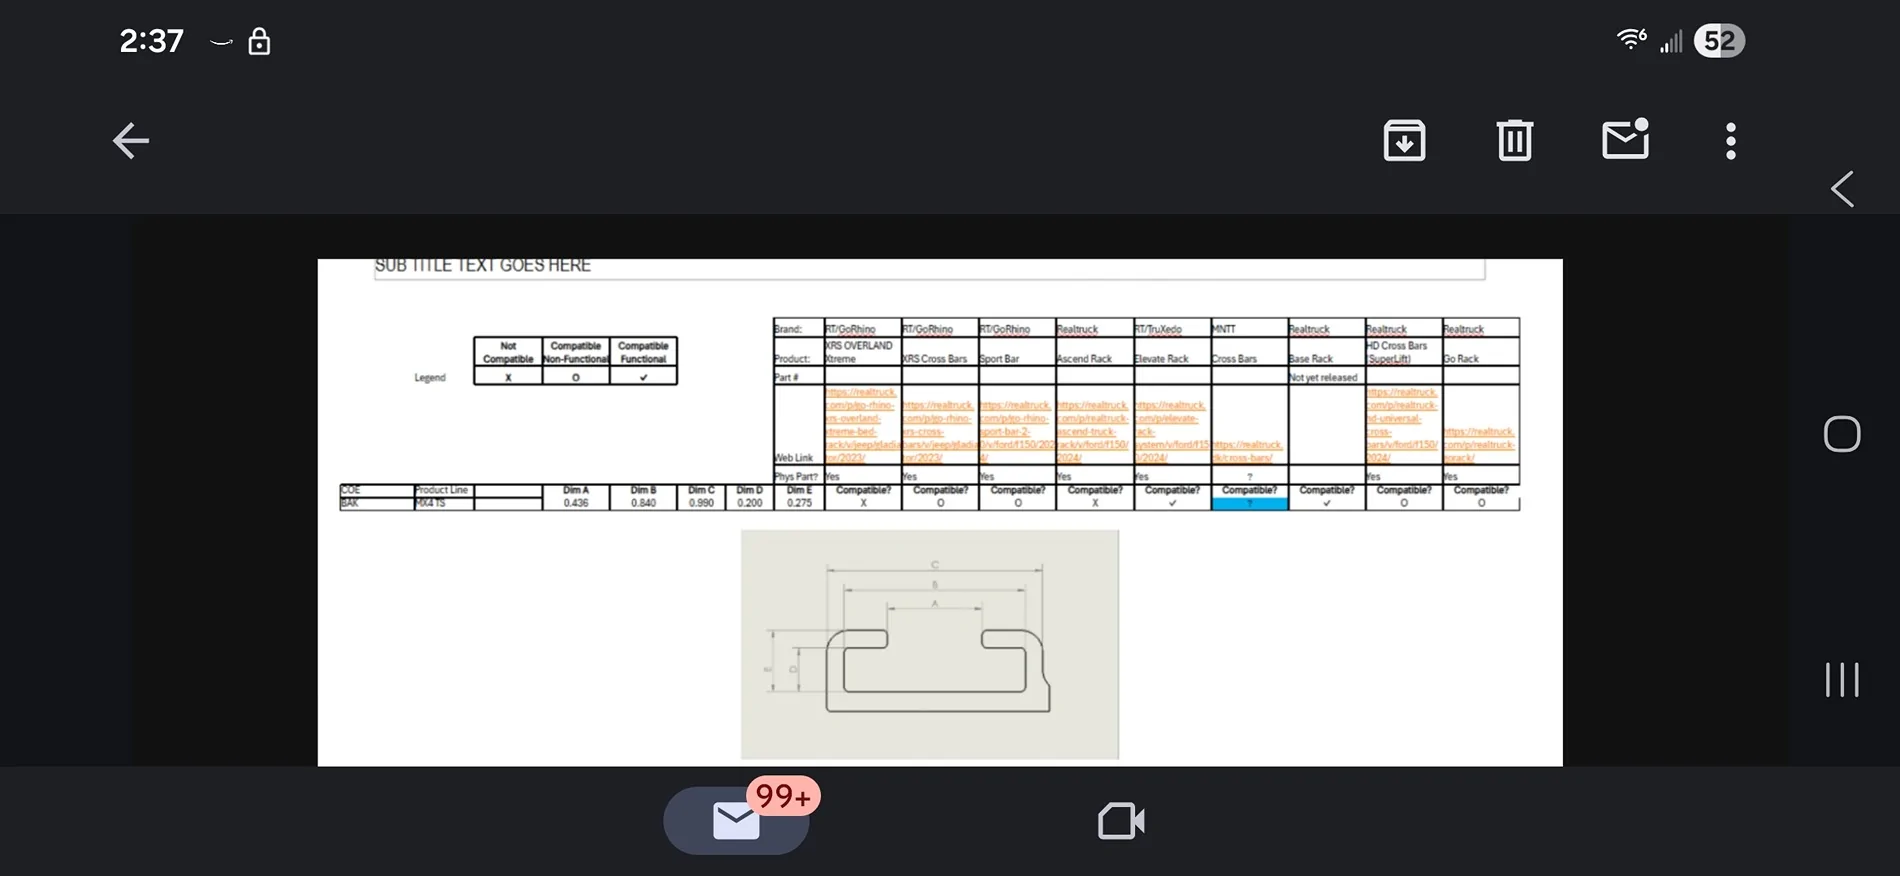
That should be helpful! I'm hoping to have some time to mock this up this evening during the late football game!@AdventureLab I called realtruck support and the guy emailed me a diagram of the t-slot measurements. Hope it helps. Sorry its a little grainy when you zoom in. I had to screenshot it from his email.

Sounds great! Got a trip to Moab and look forward to having these.That should be helpful! I'm hoping to have some time to mock this up this evening during the late football game!
I think I will take you up on that, just scheduled out a RV trip w/ the RR for Matt's Off Road games so I will be in St George for almost a week. (Started a thread about trail recommends on my stock truck in Moab and Sand Hollow if you have any recommendations)I think you could use a few additional spacers (they're 3mm thick each) in the stack to get the vertical rails up and over the tonneau. Looks easy enough. We could throw those in for you if you want to call in and speak to our CS team. They can actually add the individual parts to the order.
You may have to slightly clearance the spacer that's inline with the top surface of the tonneau, but that should pretty easy. They're aluminum, so they're easy to trim.
I wish you were closer to Utah. This is something we could knock out for you in a few minutes at the shop.
I have tons of suggestions. Shoot me a DM. I would love to get out on the trail in the Rangers.I think I will take you up on that, just scheduled out a RV trip w/ the RR for Matt's Off Road games so I will be in St George for almost a week. (Started a thread about trail recommends on my stock truck in Moab and Sand Hollow if you have any recommendations)
Not yet. Had to focus on some new Wrangler products we're working on. I'm in MX for a couple of days for a Jeep event. I may have some time to mock it up while down here. Things move at a more casual pace here.@AdventureLab any progress on the t-slot mounts? Itching to order the bed rack. Leaving mid March and would like to get everything on as early as possibly!

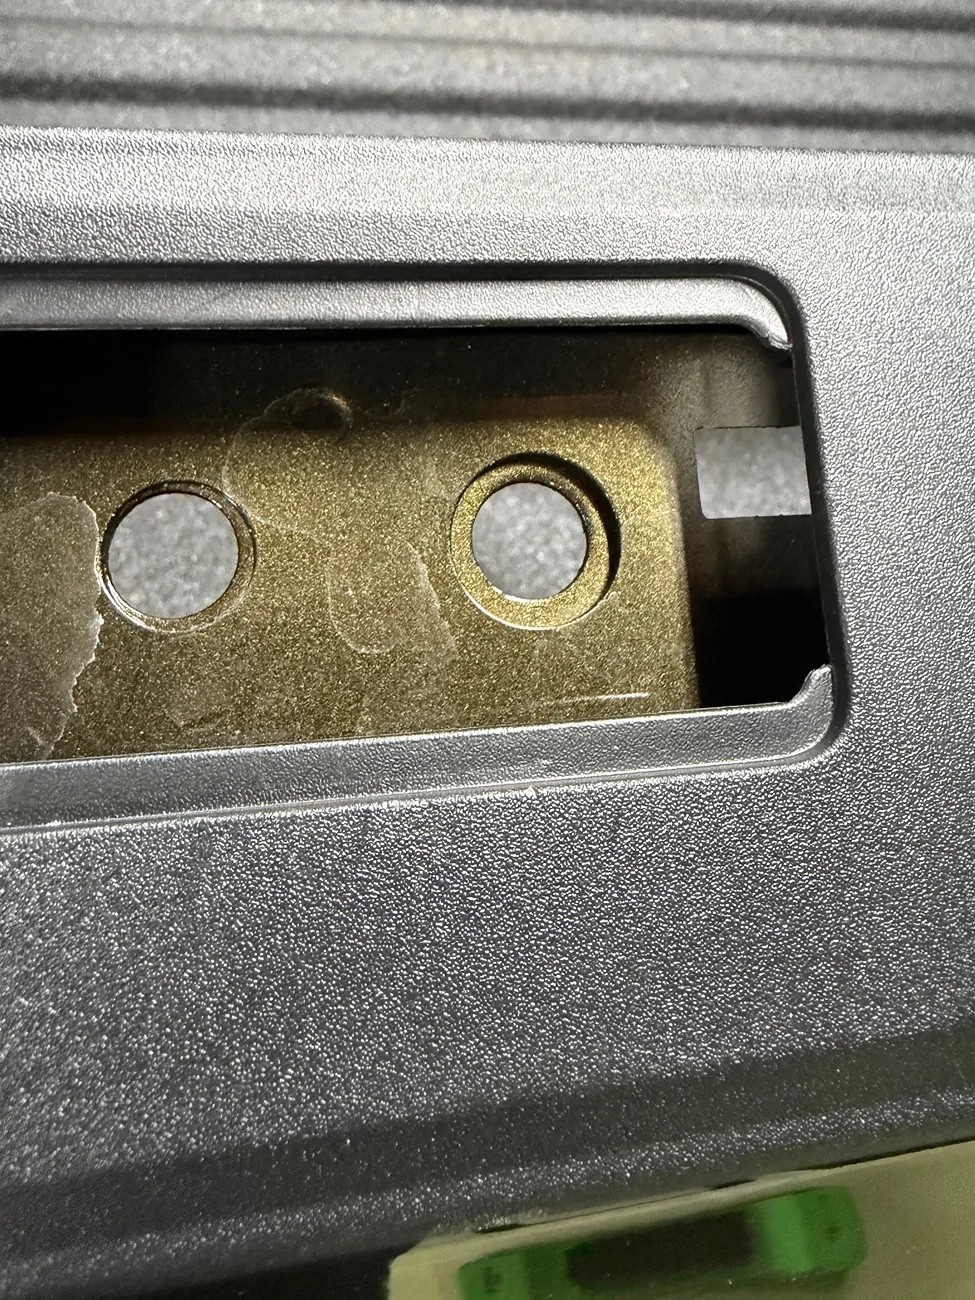
I would love to find a solution for this. The problem isn't the spacer pack, but more so the bed rail. There are only two holes in each "stake pocket", and we need both of those for the bed attachment. I think the best solution would be to leave out one of the bolts in the middle spacer pack and use that hole for the wire. However, that makes removing the rack tough. The easiest way would be to come between the bed and the cab with the wire. Pretty easy access there.@AdventureLab or anyone else. Has anyone notched the spacer pack to allow for a light wiring harness to make it under the bed if running a tonneau cover? Would be great if the packs had notch down the side that faces the bed to feed wire through.
I’ve looked at the pocket closest to the front and there is a rectangular hole to the rear and a slot that wire could go through on the bed side. The rectangular hole is only on the most forward pocket the rest all have a way to get under the bed rail towards the bed.I would love to find a solution for this. The problem isn't the spacer pack, but more so the bed rail. There are only two holes in each "stake pocket", and we need both of those for the bed attachment. I think the best solution would be to leave out one of the bolts in the middle spacer pack and use that hole for the wire. However, that makes removing the rack tough. The easiest way would be to come between the bed and the cab with the wire. Pretty easy access there.
Ooooh! Good catch. Maybe we would make a notch in the side of the spacer stack that would allow a wire to pass through. Then, we can transfer that hole to the attachment brackets. We would still need to be careful where we put the connector so the rack can be quickly/easily removed.I’ve looked at the pocket closest to the front and there is a rectangular hole to the rear and a slot that wire could go through on the bed side. The rectangular hole is only on the most forward pocket the rest all have a way to get under the bed rail towards the bed.
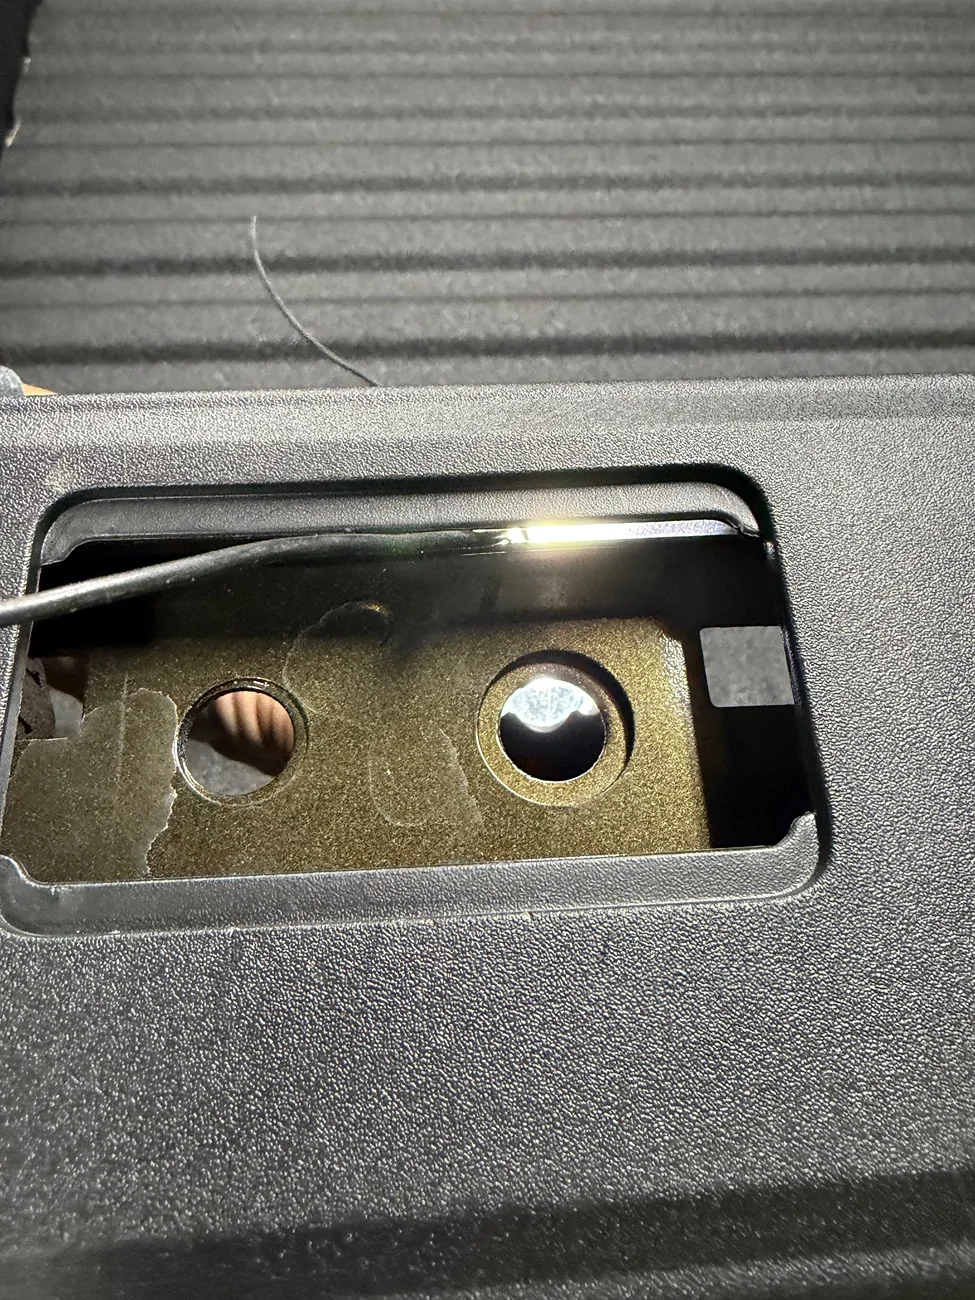
I’m not sure a dual pin will fit in the space where I have the light shinning through. But de-pinning a Deutsch connector is easy. So a nice notch in the center towards the bed might be nice. You could also just have the Deutsch connector just above the bed rail. And cap it.Ooooh! Good catch. Maybe we would make a notch in the side of the spacer stack that would allow a wire to pass through. Then, we can transfer that hole to the attachment brackets. We would still need to be careful where we put the connector so the rack can be quickly/easily removed.
There may be enough space below the plastic bedside cap and the sheet metal to tuck in a dual-pin deutsch connector. If that's the case, that connector could just stay above the sheet metal of the bedside and below the plastic when the rack is removed.
I am in MX for the next couple of days. I'll try to remember to lay a deutsch in there and grab a photo when I get back. Maybe a 2-pin flat connector like this would be better - https://a.co/d/du8dHJs.I’m not sure a dual pin will fit in the space where I have the light shinning through. But de-pinning a Deutsch connector is easy. So a nice notch in the center towards the bed might be nice. You could also just have the Deutsch connector just above the bed rail. And cap it.
I just checked a 2 pin Deutsch and it will not go through that area or through the rectangular hole. I’m still cool with the Deutsch terminating at the top of the rail or even slightly higher and plug it if the rack is off for a bit. That way you can use any of the pockets and tuck the connector in the pocket pocket with the notch. Or worst case you take out the stack and use the original cover.I am in MX for the next couple of days. I'll try to remember to lay a deutsch in there and grab a photo when I get back. Maybe a 2-pin flat connector like this would be better - https://a.co/d/du8dHJs.