nate.co
Well-Known Member
- First Name
- Nate
- Joined
- Sep 1, 2023
- Threads
- 9
- Messages
- 151
- Reaction score
- 313
- Location
- Lafayette, Colorado, USA
- Vehicle(s)
- 2024 Ranger Raptor, Polestar 2
- Thread starter
- #1
I finally finished the audio upgrades I had been planning for a while. Replaced the door speakers, put in sound deadening in the roof, doors, back wall and under the rear seats. Replaced the stock subwoofer with a JL 10" stealthbox sub, mounted the amp and Midland GMRS radio on the back wall. Installed a 3rd brake light GMRS antenna mount, wired in a radio handset plug in the center console storage area. A lot of work but a great outcome!
These changes make a HUGE difference. The speakers are a lot more detailed and clean sounding, and that sub is ridiculous. I have it turned all the way down and it's just got incredibly deep bass and punch. Sounds so, so good.
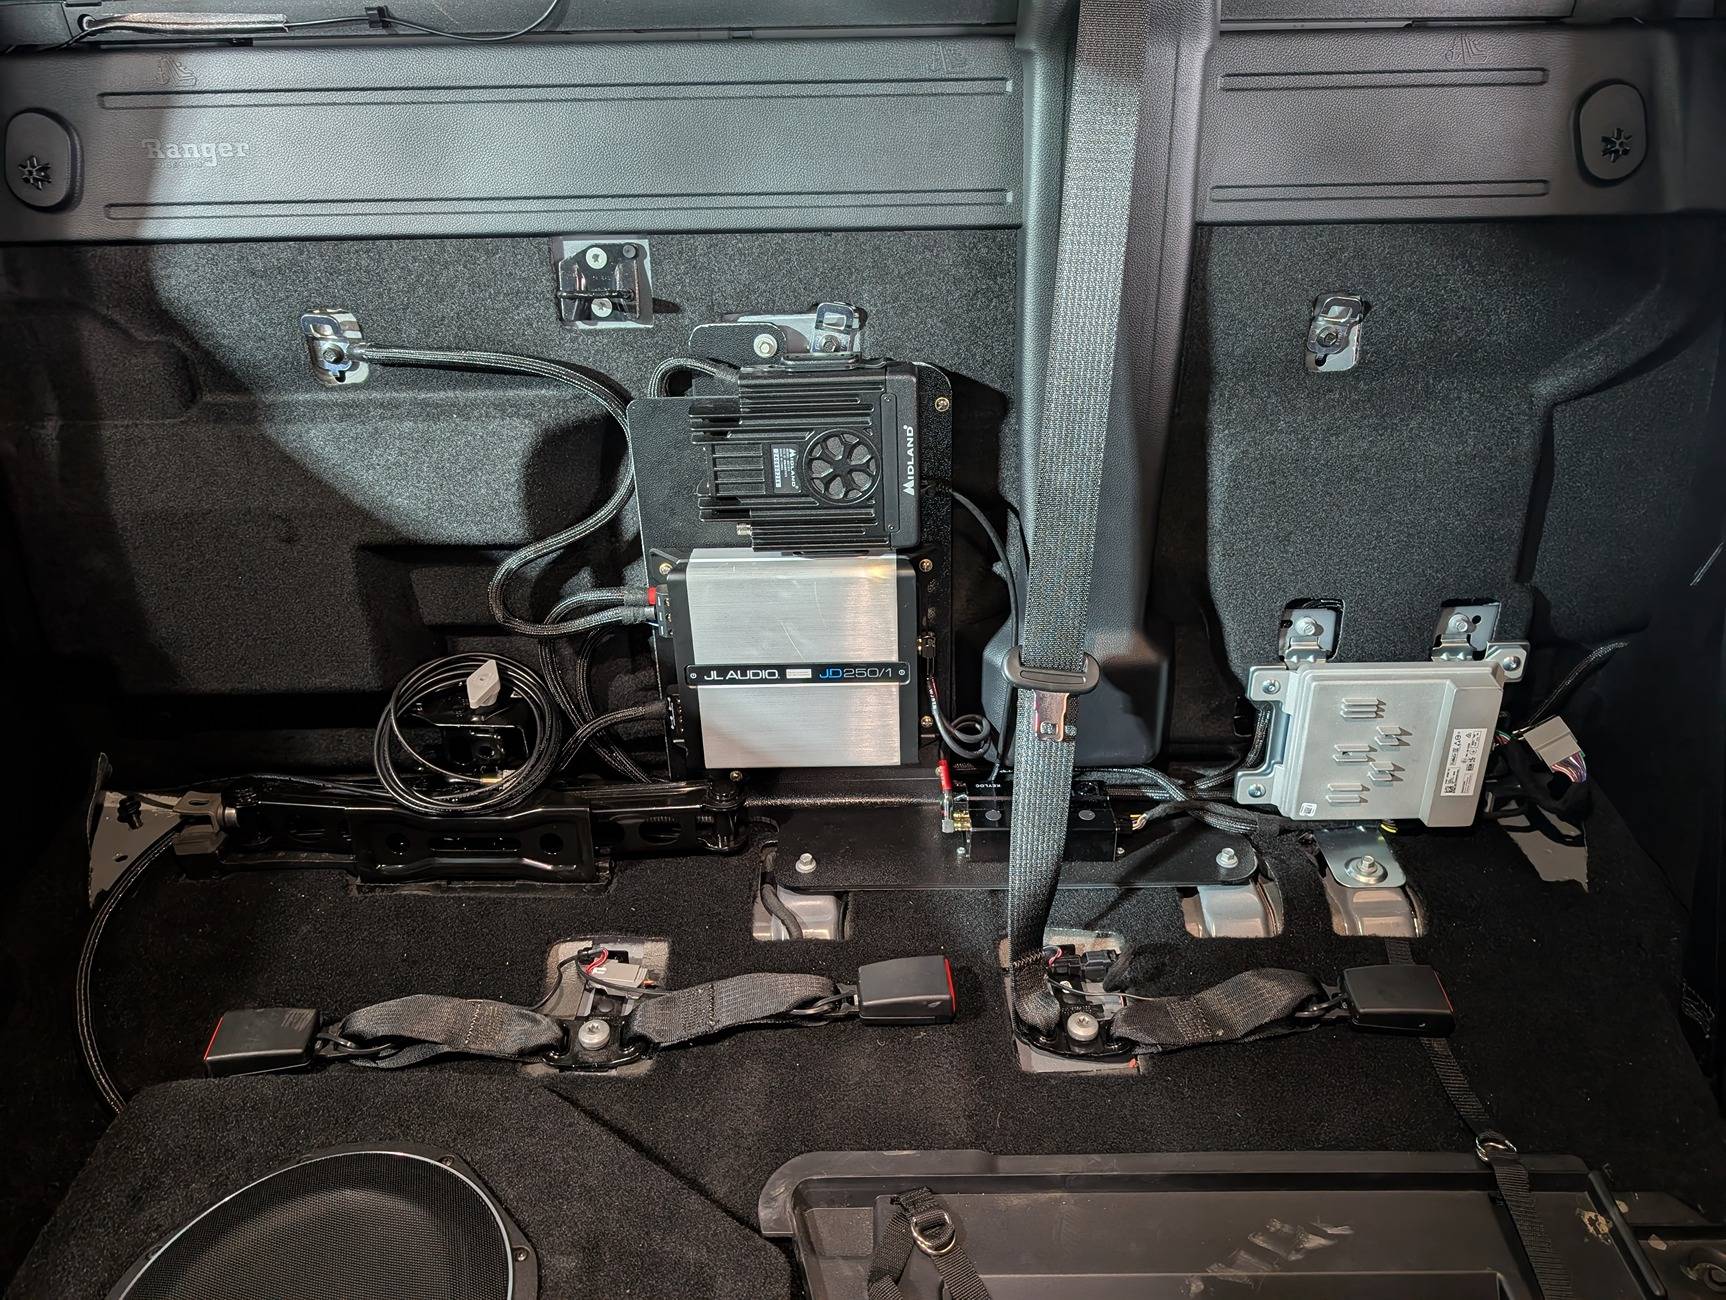
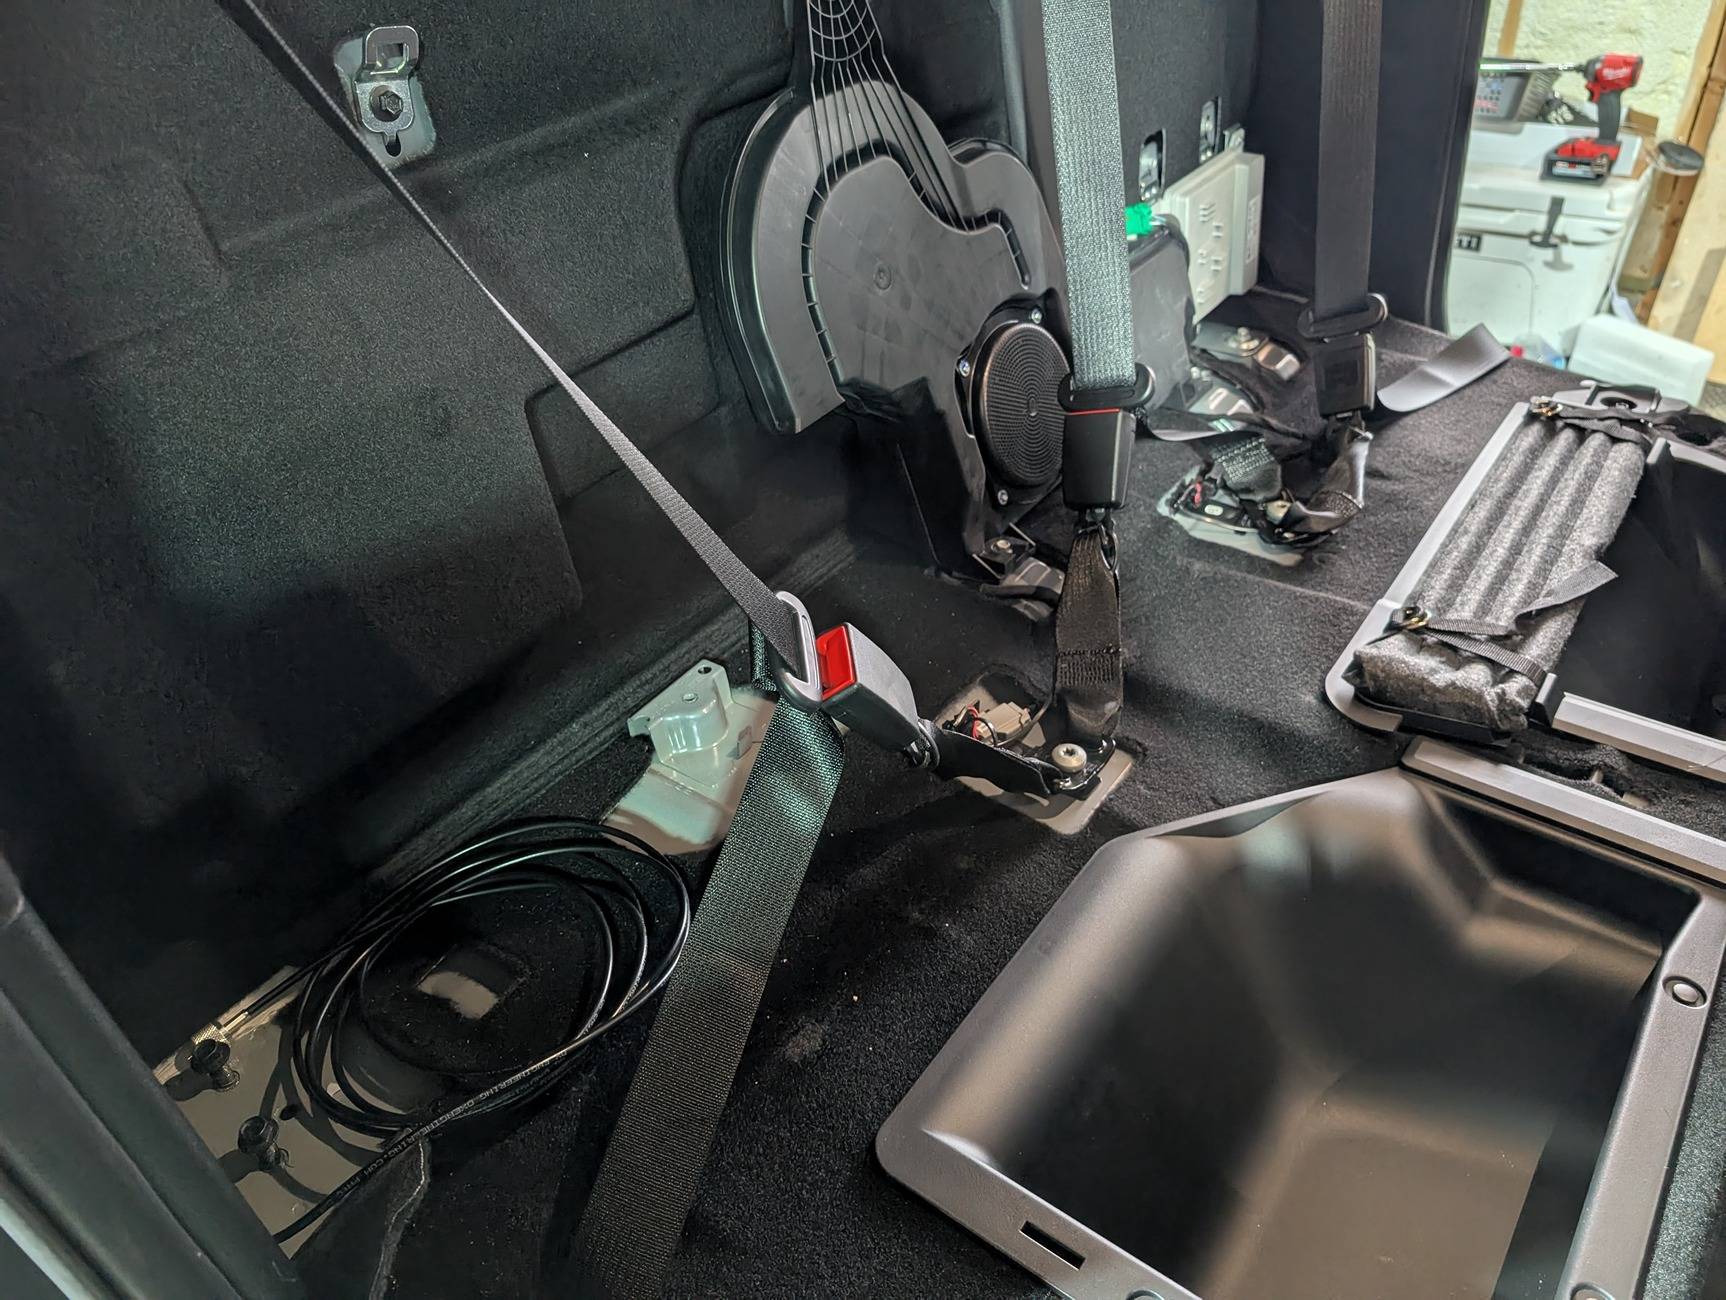
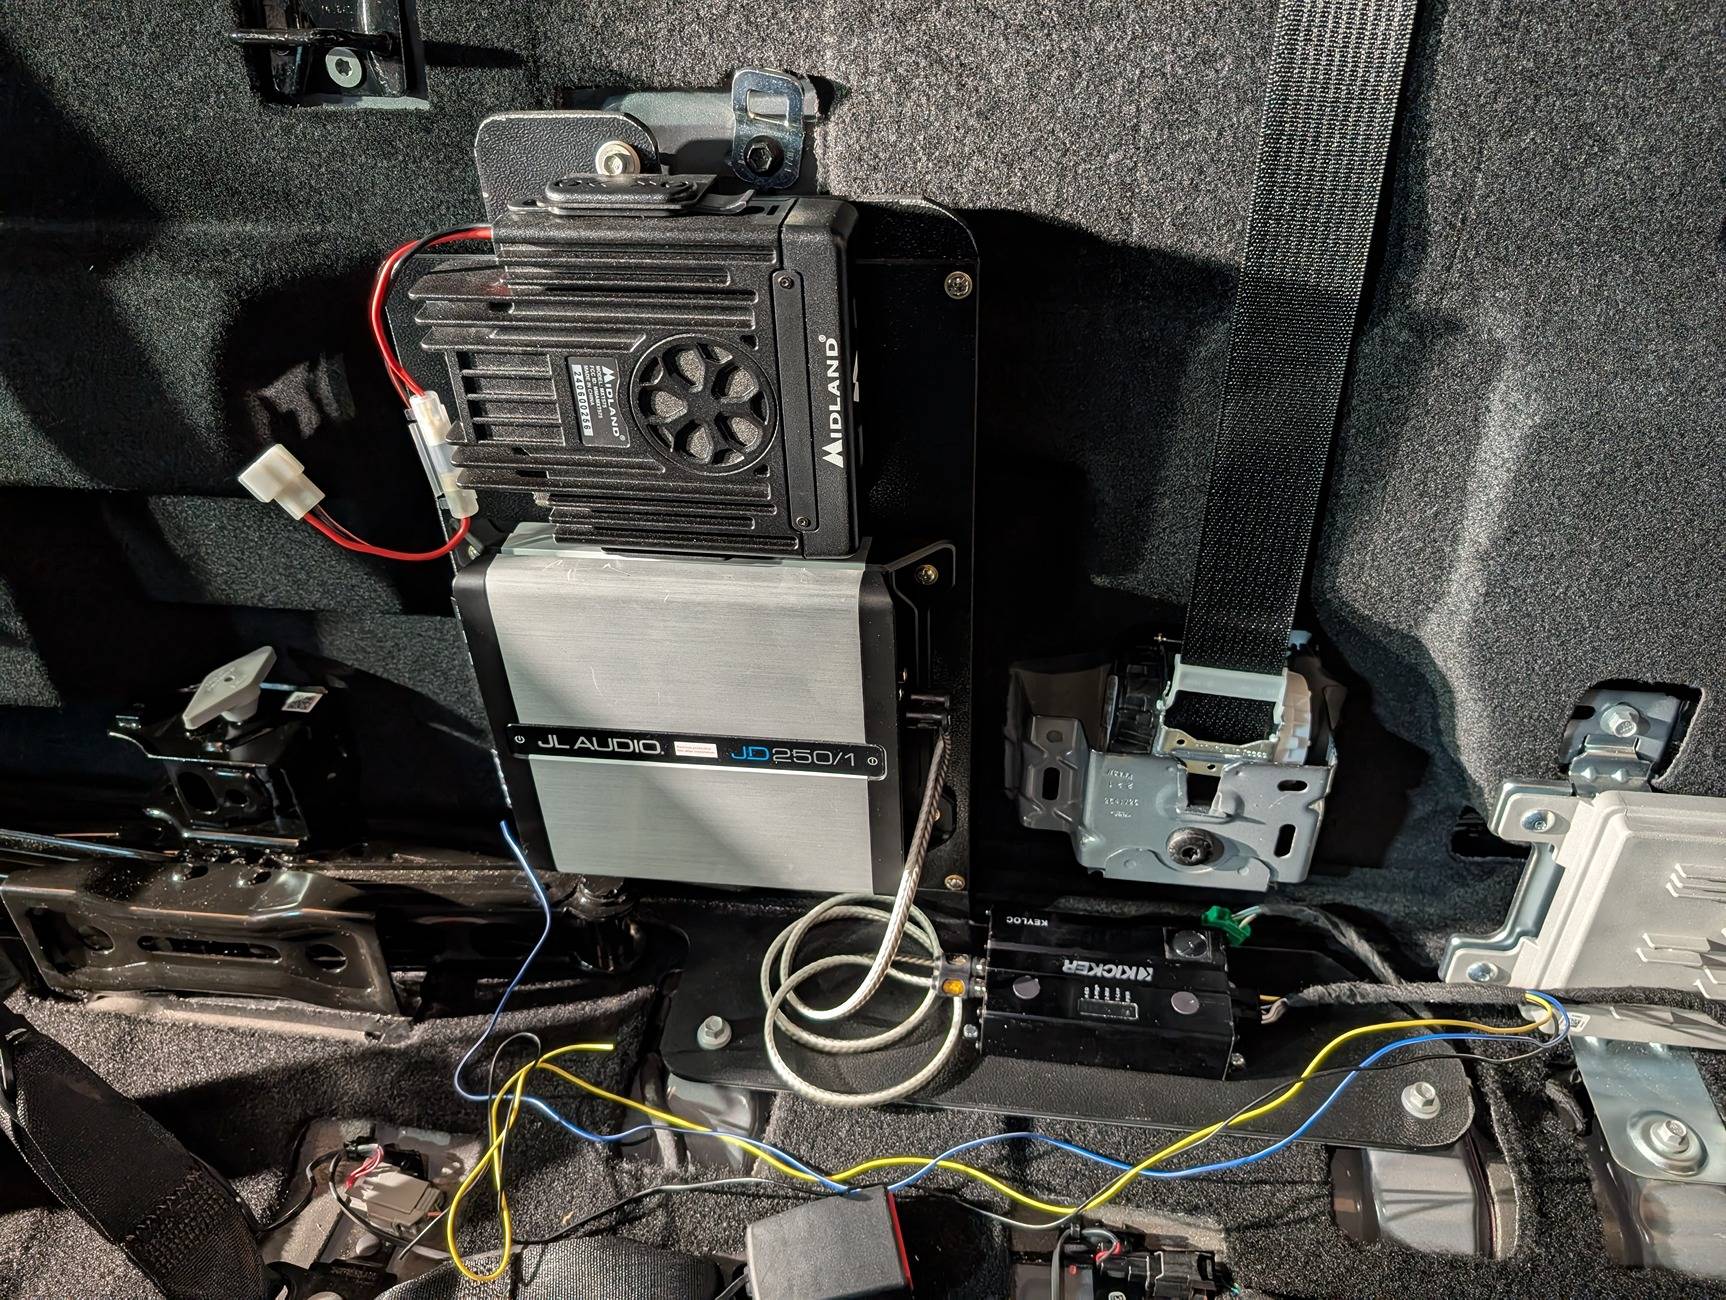
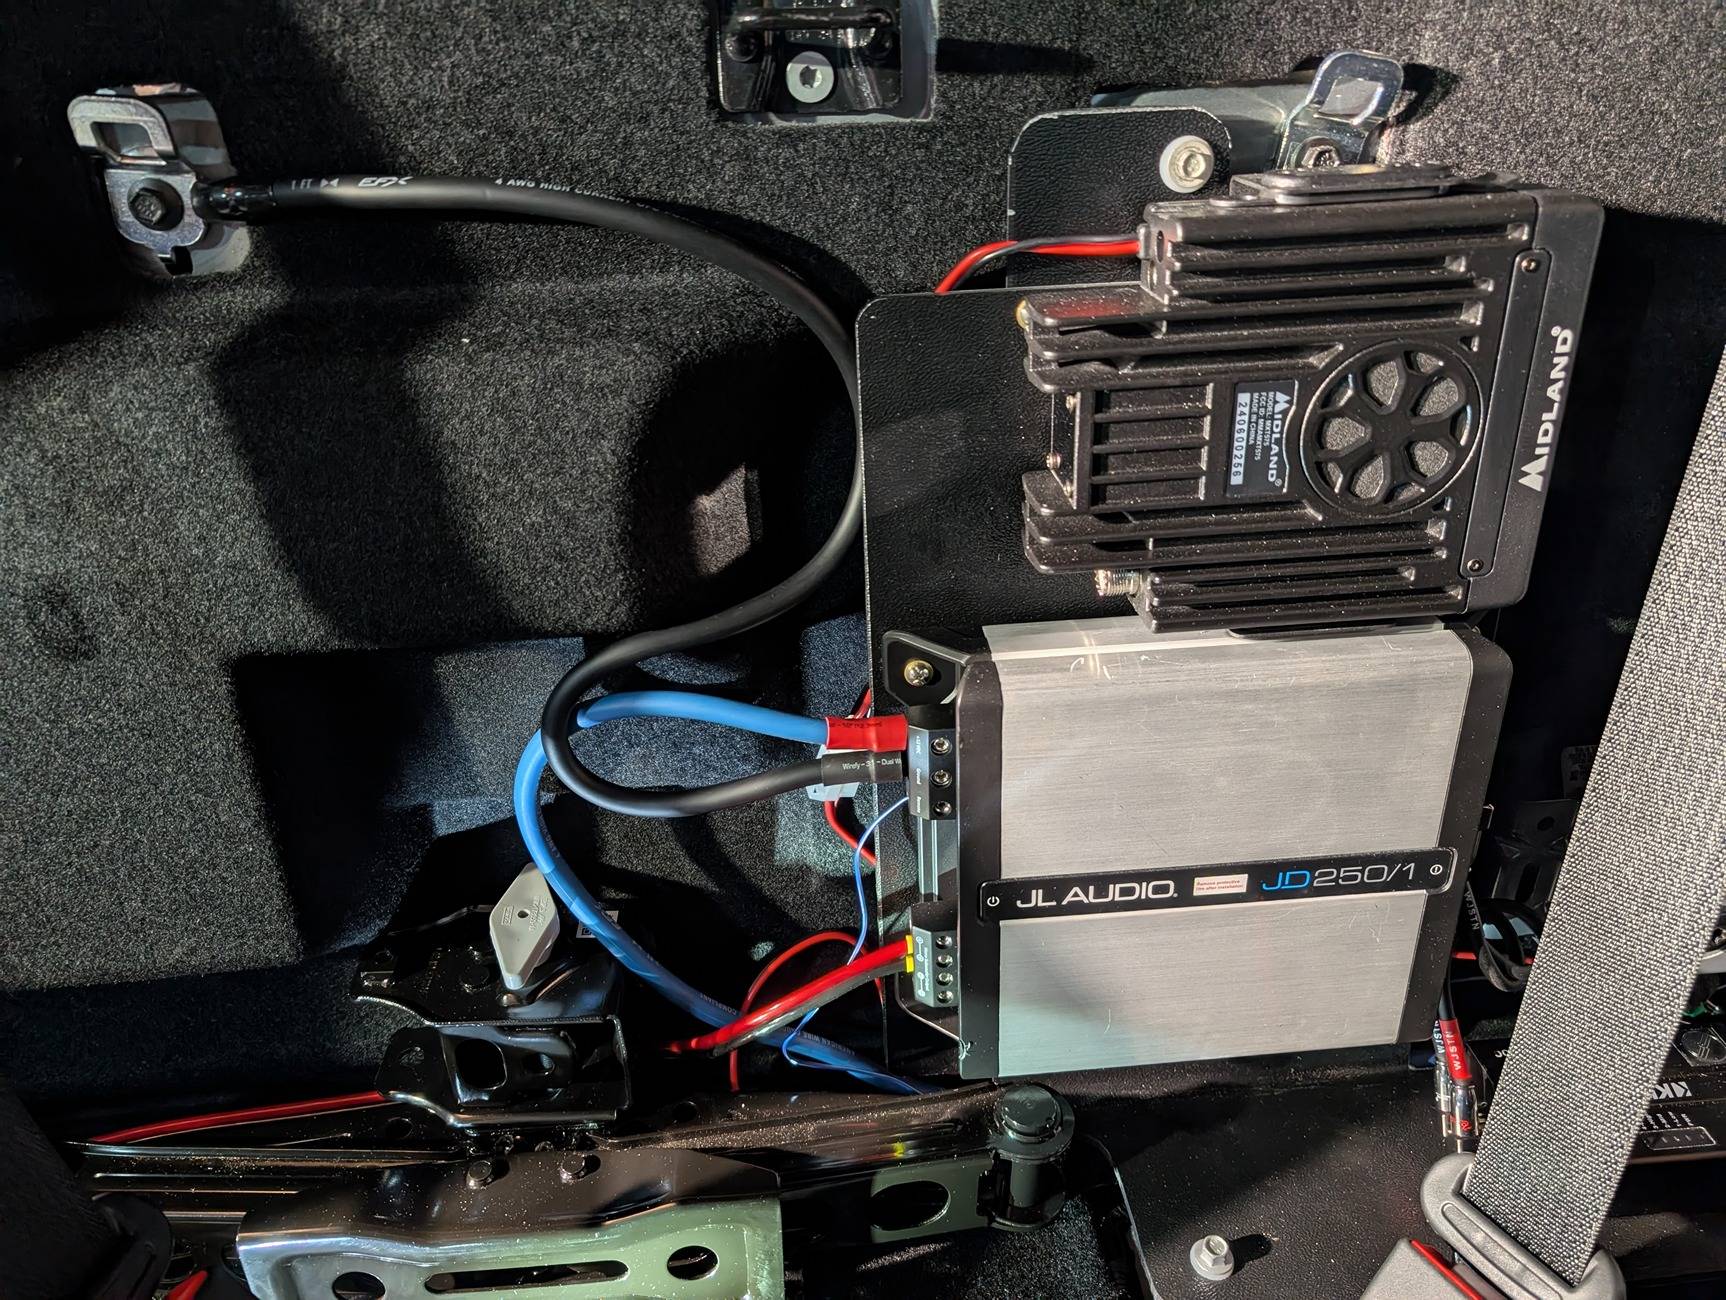
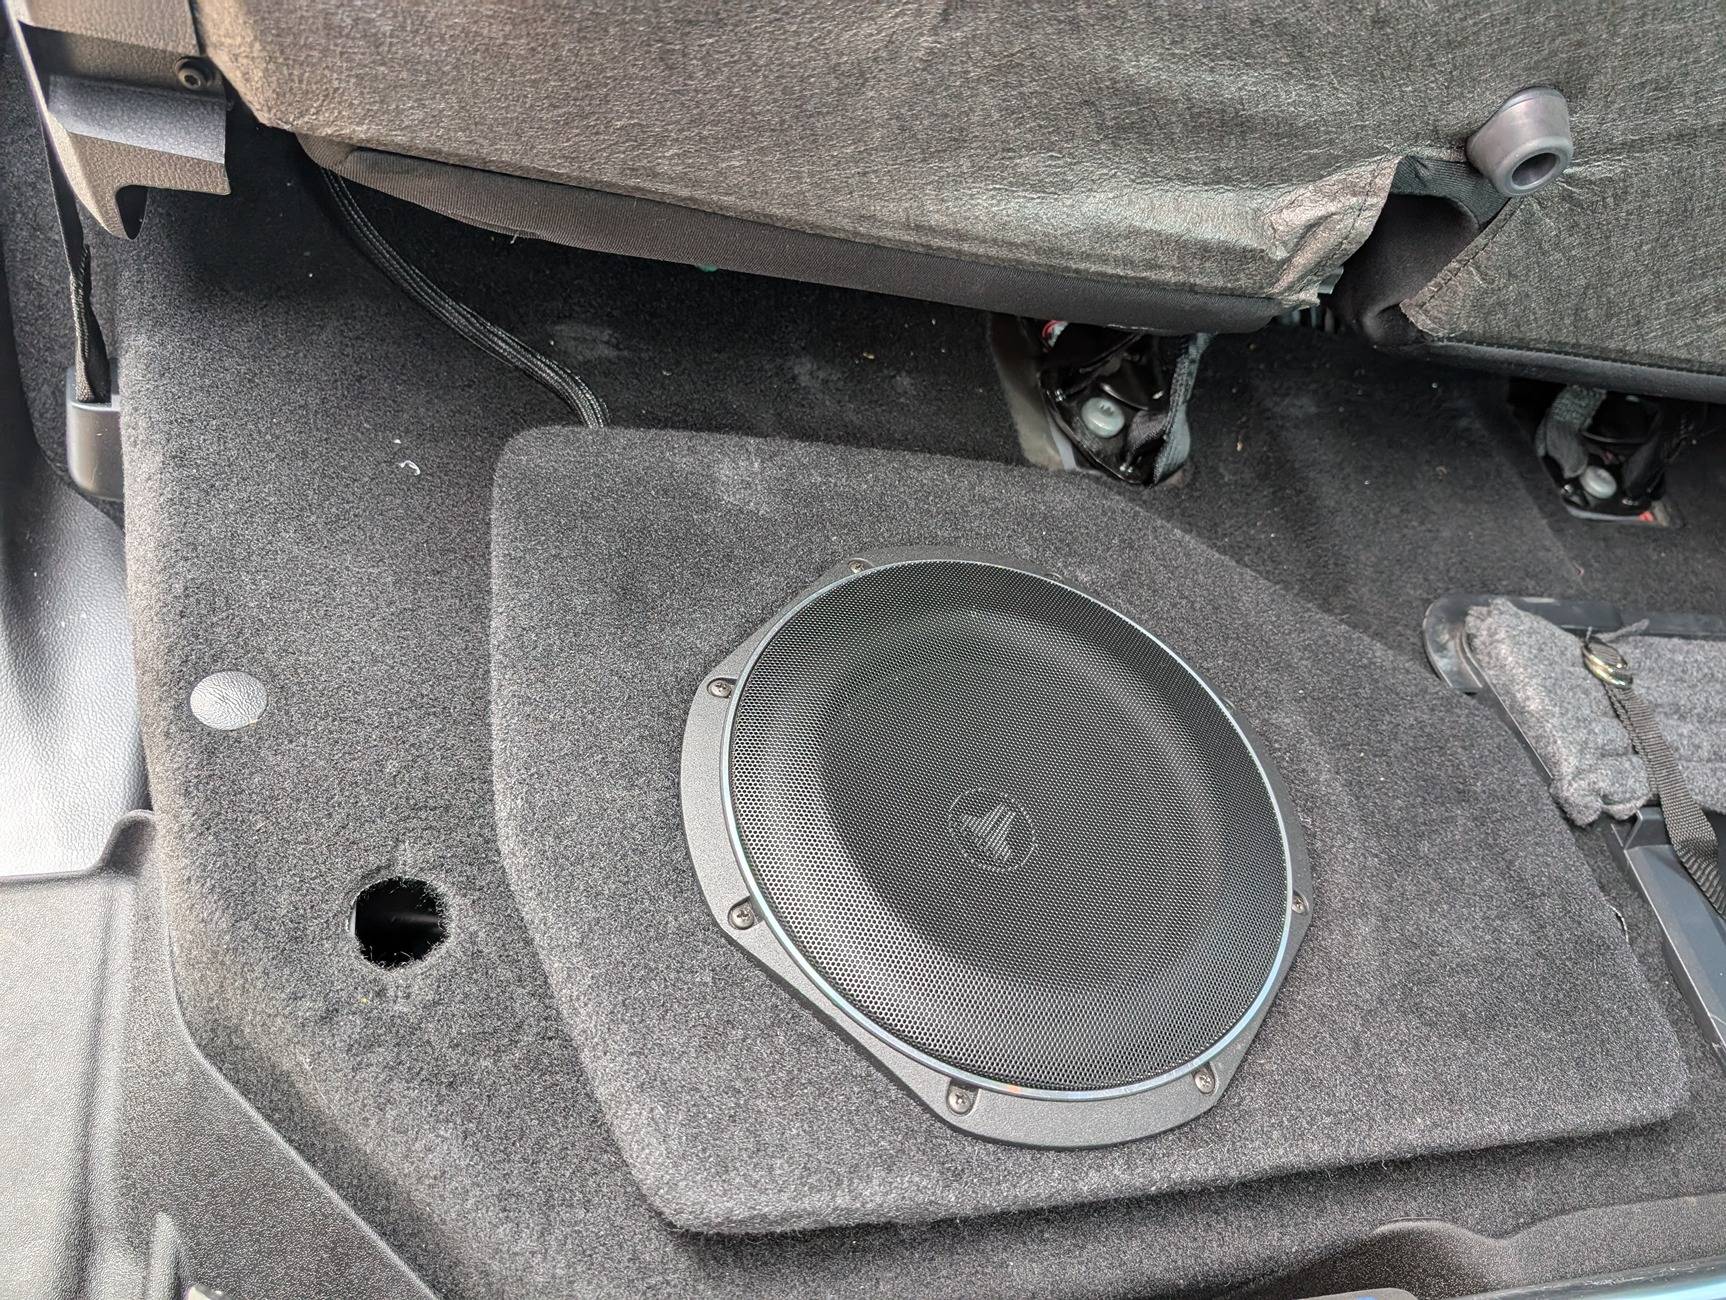
The back wall without the seat -- Midland MXT575 GMRS radio, JL amp for the sub, KEYLOC right behind the seatbelt and tied into the factory amp on the right. You can see the Stealthbox sub on the bottom left with the speaker cable running to it.

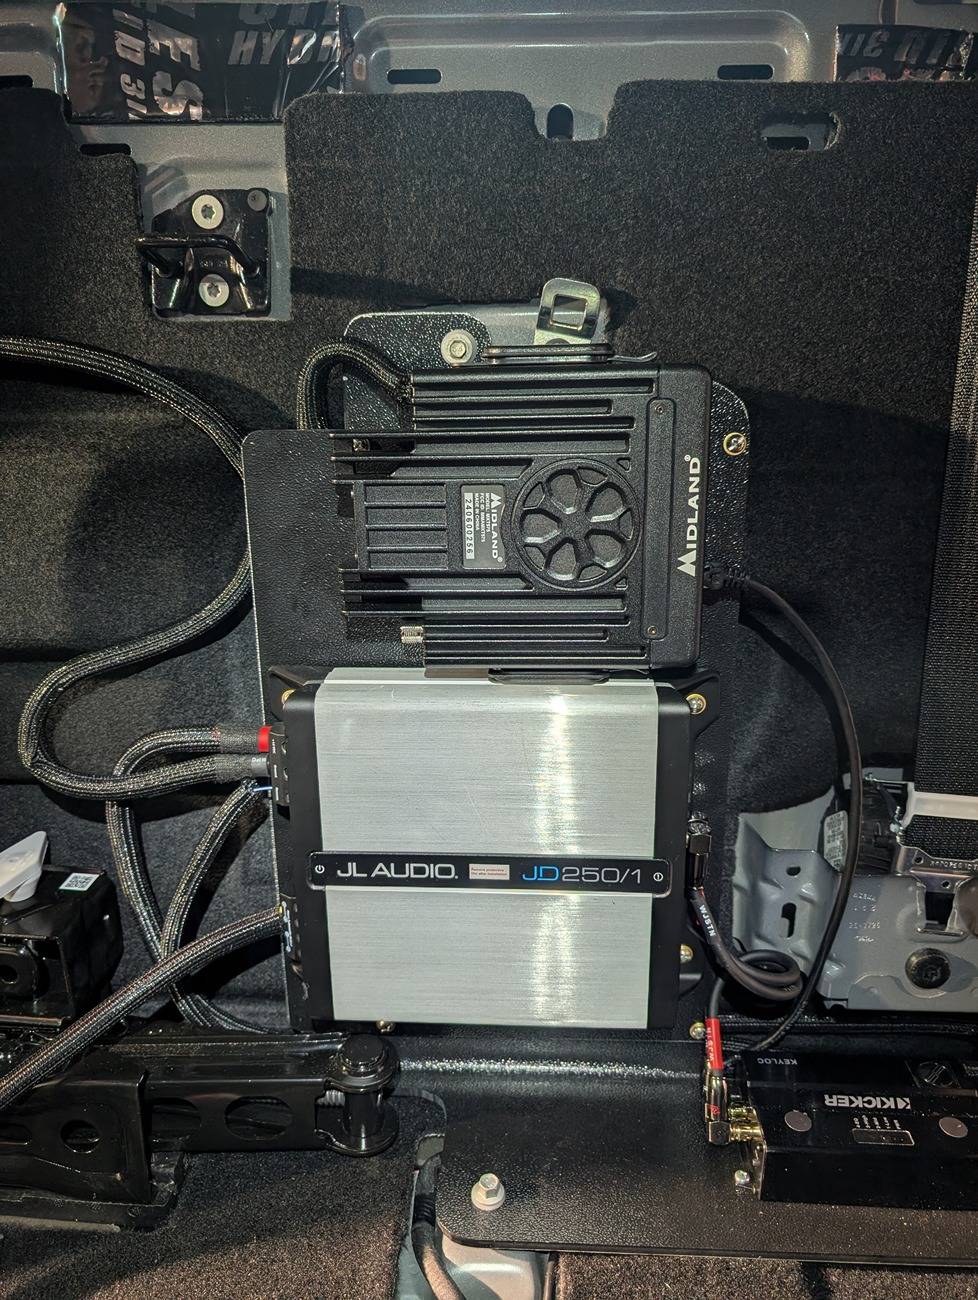
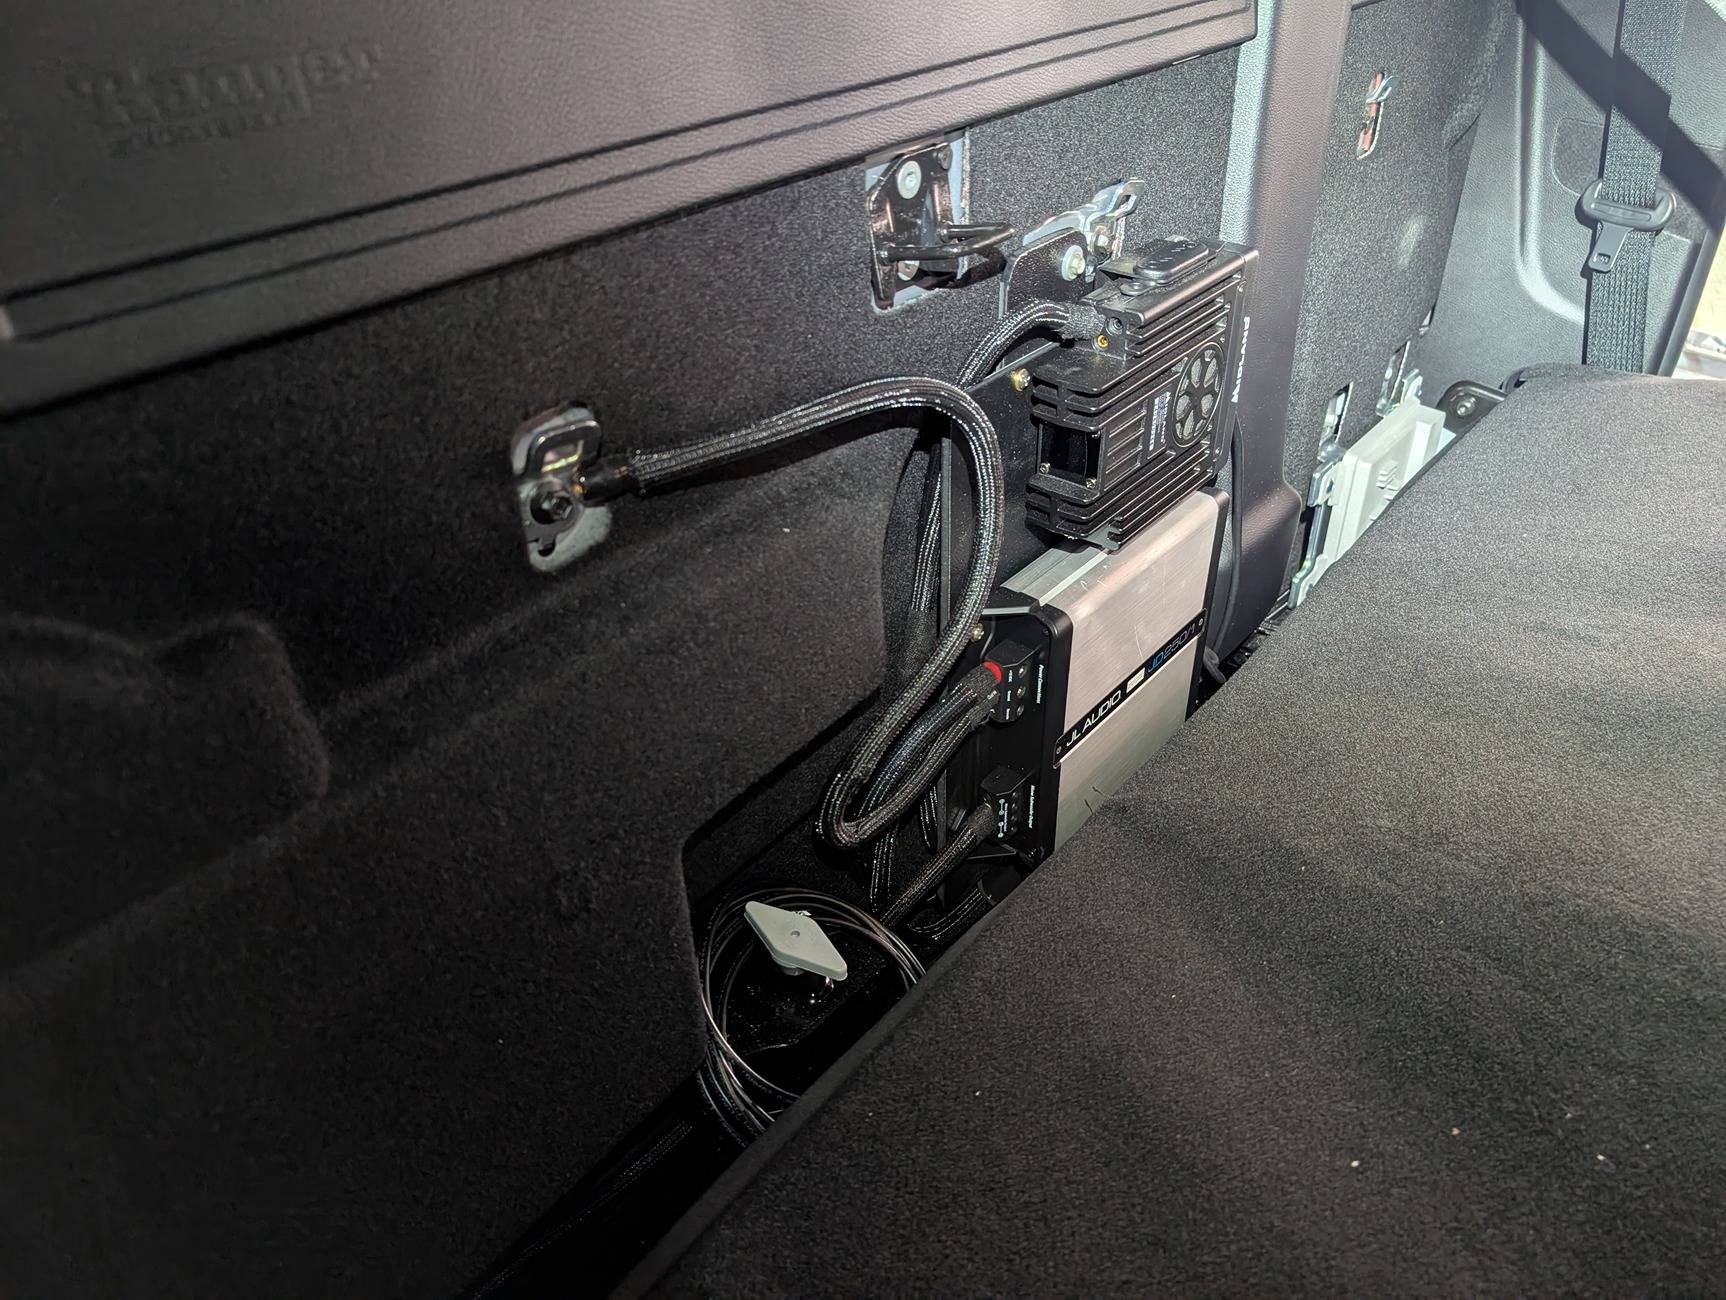
Closeup of the GMRS radio and amp on a custom ABS plastic bracket that replaces the factory sub. Kicker KEYLOC on the bottom right, which is the device that adapts the factory stereo to add a sub, Sounds Good Stereo sells these with an adapter cable that plugs right into the factory amp and is super clean.

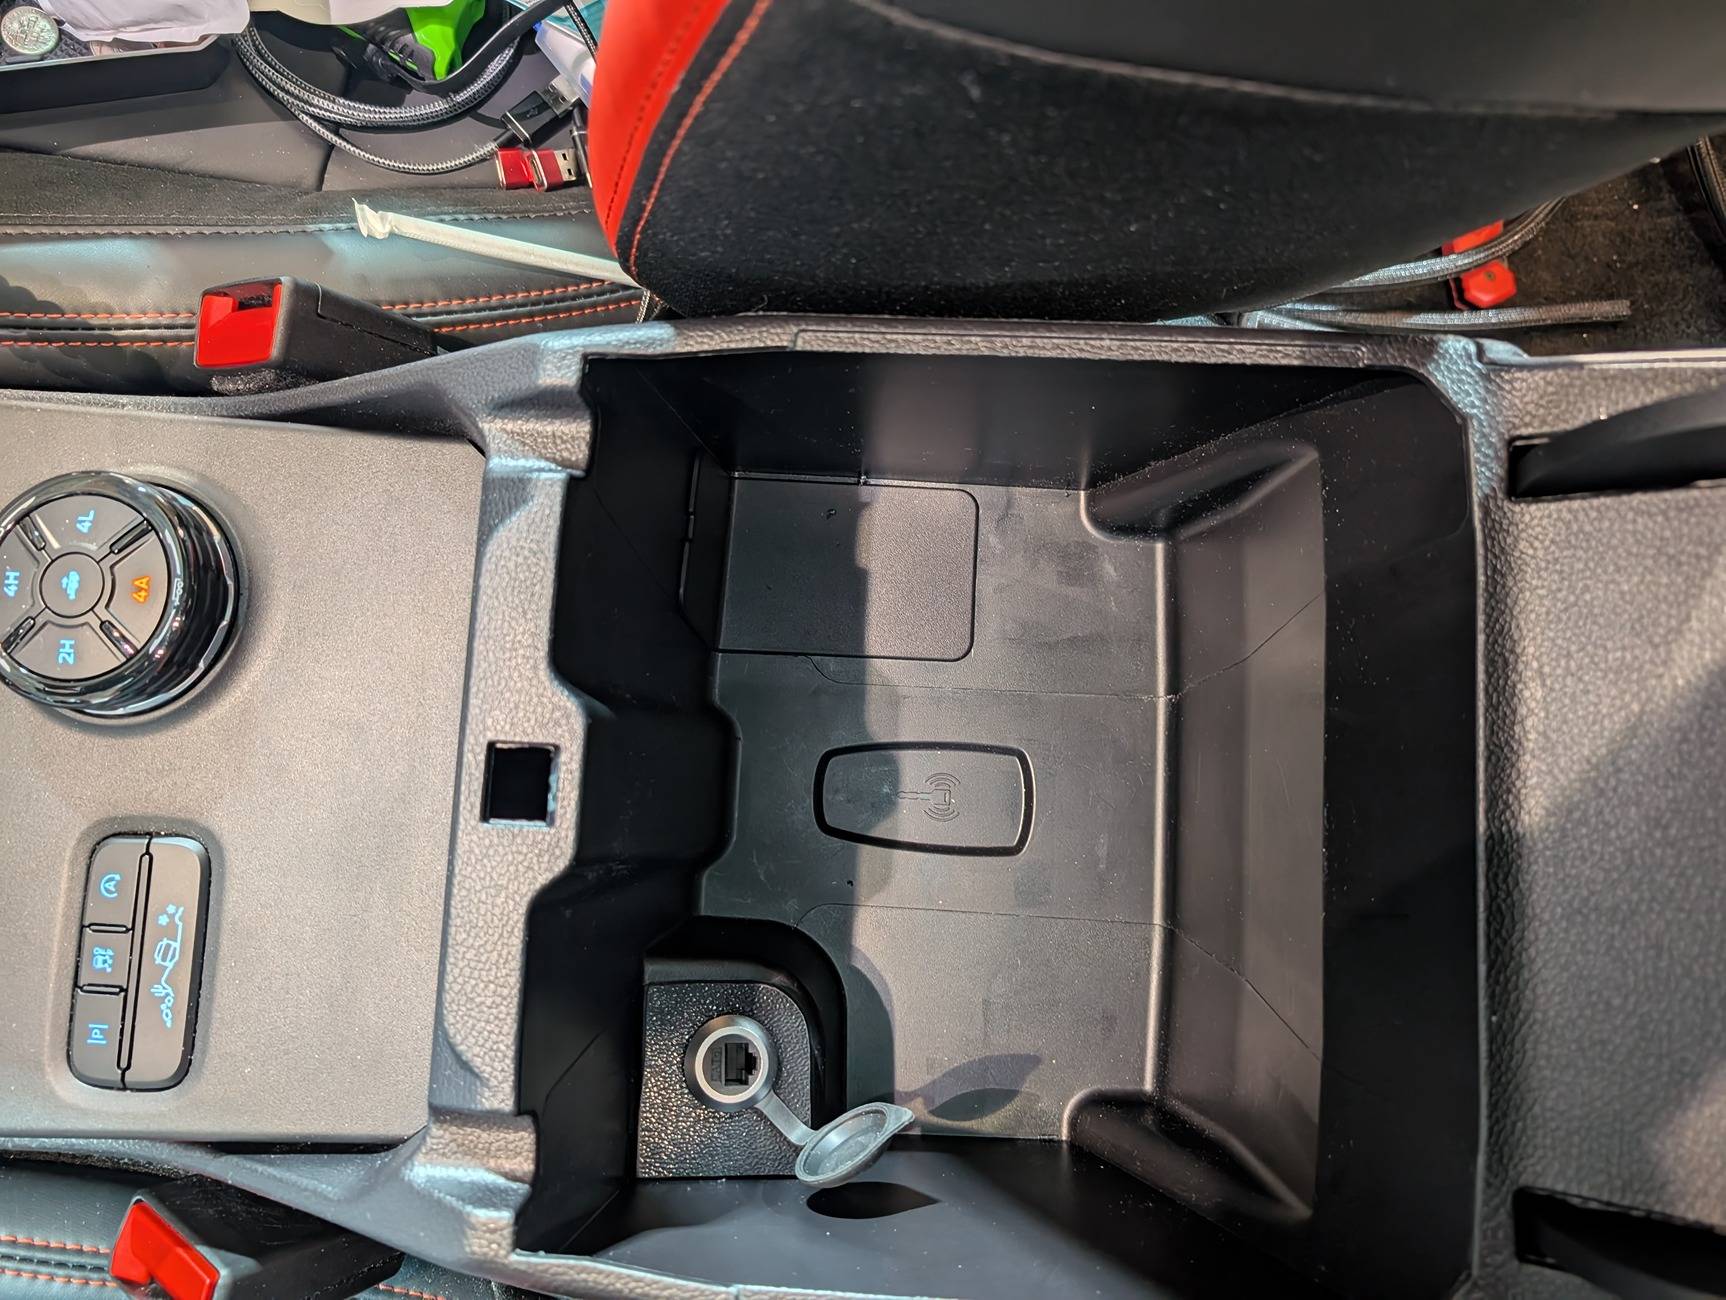
GMRS radio handset plug replacing the 12v connector in the center console storage area. Stays out of the way and to use, just plug in the handset and flip aux switch #2
Parts used in this setup
Speakers and Subwoofer
Sound deadening
GMRS radio, antenna and mount
Misc
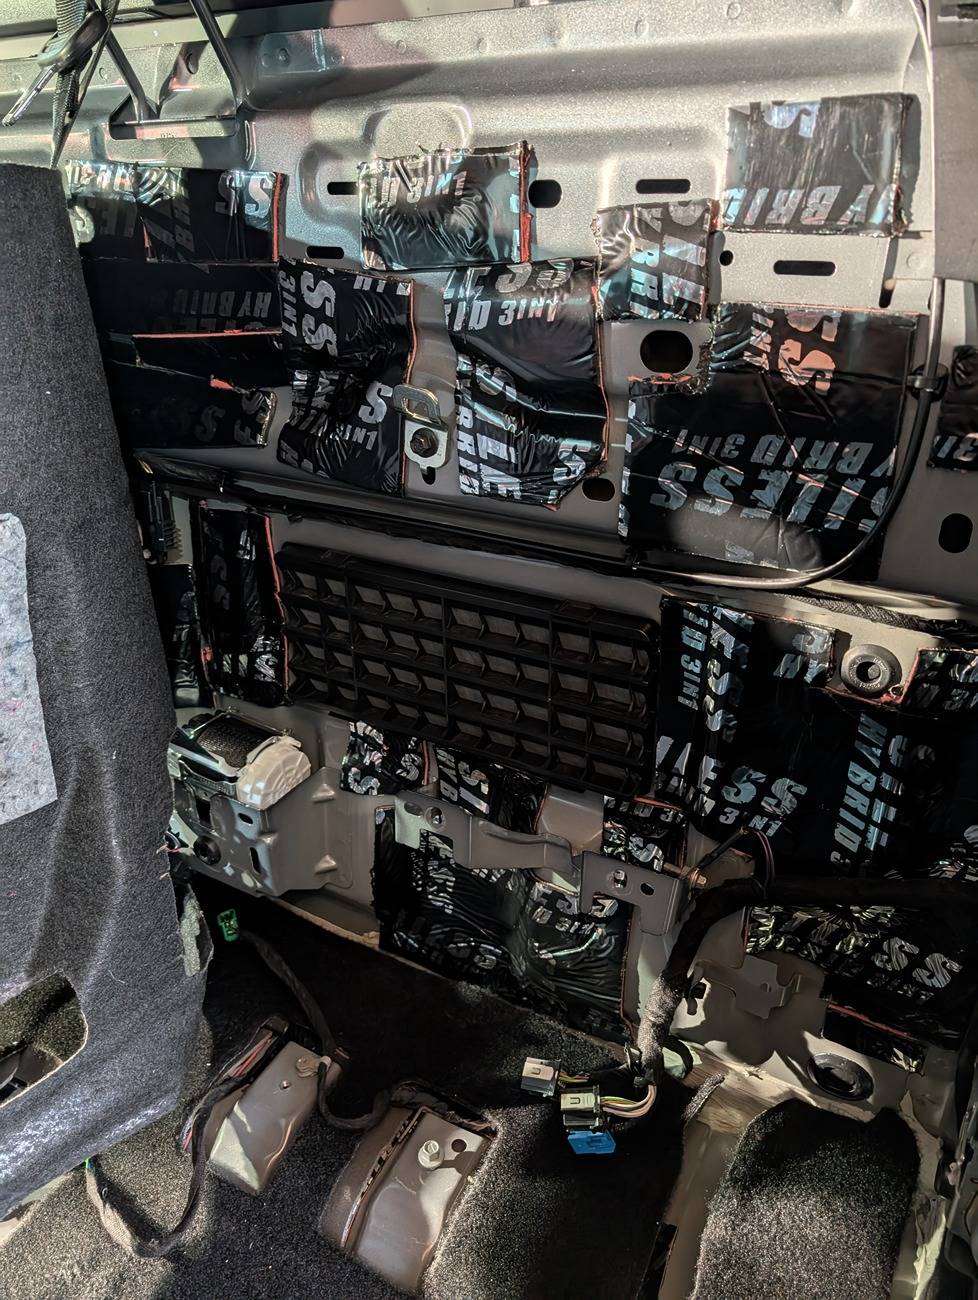
Door speakers and sound deadening install
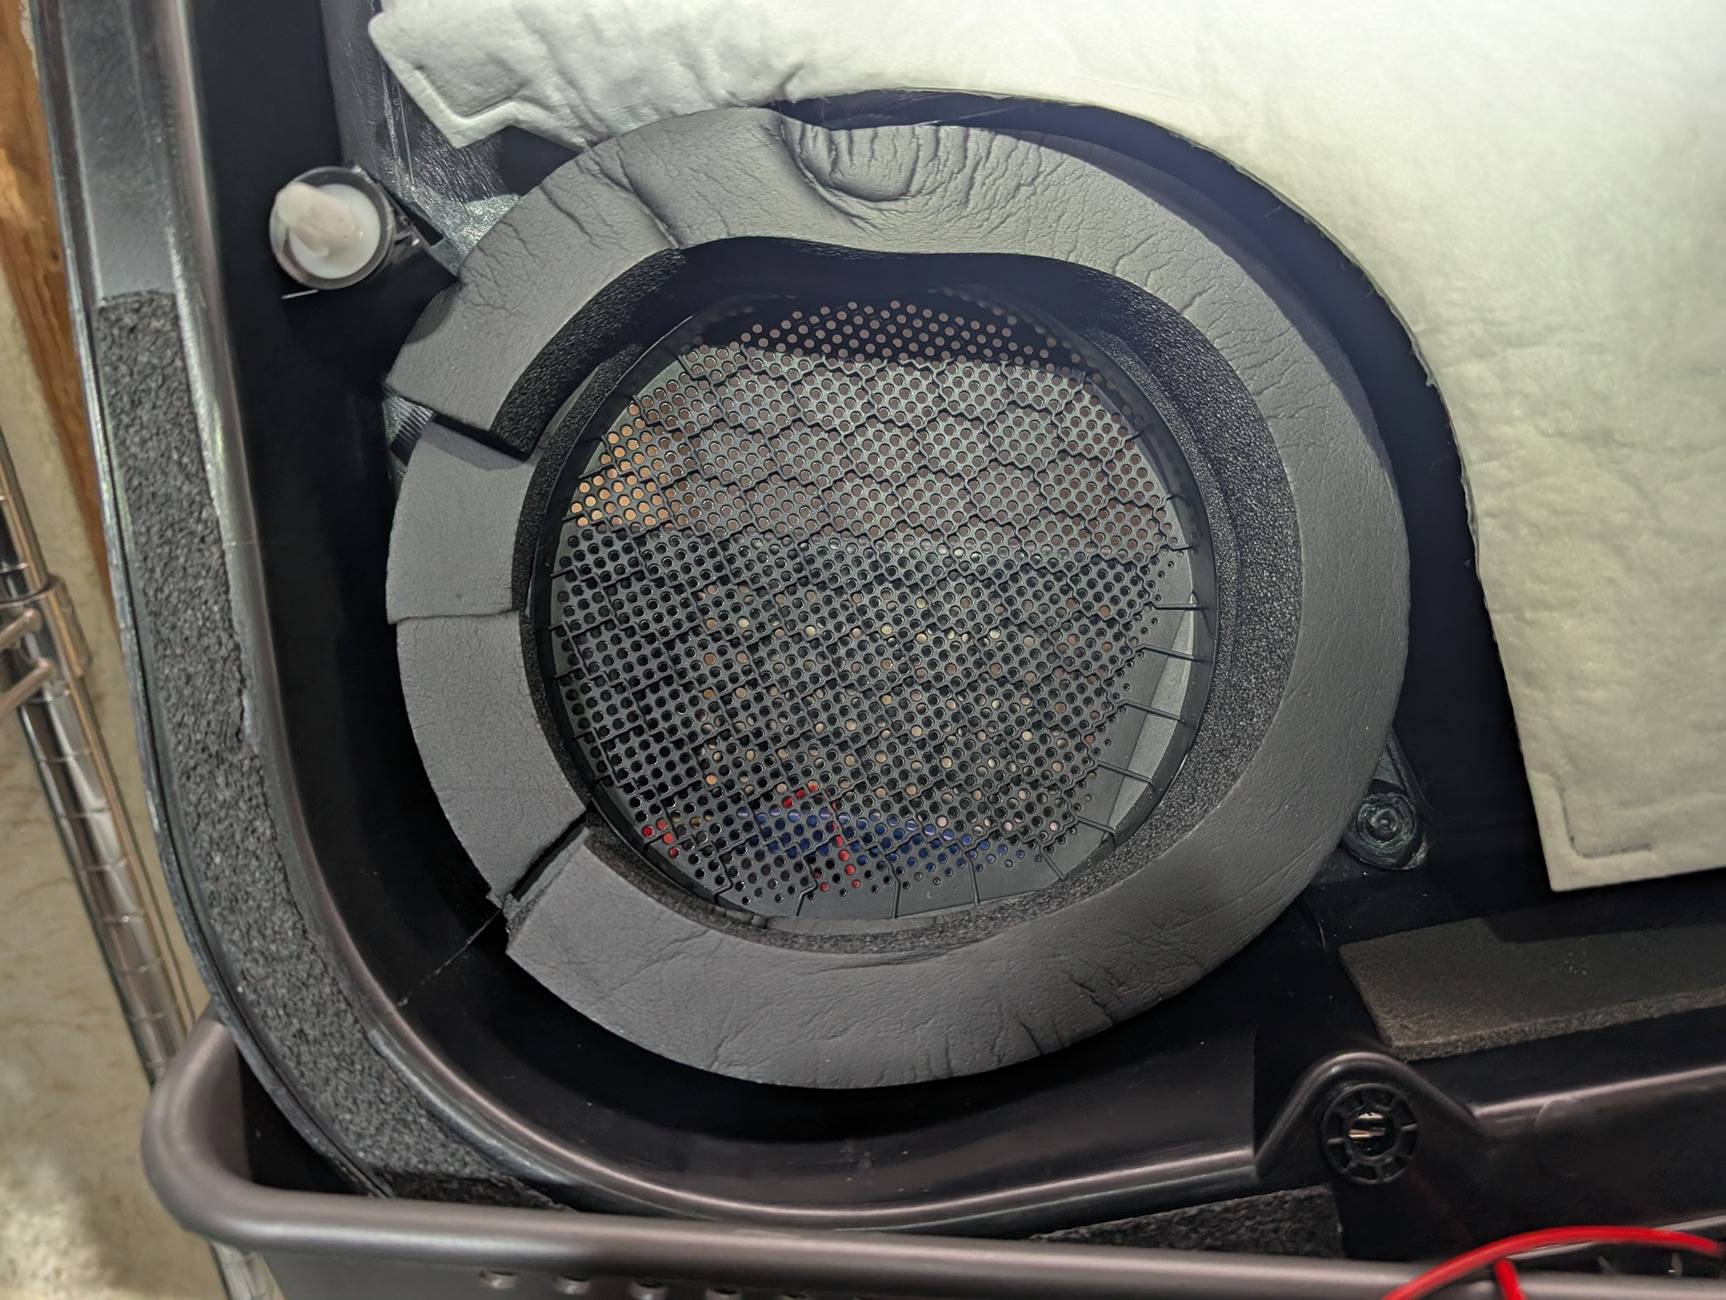
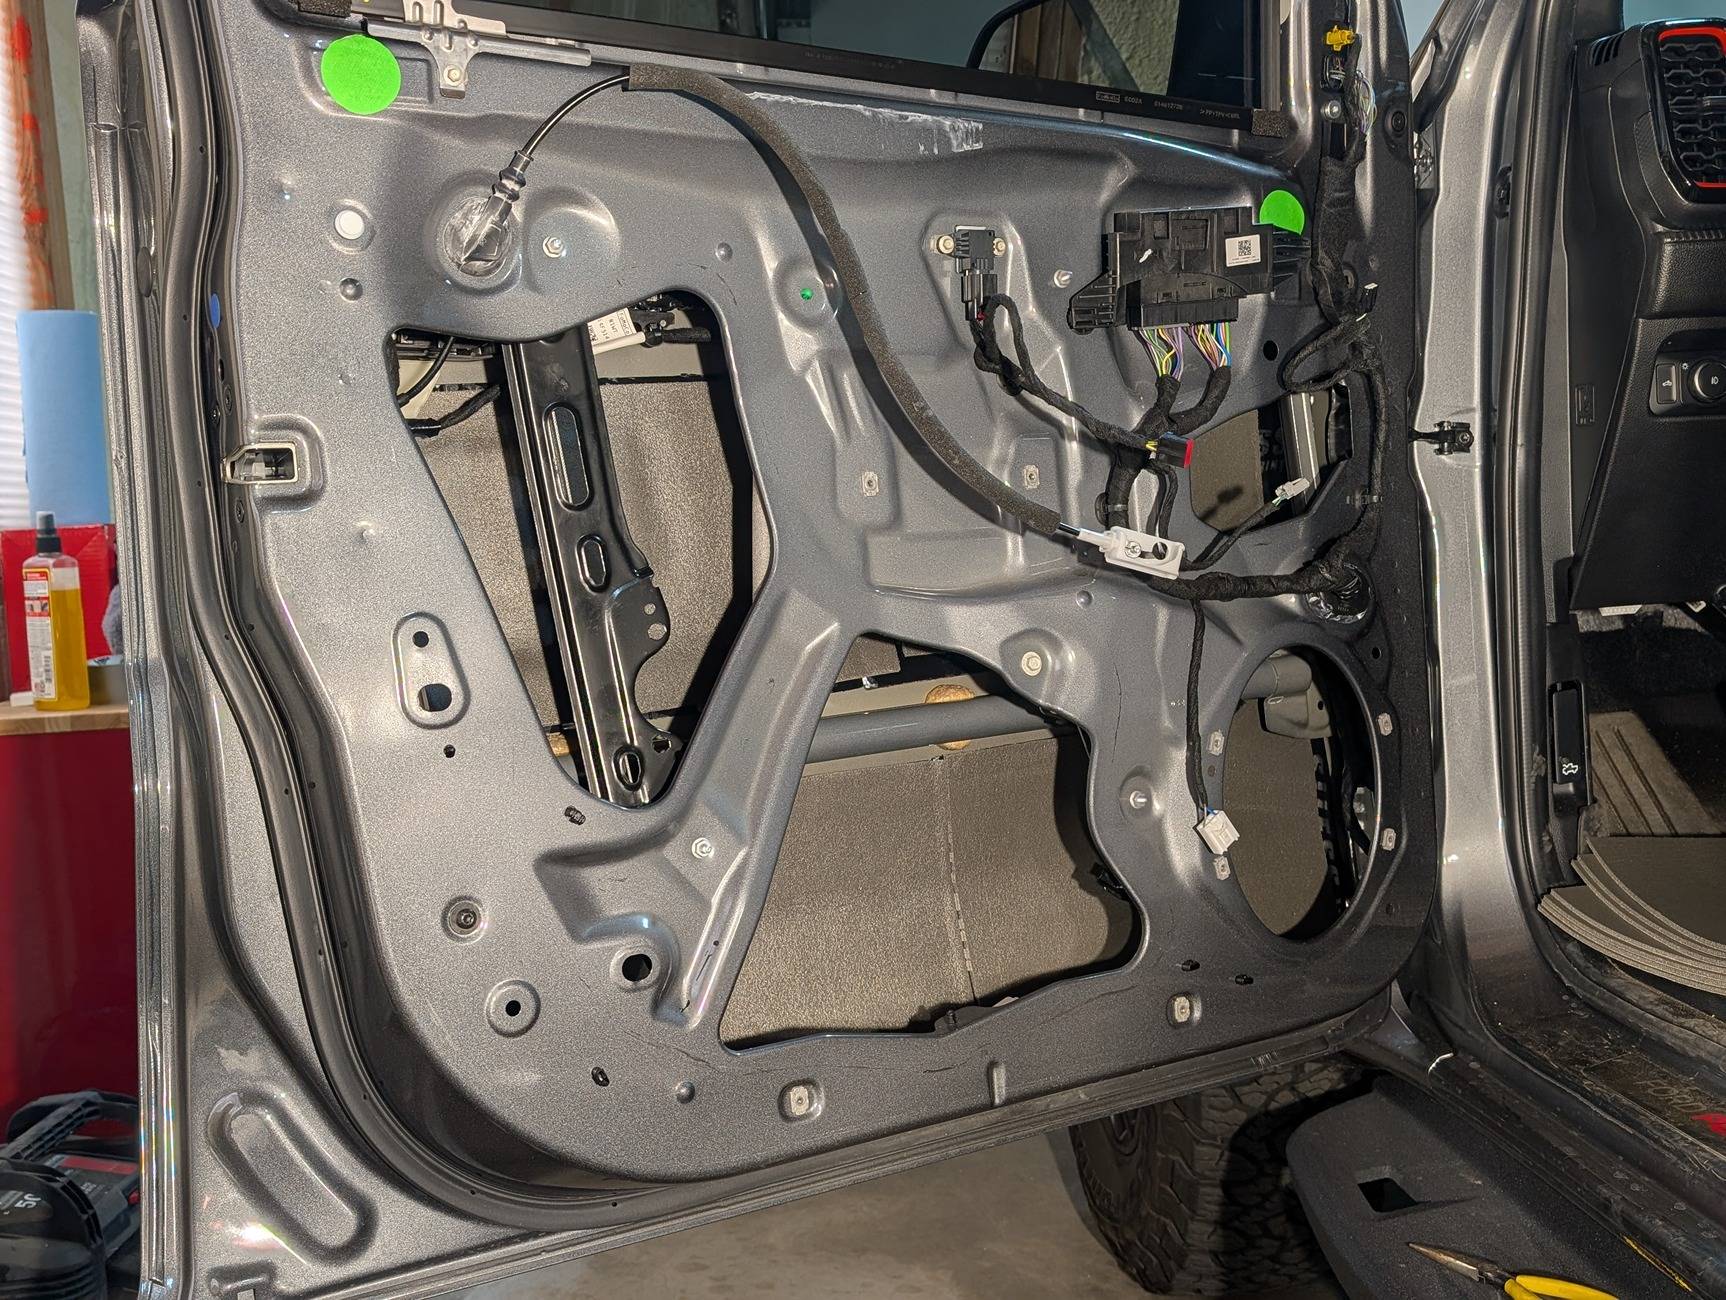
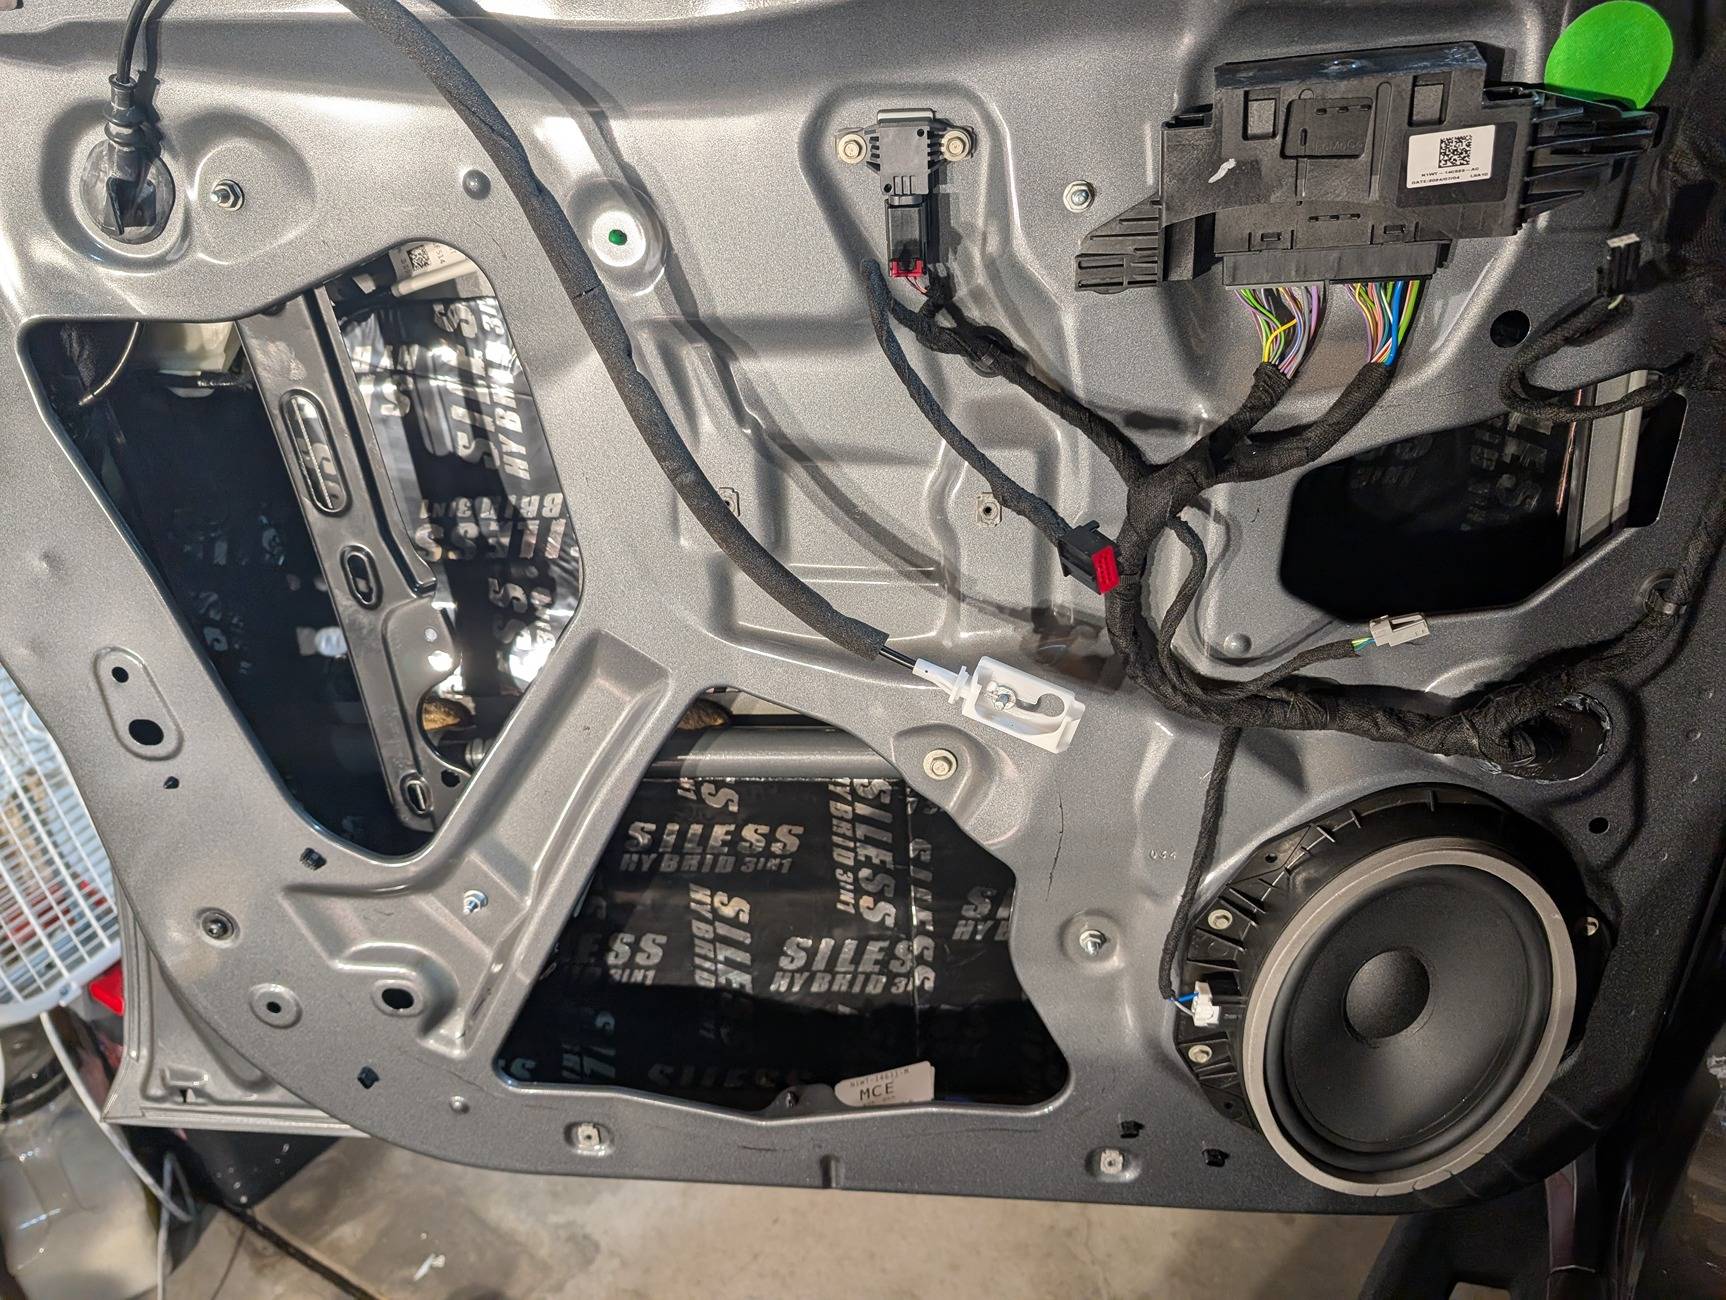
The Focal 165 fit the rear doors and the Focal 690 fit the front. I didn't install the tweeters because I'd already taken down the headliner and didn't want to pull apart the A-pillars again. Taking the doors apart is easy, and the Siless "hybrid" sound deadening has a mylar layer instead of metal, so it's easy to install with your hands. Getting it into the door is a bit awkward but overall pretty easy.
I didn't take pics when I was doing the roof, it's a big hassle to take the headliner down, but it is worth it. I used flaberdoopin's video as a reference and that was really handy.
Here is a door finished with the deadening and then a layer of foam on top:
And this is with just the deadening and a test fit of the speaker
Center Channel Speaker
I replaced the center channel speaker on the dash with a Kicker KSC350. Thanks to @GLW for the recommendation and wire polarity.
On the wiring from the plug, the solid white wire is positive and the multi-color wire is ground. I just dismantled the stock speaker to re-use the plug. It's held to the stock speaker with a rivet that pulls through the plastic bracket. You could also just clip the existing cable and wire it in.
The speaker fits best with the contacts towards the front of the vehicle, this let the speaker sit down in the cavity.
I cut out some spare foam and put a ring on the center console speaker grille -- this did seem to help.
Subwoofer and GMRS radio install
First you have to take out the rear seat. There's two 13mm bolts on either side of the seat, right next to the back wall. There's some carpet to pull forward and then the bolts are visible. You need to disconnect the center seatbelt and then fish the belt receivers through the seat before removing it. Not too difficult but the seat is awkward to move around. There's a YouTube "Ranger rear seat delete" video that's helpful here, even though it's for a 5G ranger it's exactly the same on the 6G.
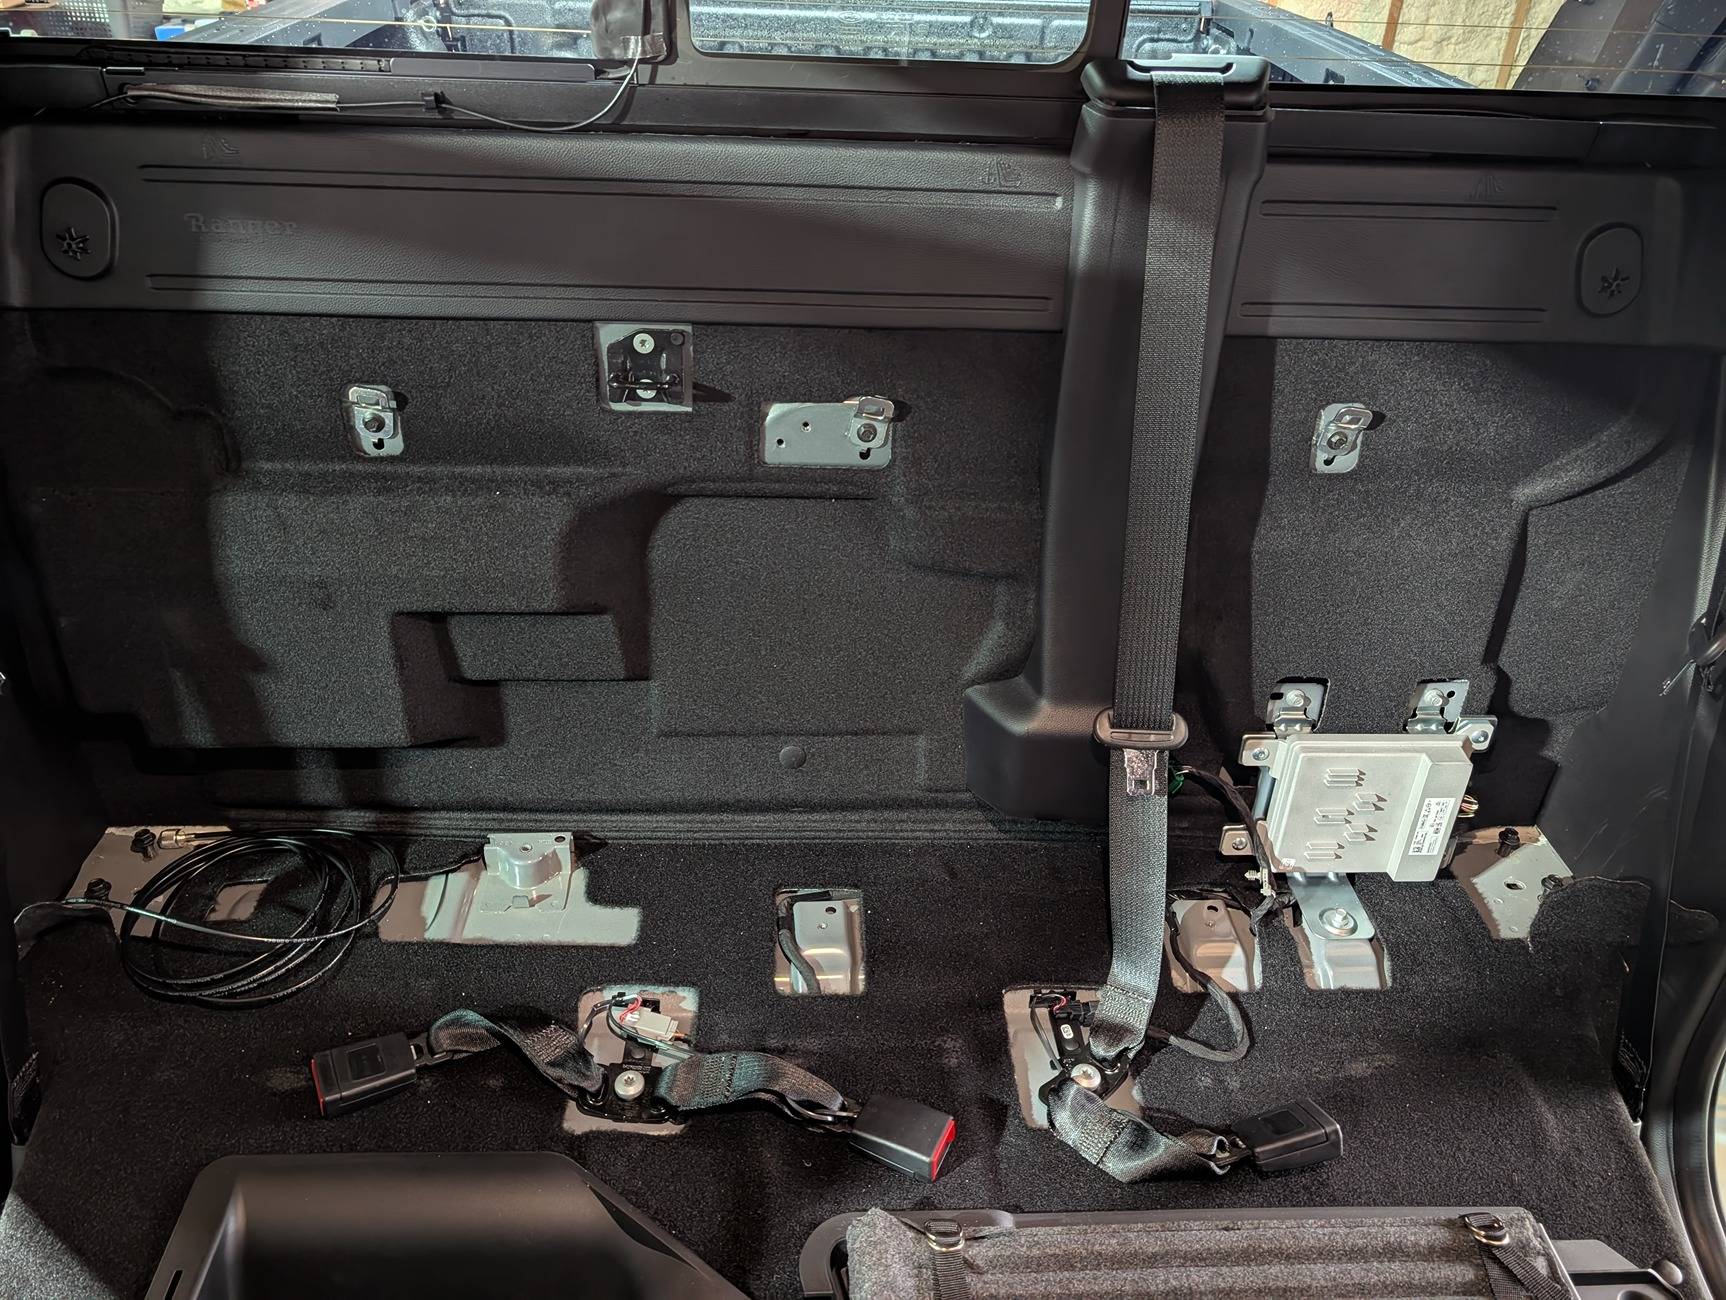
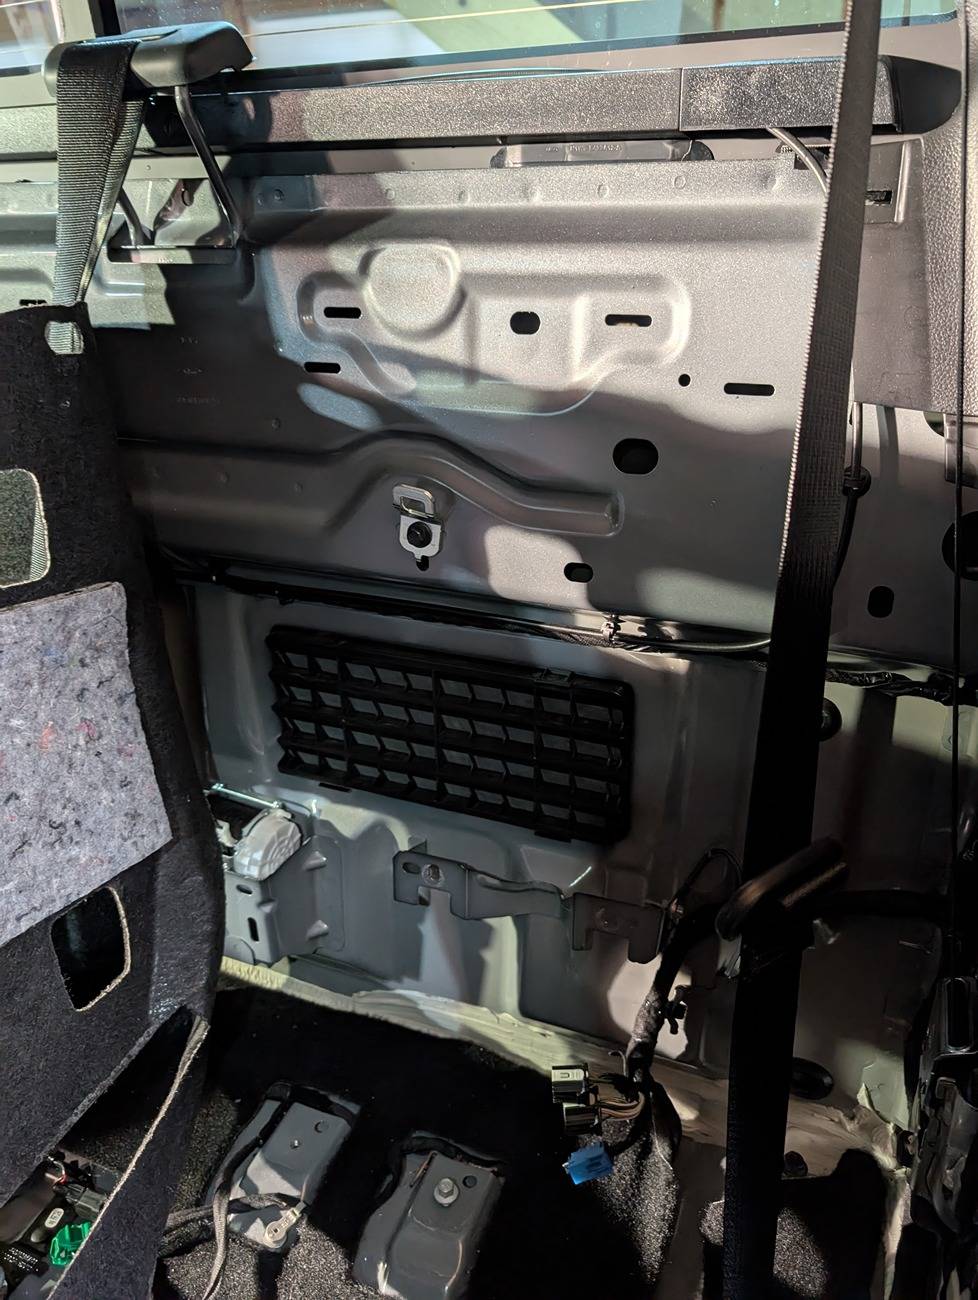
Here's the back with the seat removed, ready to get torn apart
Next remove the factory sub. There's three bolts, the top one is slightly smaller. I re-used these bolts but added nylon spacers and washers when I put the ABS mounting bracket in later.
I built a mounting bracket for the amp and radio to replace the stock sub using an 18x24 ABS panel.
I made a cardboard cutout of how to cut the ABS to make the bracket. If you want to recreate this, these are the measurements and the 10" x 14" part is just cut out from the right half of the main panel, then bolted together (pics below). Here's the measurements:
I cut out the ABS panel using a jigsaw and a plexiglass blade, it was very easy to cut. Then to bend the bottom part I used a heat gun and a metal shop drawer as a jig. You have to get the ABS up to temperature and then it bends easily, then hold it in place while it cools. Here's the unfinished panel testing the fit:
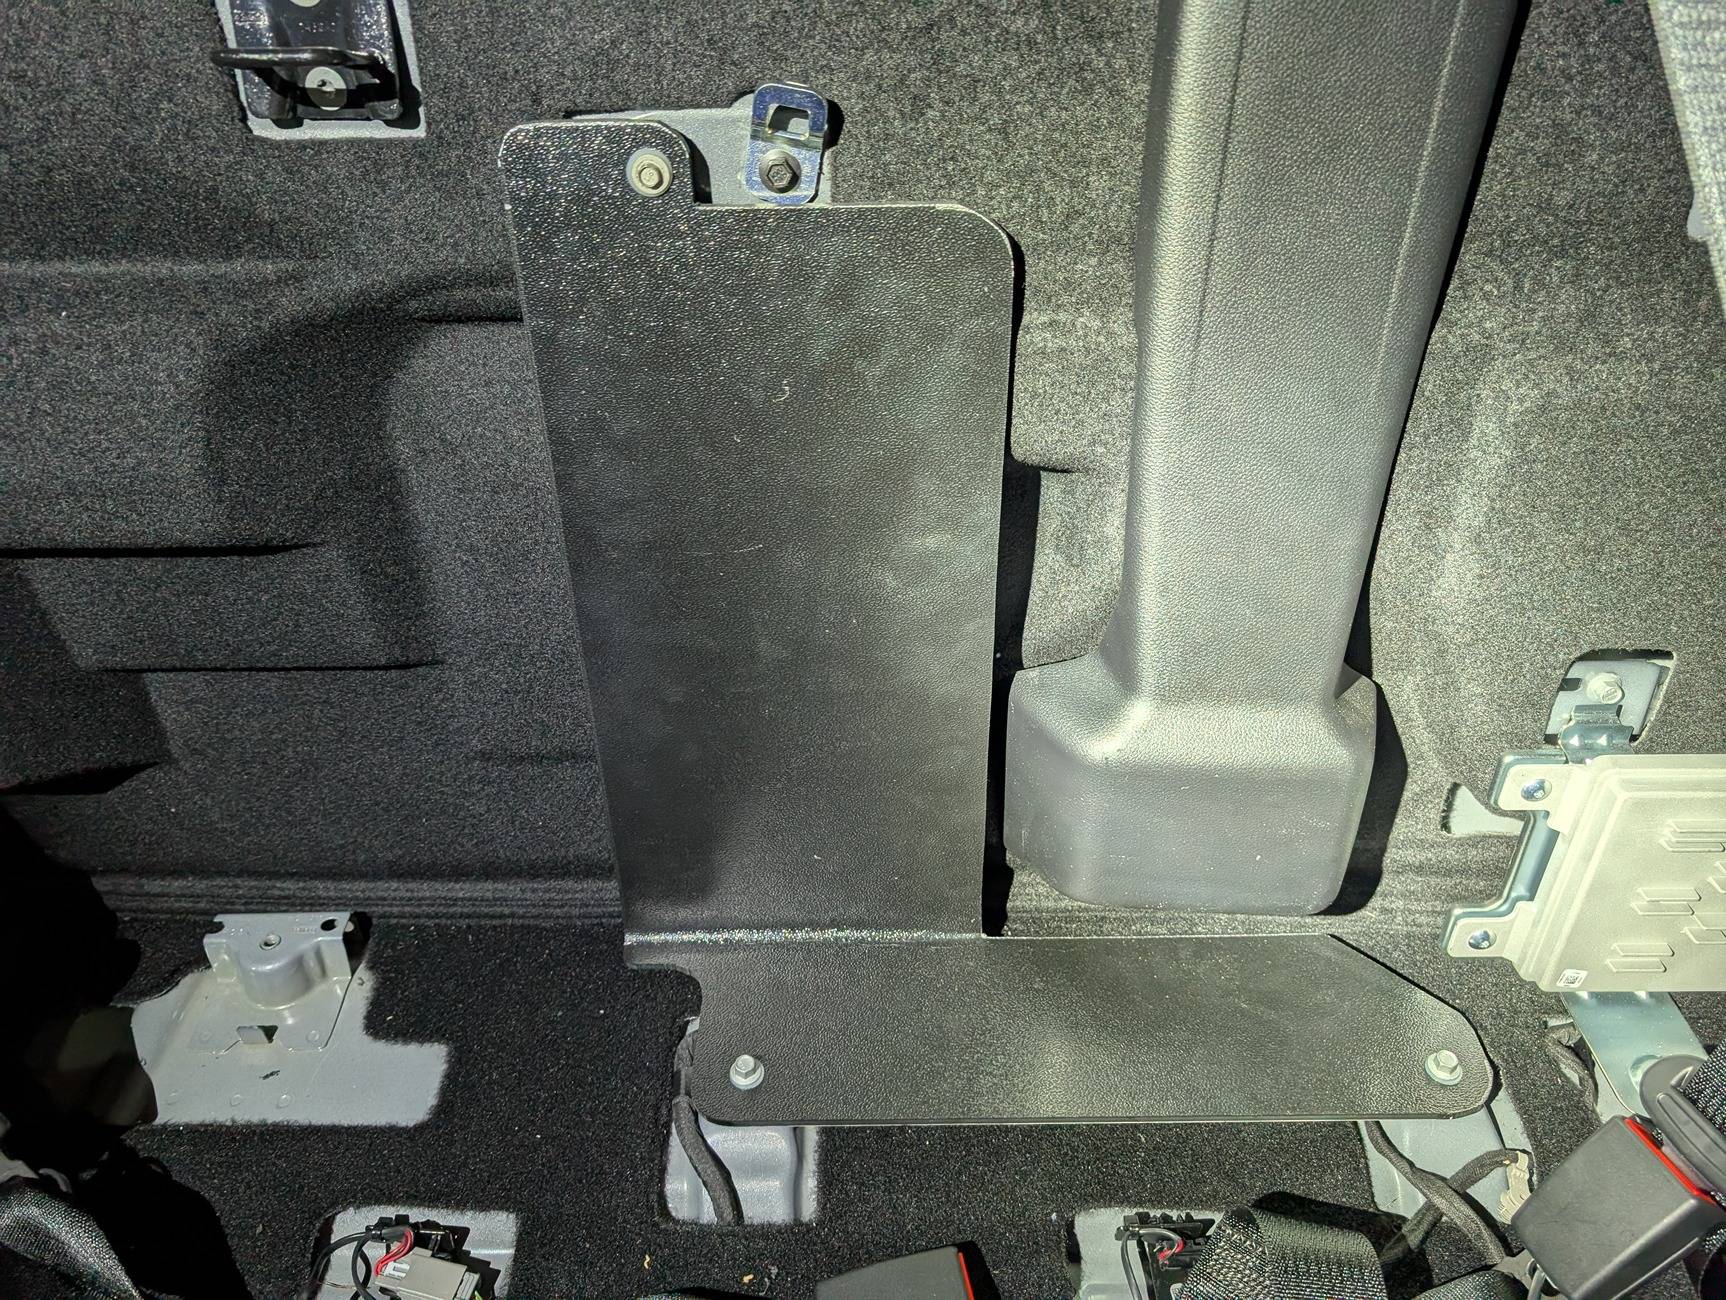
I cut it down some more to round the corners and so that the jack wouldn't interfere with it:
I bolted the spare section of ABS to this main one and then mounted the amp and radio. Amp on the bottom, GMRS on top and the KEYLOC on the bottom part. This way the Sounds Good Stereo adapter Y-cable fits easily, all plugs worked as-is, everything just snapped together. I taped off the stock subwoofer input just to keep it clean but the stock sub is gone.
The KEYLOC adapter cable has three bare wires. Yellow needs to be wired to fuse #35 (or some other ignition-switched source). Black is ground. Blue is a remote trigger for the amp to turn on.
Wiring into the battery and aux switch
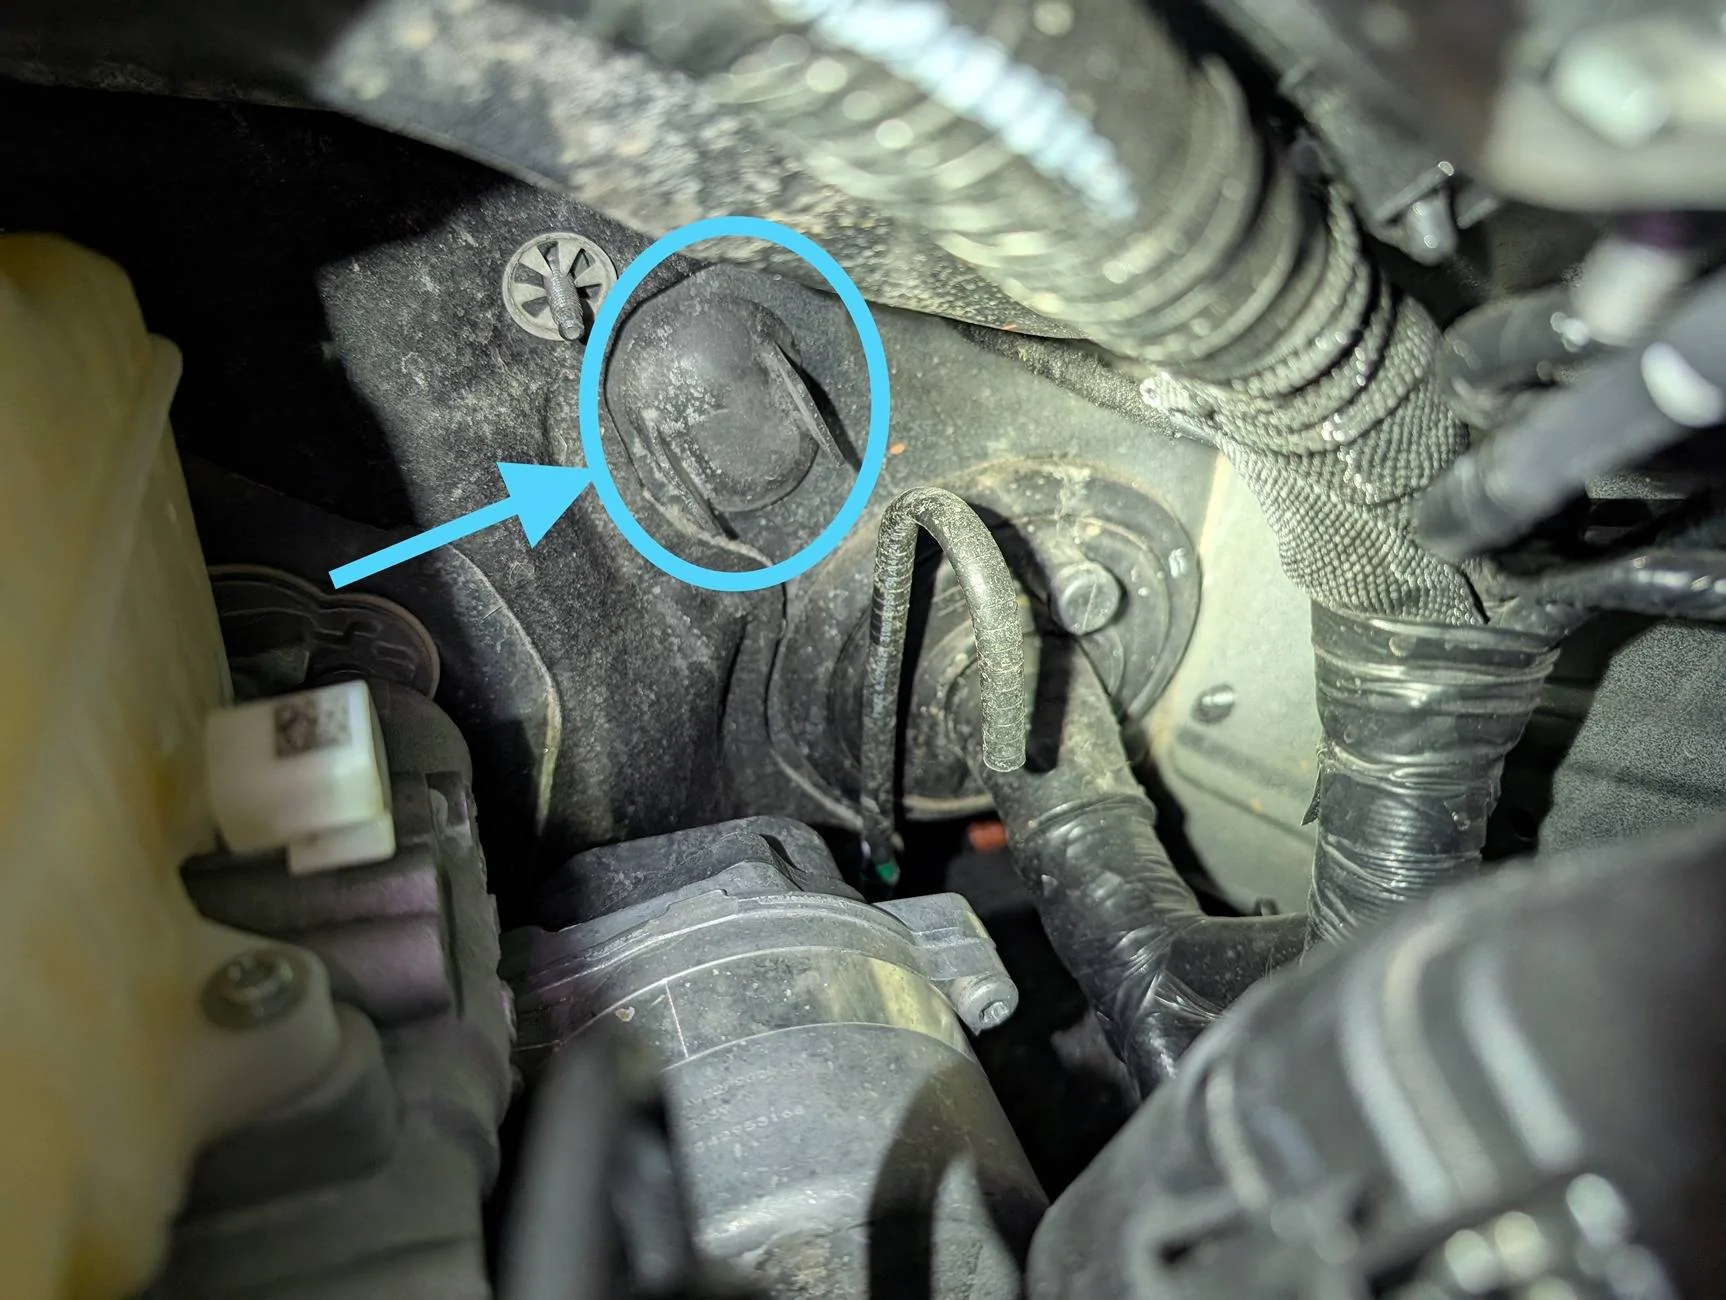
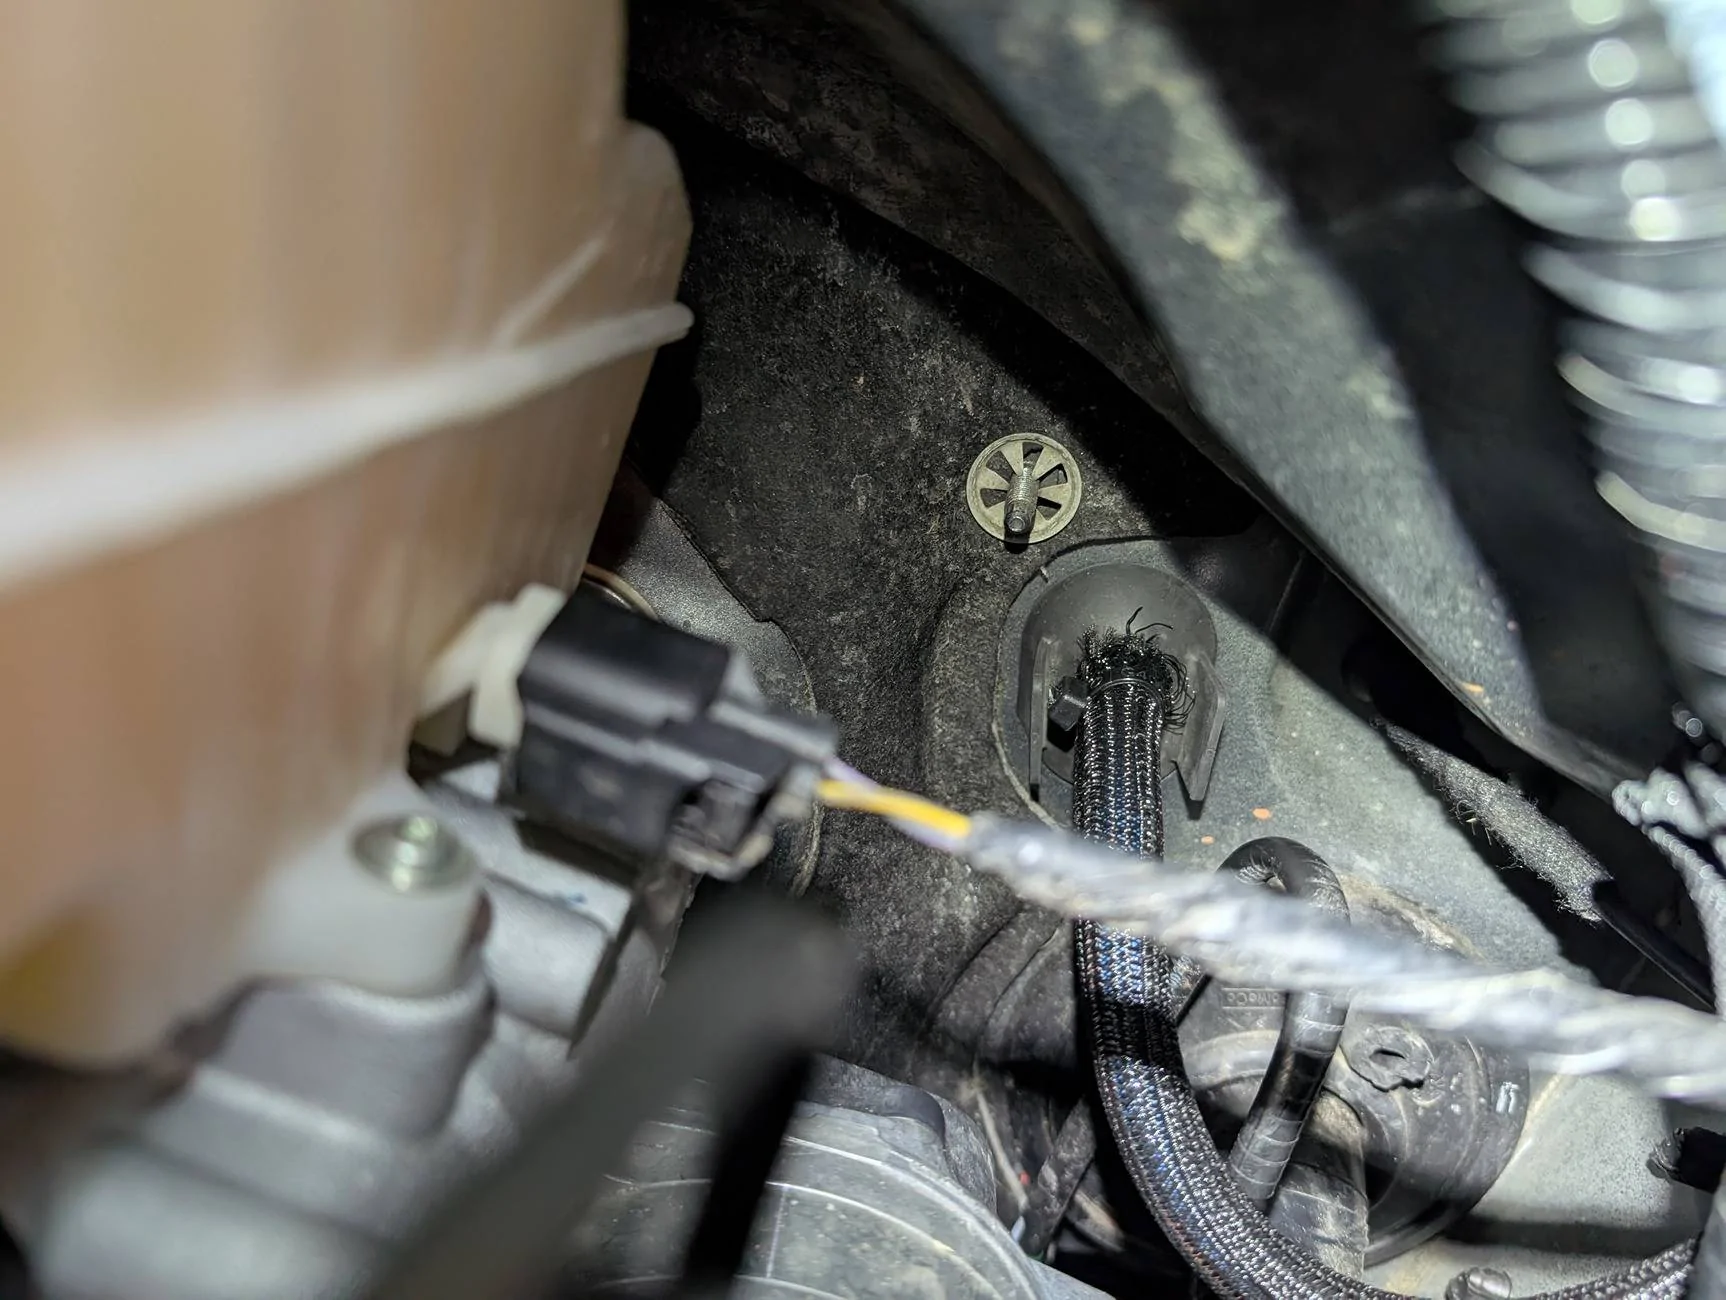
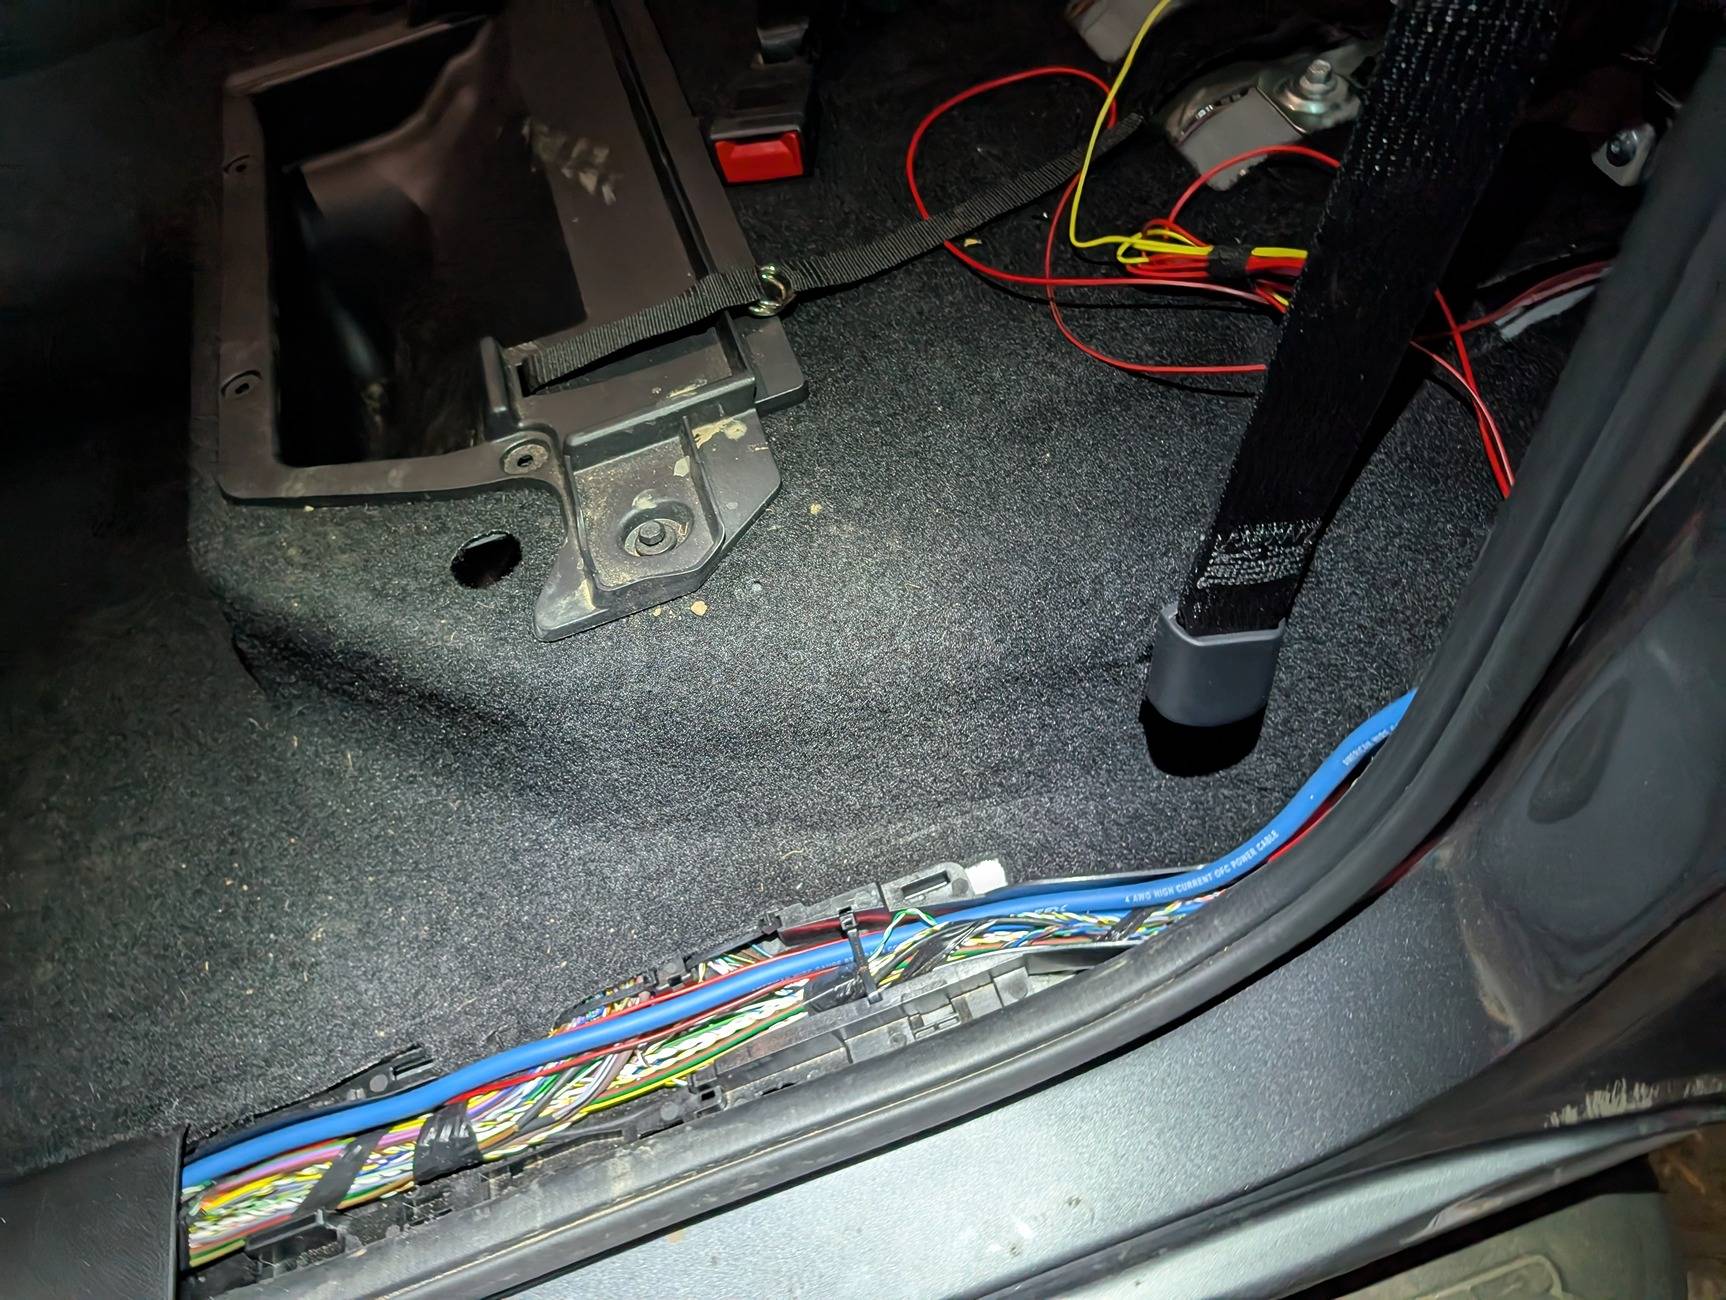
Next, some wiring to the amp, KEYLOC and GMRS radio. On the driver's side of the engine bay, right on the back there is this grommet with two "wings" that you can pull out. This leads into the driver's footwell, behind some sound deadening fabric above and to the left of the brake pedal.
Run the amp power cable through this as well as a power lead to the GMRS radio. I used aux switch #2, which is the blue/orange one near the battery. Cable in and protected by some flex loom, zip tied to the cable.
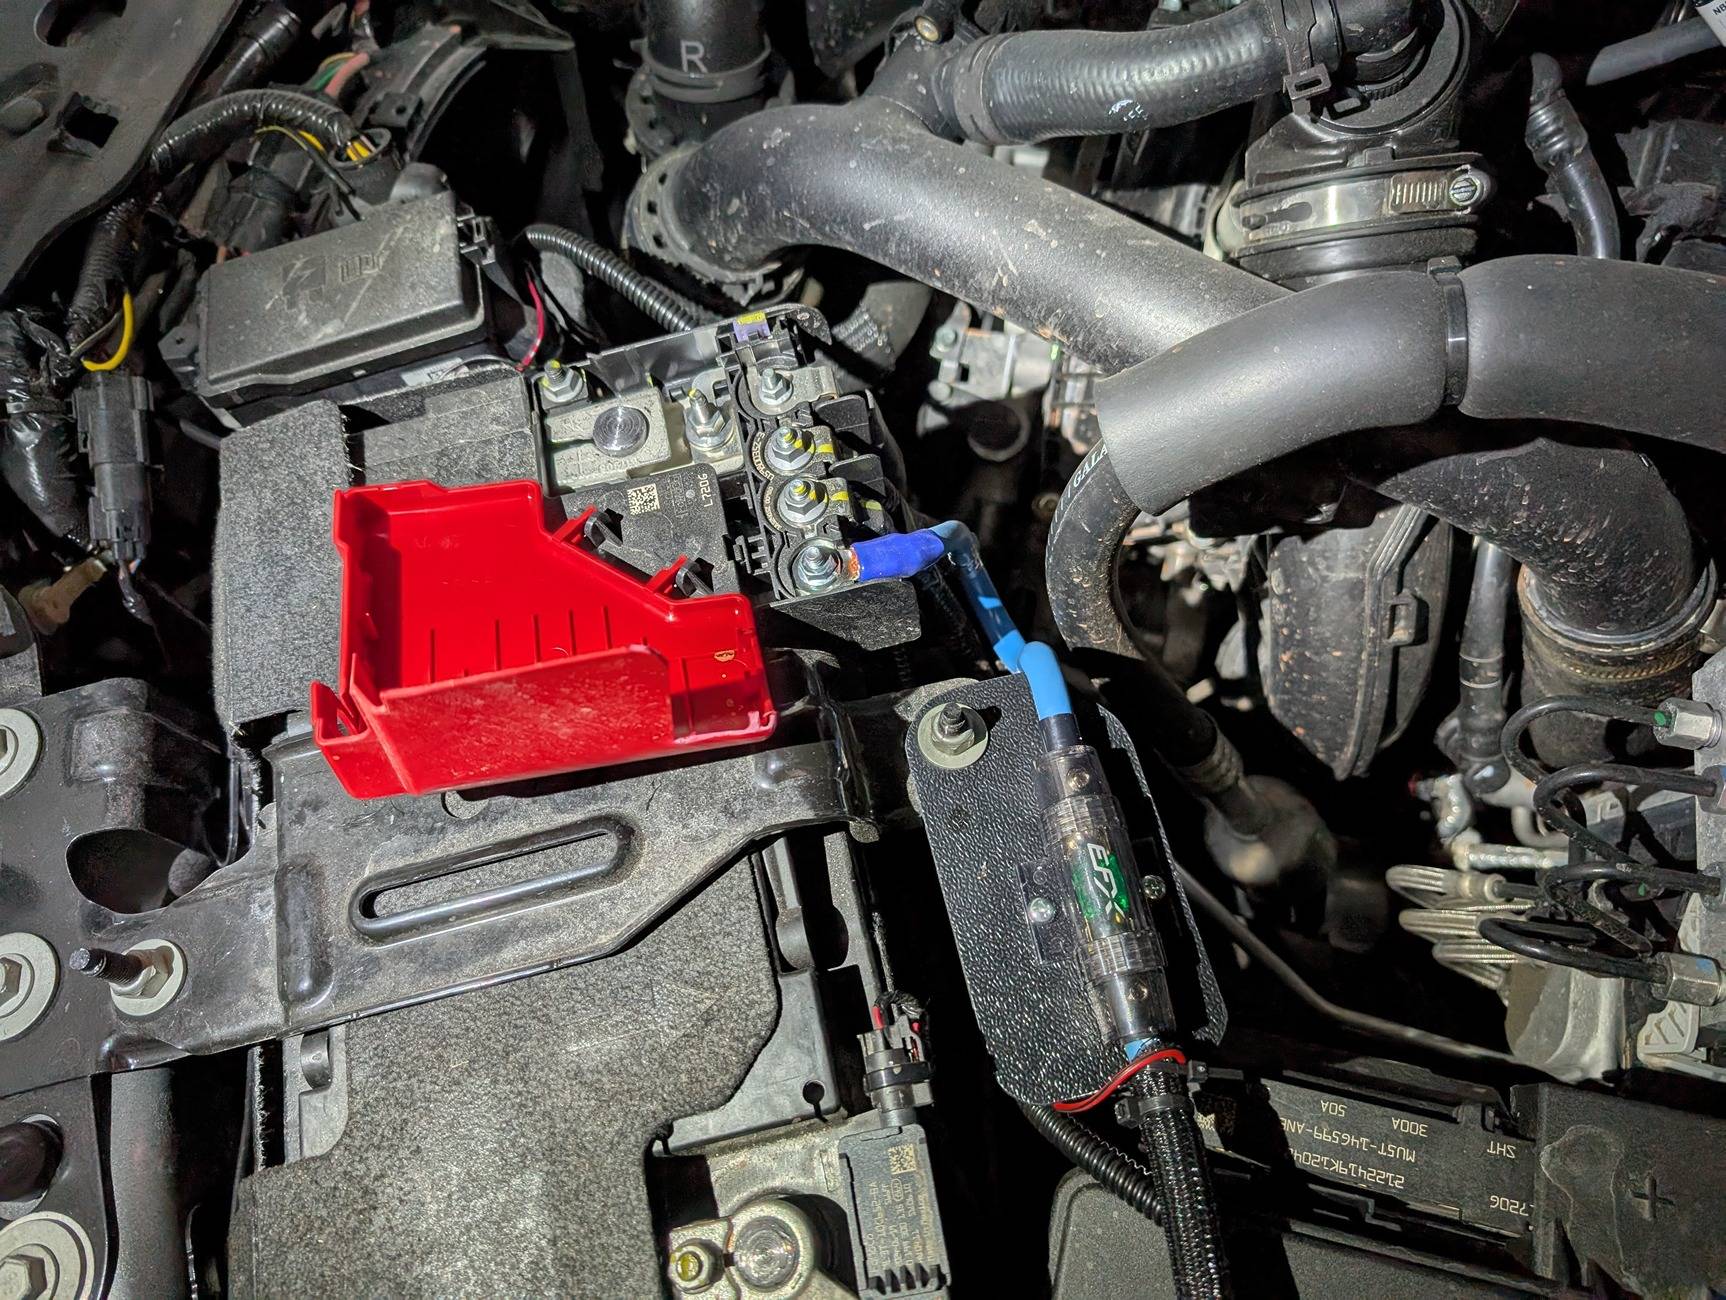
On the battery there's an extra terminal, I used another piece of ABS plastic to make a fuse platform for the amp power line. The spare terminal is an M6, picked up a flange nut at the hardware store.
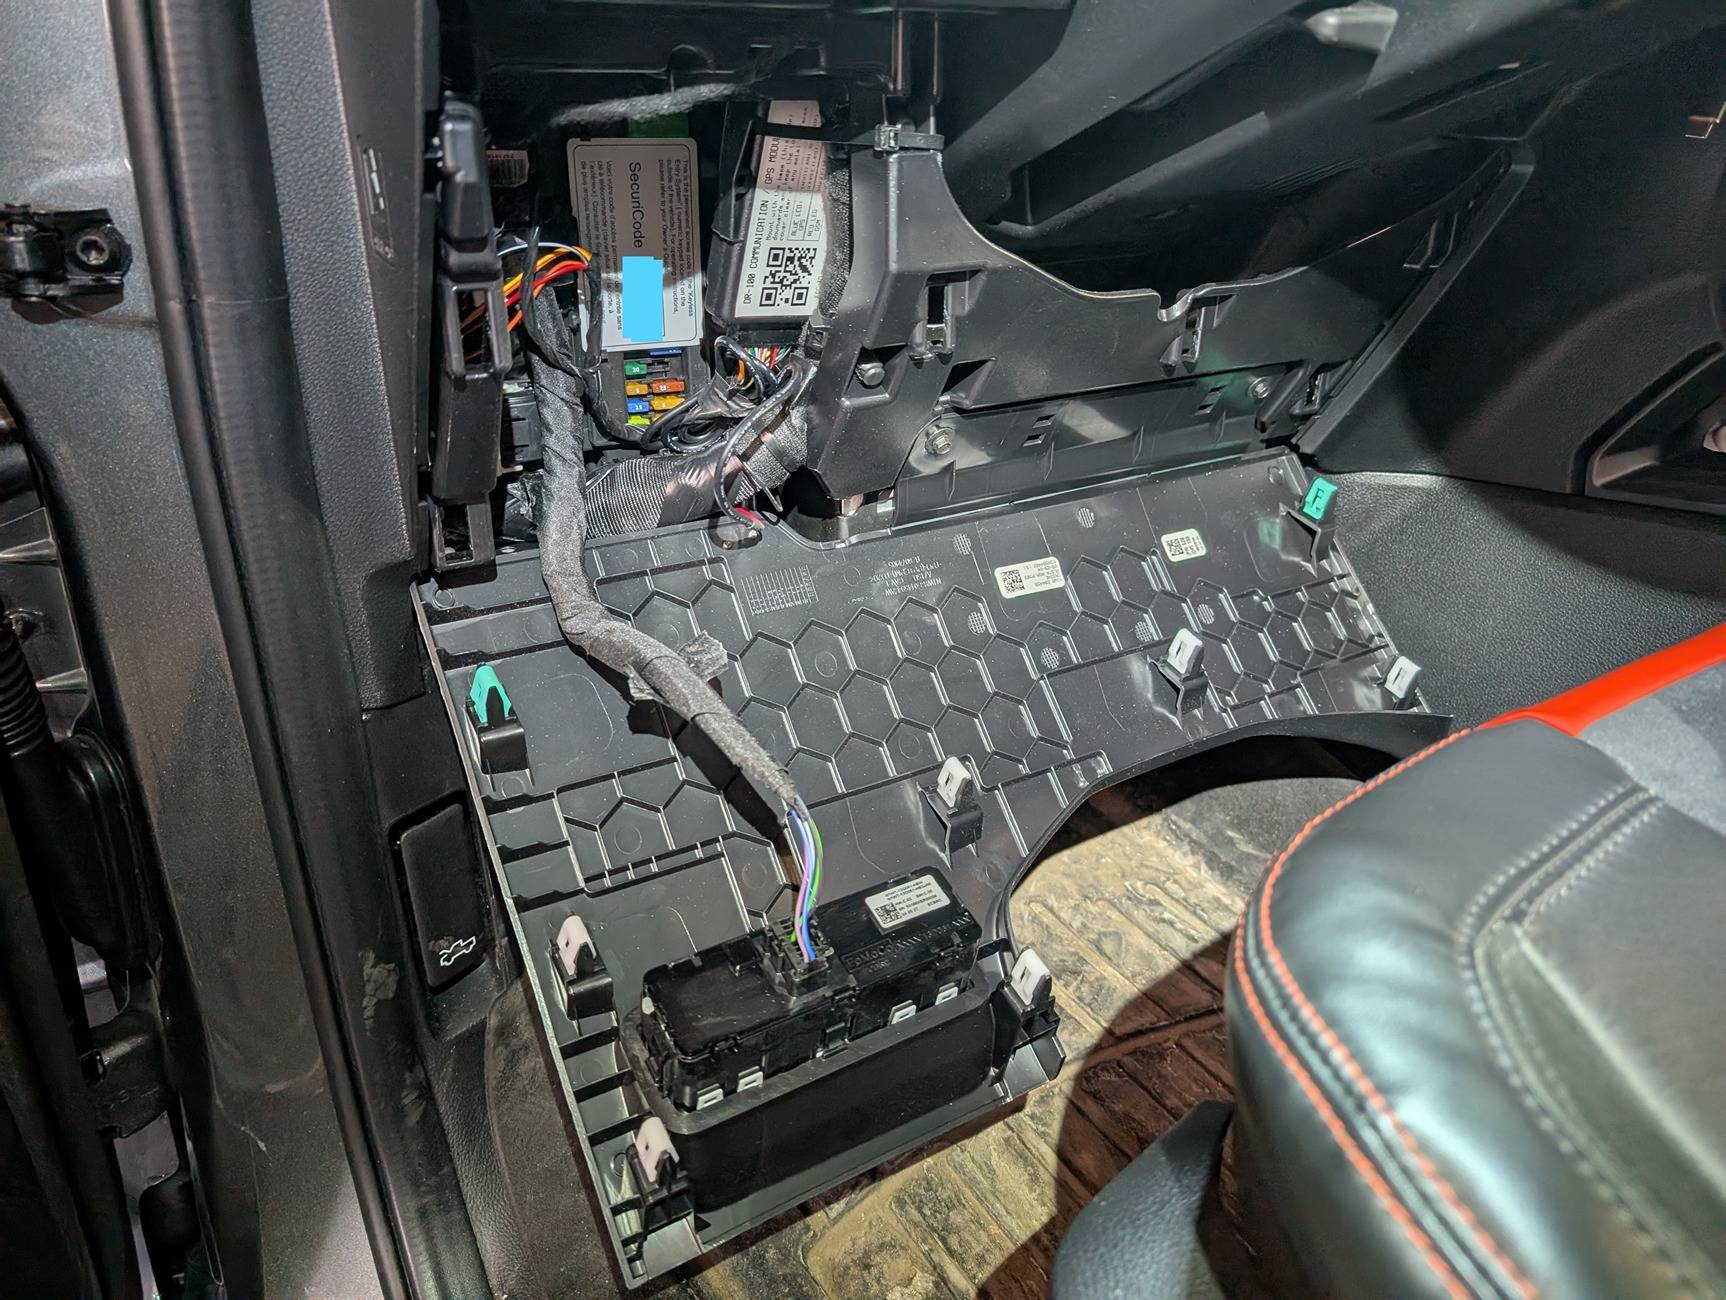
To power the KEYLOC, I used an add-a-fuse on fuse number 35 in the fusebox behind the headlight controls under the steering wheel:
At this point there's a power lead from Aux #2 under the hood for the GMRS radio, an ignition-switched power lead from fuse #35 for the KEYLOC, and the main power lead for the amplifier from the battery.
Sound deadening for the back seat and wall
Back to sound deadening, I removed the amp bracket and pulled down the carpet in the back and put sound deadening in. The carpet on the back wall is run through by the center seatbelt so you can't really remove it - I just folded it in half when working on one side or the other.
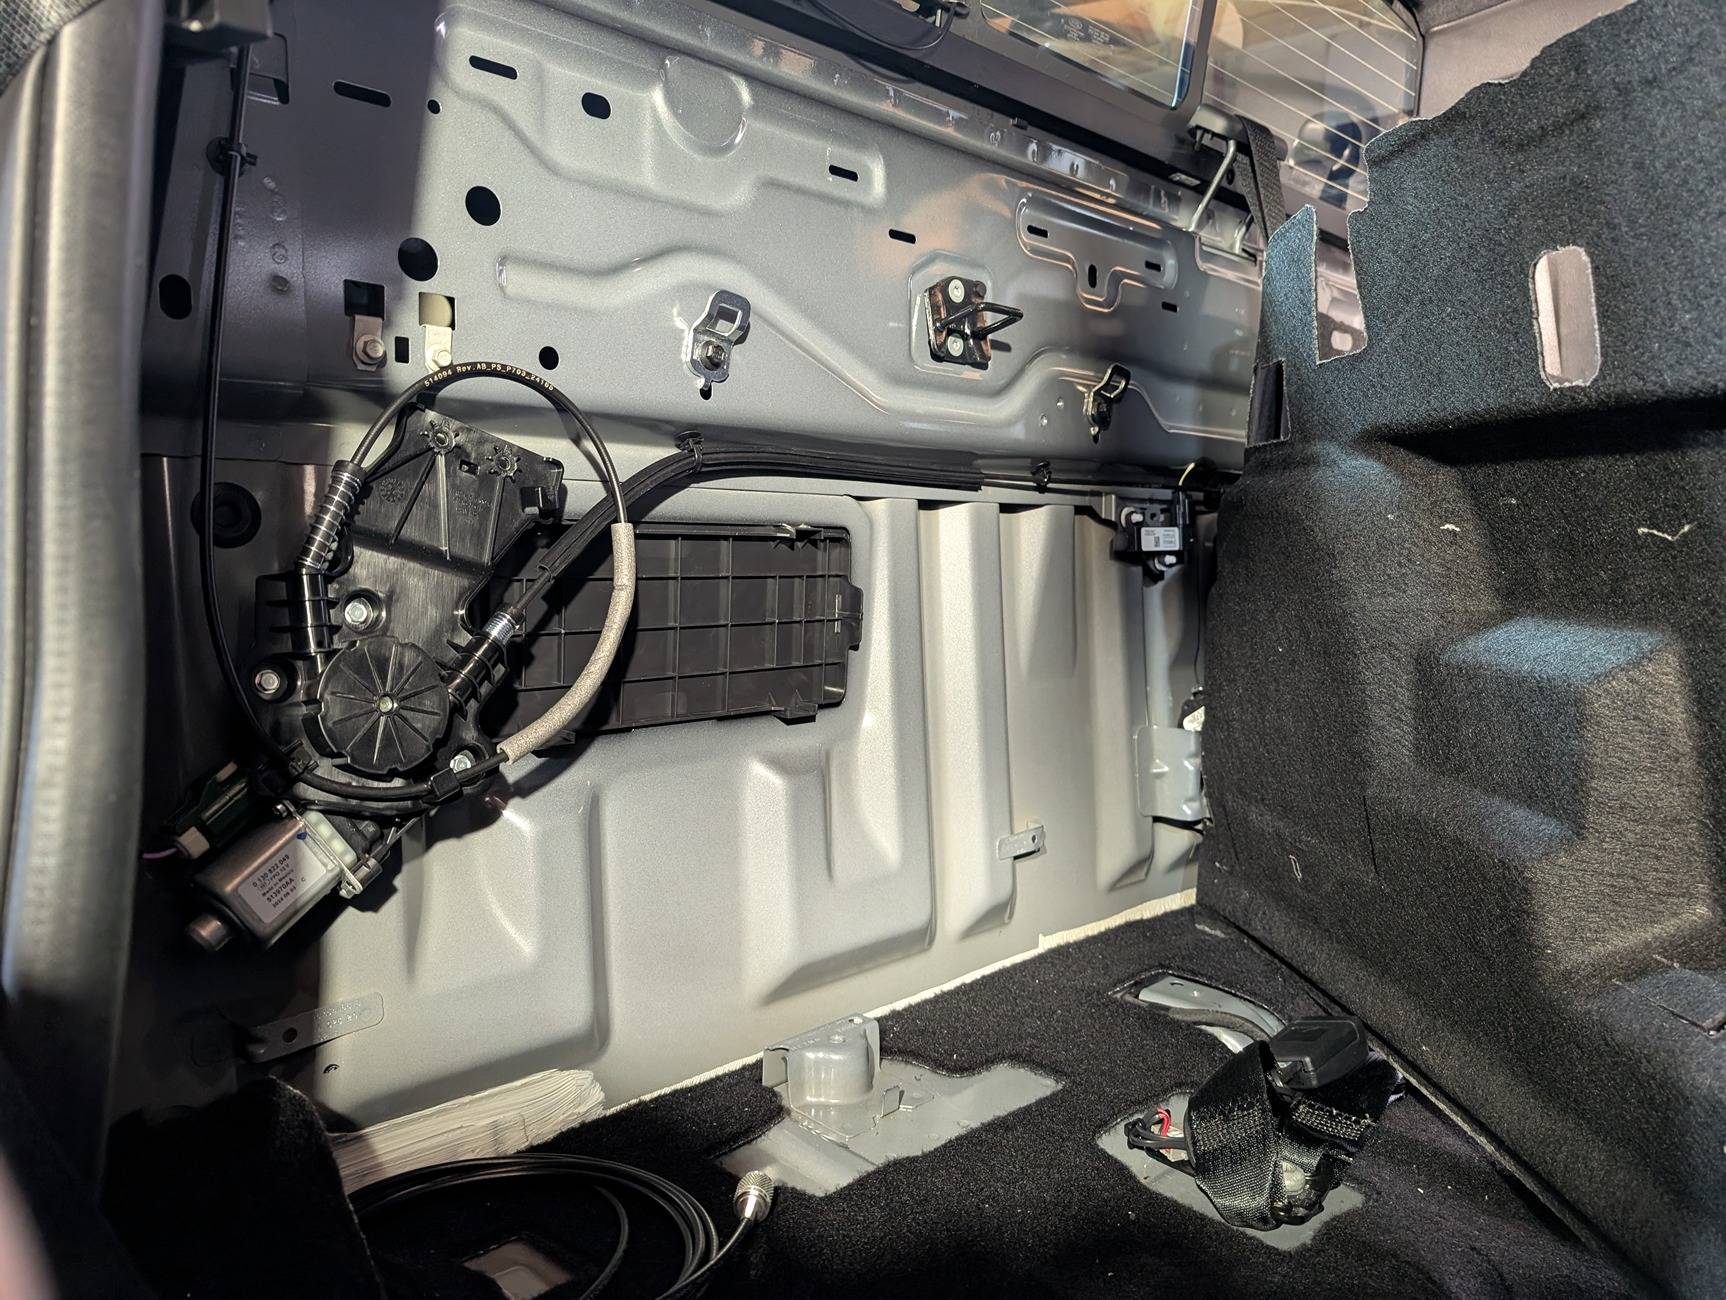
Driver's side back wall with the factory amp removed
Passenger side:
Now with some sound deadening on the passenger side
And on the driver's side. This is a bit of a mess but there's a lot of holes that are used to align the carpet and other parts so I just put blocks in to cover most of it.
And the floor under the back seats. I should have run the ethernet cable from the center console storage at this point, would have been better. Instead I tore this apart again later, so if you plan ahead, run that cable now.
With a layer of foam on top:
Wiring to the battery
I ran the power cables in the channel on the driver's side right next to the door. You have to remove the door seal and then pop off the plastic door sill panels and the bottom of the B-pillar cover. It was fairly easy to run the cables but took some time to get it past the B-pillar. There's not much room but it was enough to fit the cables. I used a 4G cable for the amp which is overkill for a 250 watt amp but I'd rather have a lot more cable than needed. The GMRS and KEYLOC cables are 16g wires.
For the GMRS radio and the KEYLOC, I grounded them to the grounding point on the bracket that holds the stock amp. It's behind the carpet on the right side and held on with a bolt, it's where the factory amp is grounded.
For the amp, I ran a ground to the latch point and used a wire brush drill bit to scuff off the paint to make sure the amp has a good grounding point. I may go back and shorten the power and ground cables but I'm not sure. Going to wrap everything with the flexible cable wrap just to protect it a bit. I took the time to put ferrules on each wire and crimped them with a crimping tool.
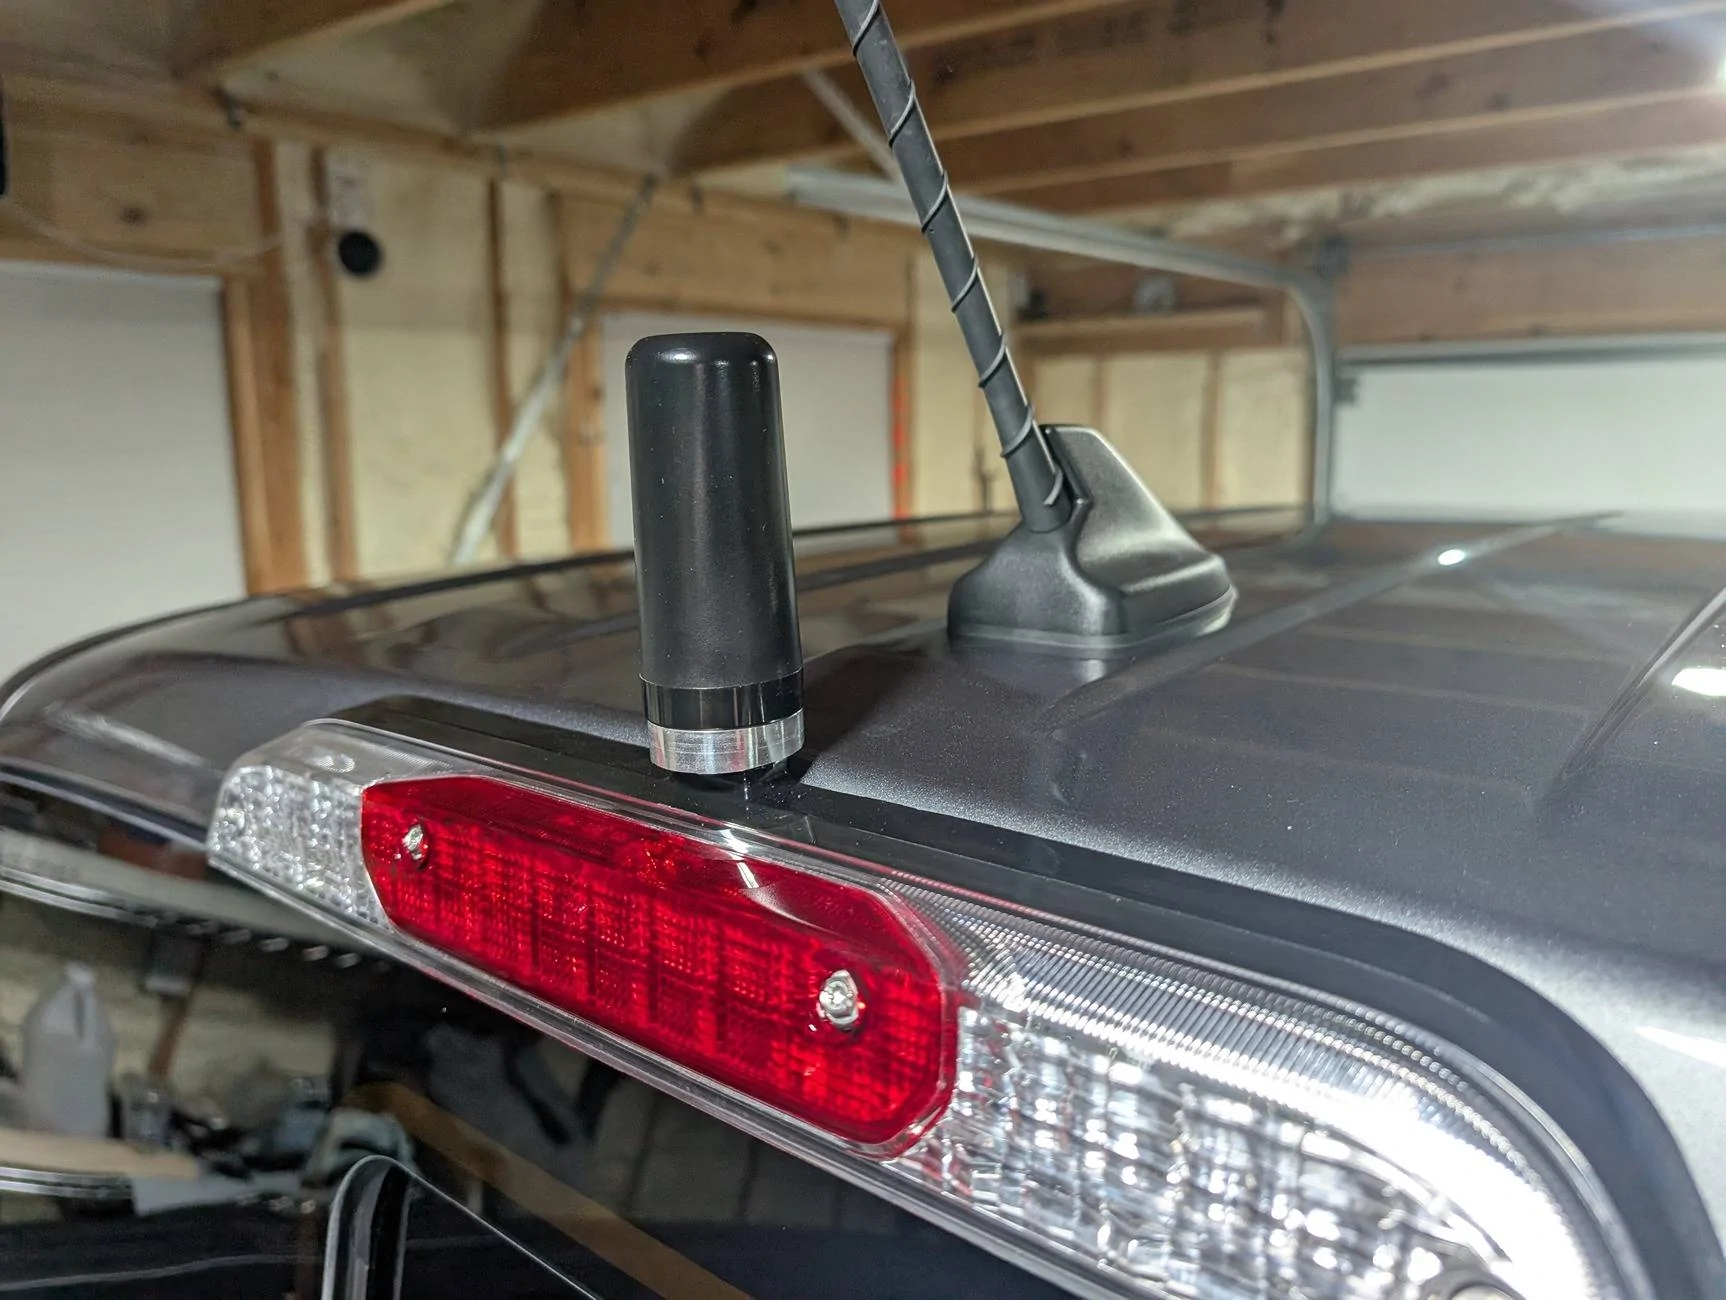
GMRS radio antenna and handset socket
I used a Bulletproof Diesel 3rd brake light antenna mount. It's clean and the antenna cable runs into the cab from the headliner, this takes a while to mount and I did this part when doing the sound deadening in the roof because I wanted to get the cable into the cab and under the headliner to run down the C-pillar.
The instructions are very clear but there's a lot of steps since you need to align it, drill some holes behind the light and then run the cable. Turned out really nice, looks like it was OEM.
I installed an RJ45 plug in the center console to replace the 12v connector there. This works well since it's raised off the bottom and there's a cable channel in the lid of this compartment. I don't think I'd ever use this 12v connector any way.
For this, I used a tapered drill bit to round out the existing hole (it's slightly too large to re-use directly but not large enough to work right). Then I cut yet another little piece of ABS plastic to fit that corner, used the taper bit again to make the right size hole for the RJ45 plug housing. Stuck the whole thing down with two layers of 3M VHB tape to keep it in place. Looks pretty good and the little cap on the plug keeps it clean when not in use.
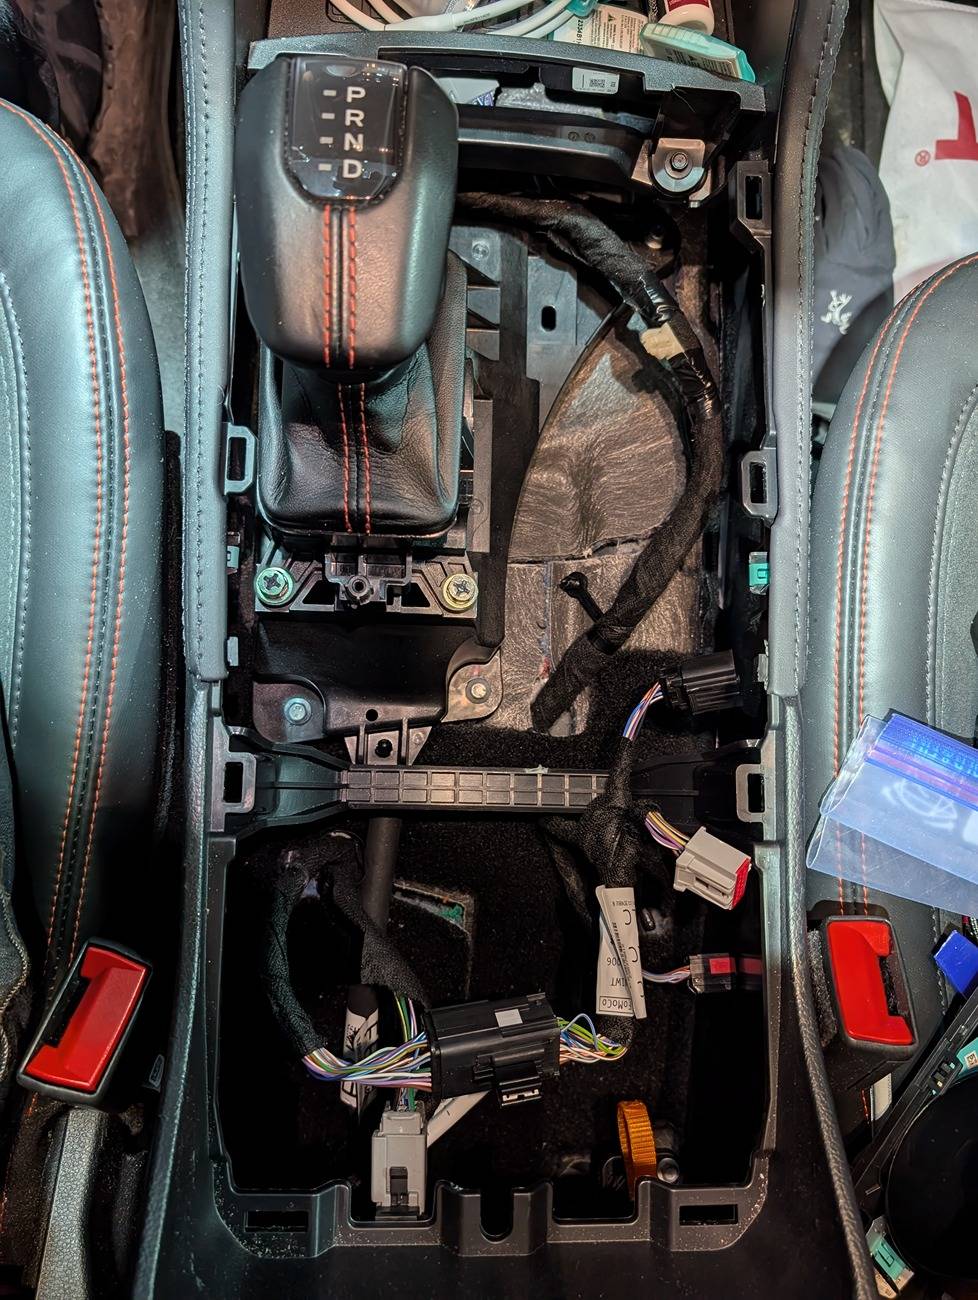
To get into this compartment, you need to remove the trim around the gear shift, then remote 3 bolts and then pop the center console up. Then remove the 12v plug and unplug it from the wiring harness, I wrapped the plug in cloth tape and tucked it away. From here you can run a standard ethernet cable to the back wall under the sound deadening fabric and carpet. I used a nice monoprice Cat6 cable just because it's very durable.
Finishing up
Finally time to button up the carpeting and install the sub. The stealthbox fits perfectly in the storage compartment once you have removed the plastic liner and is a high quality box made of fiberglass, filled with batting and covered with carpet. I wrapped all the cables with the mesh cable loom, tucked all the wires in and wrapped various parts with fabric tape.
Here's a pic with the rear seat back in place. You need to keep that GMRS radio as close to the back wall as possible, and as low as possible (without making it impossible to remove the jack). The seat just barely latches when I "slam" it -- I'm going to try a couple things to make it work better, maybe some washers to space the black latch bracket forward a bit. But, the seat does latch and it all tucks in nicely.
Everything worked the first time, ha! This was a lot of work but getting it all done at once made it fit together and I didn't want to add the GMRS later, etc, because the space is so constrained behind that seat. Another option would be a different ABS panel above the factory amp, that might have a little more room to work with.
Amplifier Replaced -- AudioControl ACM 1.300
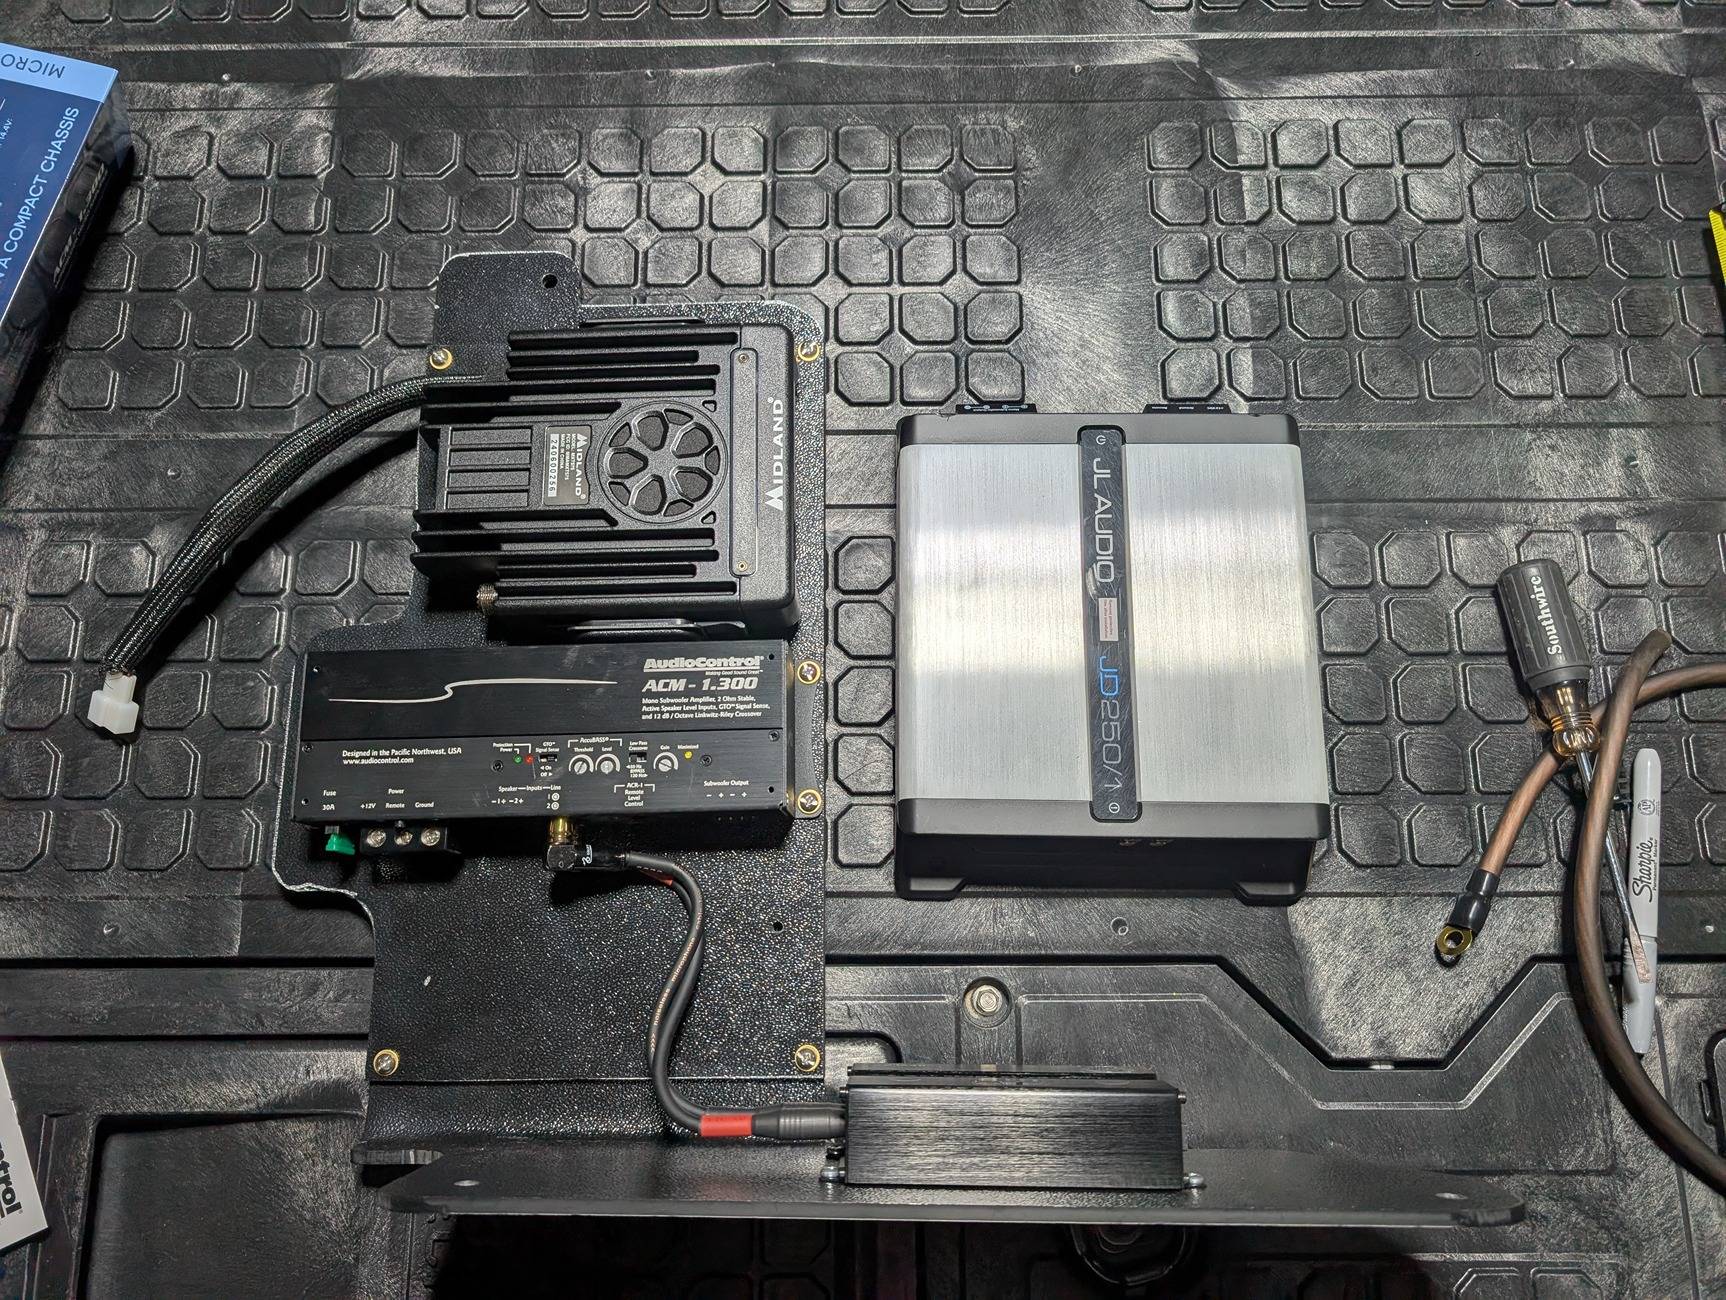
I went back and replaced the amplifier with an AudioControl ACM 1.300, it is much smaller than the JD250/1. Here you can see just a size comparison between the two. I modified the bracket a little more to have a cutout and give me more room to run cables near the jack.
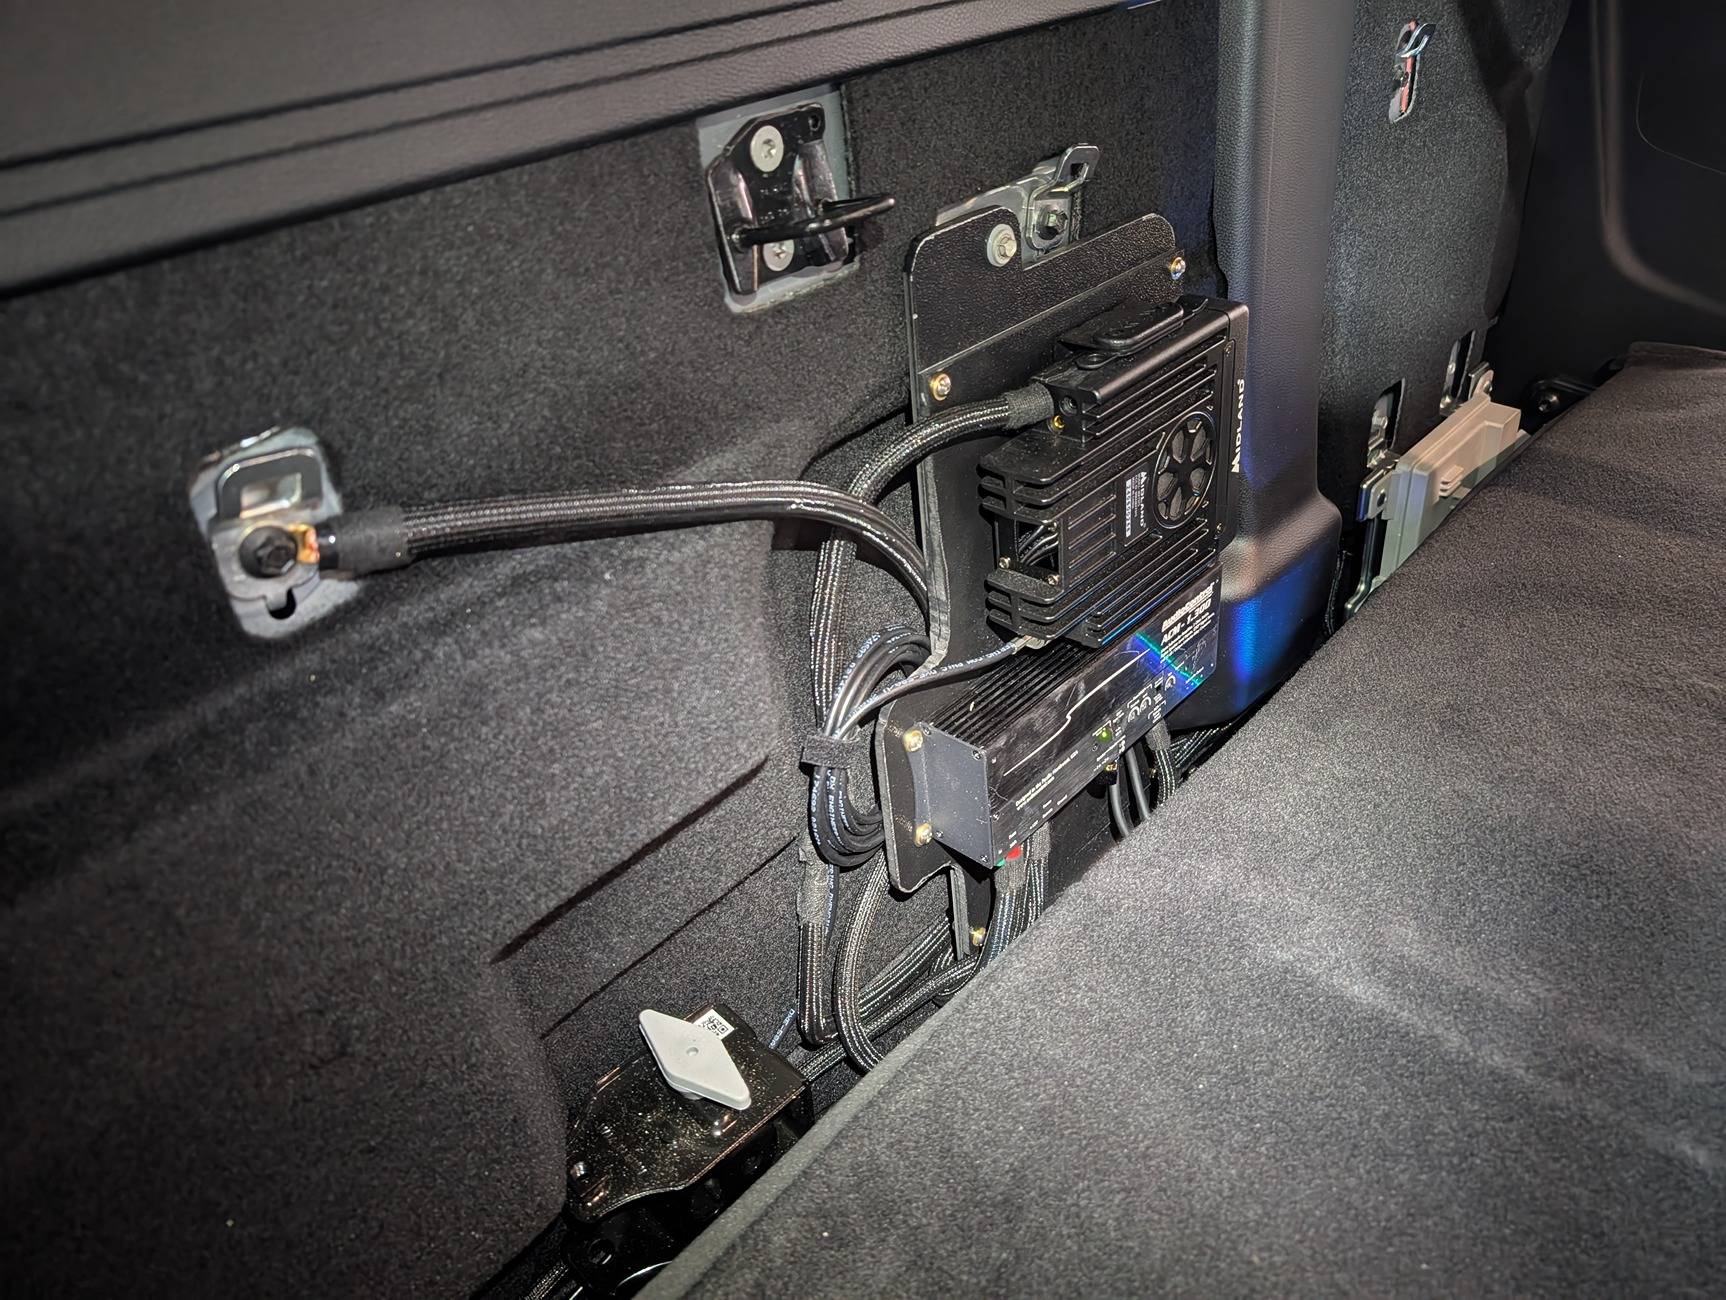
The JD250/1 has the connections on the sides and the ACM 1.300 has them all on the bottom, so I still mounted the amp well above the floor. I think I could have got it closer, but even as is it allowed me to move the GMRS radio down by about 2 inches. This was enough that I don't need to have spacers in the back seat latch.
Much better setup now honestly, the ACM 1.300 is better for this install just because of the space. The connectors on the JD250/1 are better (hex head screws, larger sockets) but overall this is a better setup now.
And another pic with the cover plate on the amp.
Amplifier and KEYLOC Settings
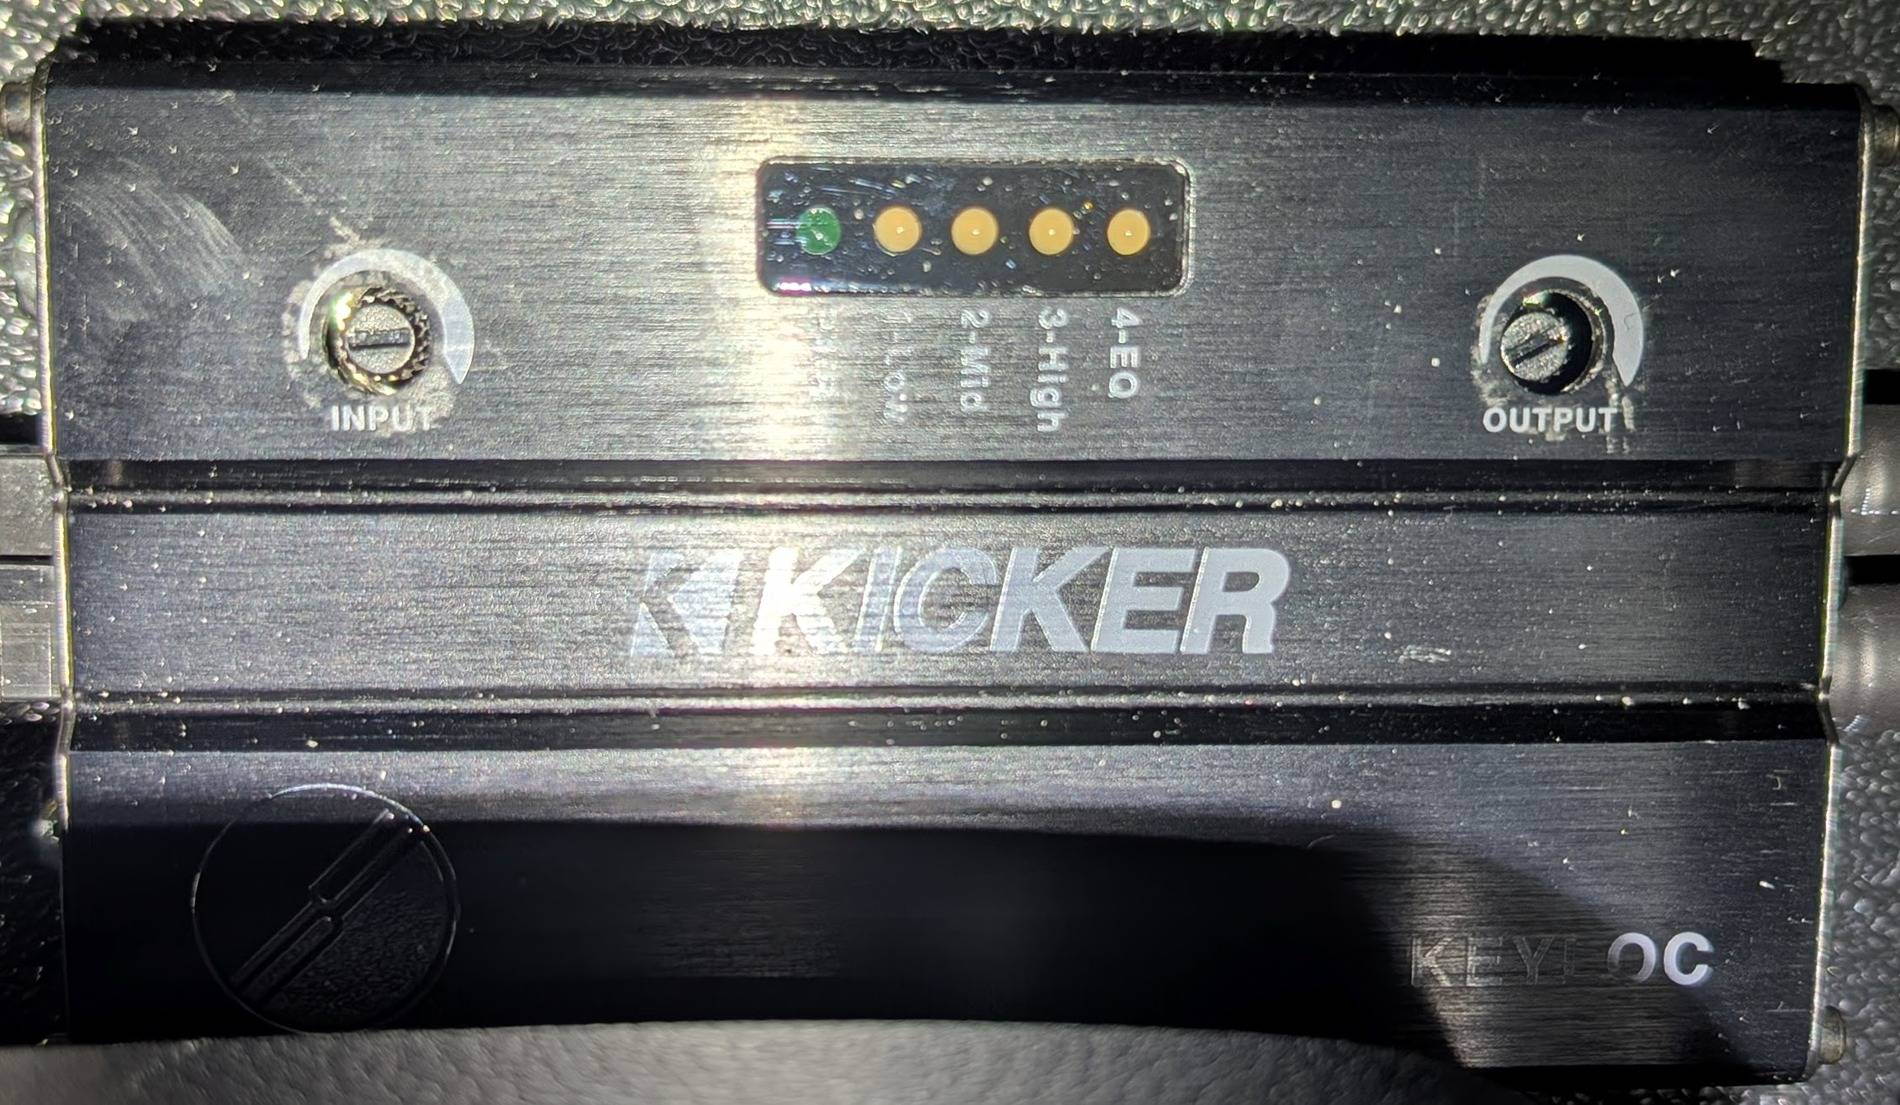
I took the cover stickers off the KEYLOC and adjusted the OUTPUT gain down about 50% from where it was. I didn't adjust the INPUT gain, and I covered these up with wiring harness tape to keep dust out.
OUTPUT gain is now at about 8 o'clock.

And on the ACM 1.300, after adjusting the KEYLOC output gain, I was able to adjust the gain and thresholds. All of them are set at about 10 o'clock.

With these settings, I was able to re-adjust the settings in the truck. I've now got Treble at +2, Mids at +3 and Bass at -1. Sounds fantastic and doesn't bottom out or get muddy. Really happy with how it turned out.
These changes make a HUGE difference. The speakers are a lot more detailed and clean sounding, and that sub is ridiculous. I have it turned all the way down and it's just got incredibly deep bass and punch. Sounds so, so good.
The back wall without the seat -- Midland MXT575 GMRS radio, JL amp for the sub, KEYLOC right behind the seatbelt and tied into the factory amp on the right. You can see the Stealthbox sub on the bottom left with the speaker cable running to it.
Closeup of the GMRS radio and amp on a custom ABS plastic bracket that replaces the factory sub. Kicker KEYLOC on the bottom right, which is the device that adapts the factory stereo to add a sub, Sounds Good Stereo sells these with an adapter cable that plugs right into the factory amp and is super clean.
GMRS radio handset plug replacing the 12v connector in the center console storage area. Stays out of the way and to use, just plug in the handset and flip aux switch #2

Parts used in this setup
Speakers and Subwoofer
- Front doors: Focal Ford Inside IS 690
- 6x9 speakers with separate tweeters
- https://www.crutchfield.com/p_091ISFOR69/Focal-Inside-IS-FORD-690.html
- Rear doors: Focal Ford Inside IC 165
- 6.5" speakers with integrated tweeter
- https://www.crutchfield.com/p_091ICFOR65/Focal-Inside-IC-FORD-165.html
- Center Channel: Kicker KSC350
- Subwoofer: JL Audio 10" StealthBox
- Speaker wire for the sub
- Amplifier: JL Audio JD250/1
- https://www.crutchfield.com/p_13698360/JL-Audio-JD250-1.html
- Replaced with the ACM 1.300 below
- Amplifier: AudioControl ACM 1.300
- Kicker KEYLOC with wiring harness
- Choose the 8-speaker B&O version. This adapts the factory amp to a clean output for the sub amp. This comes with an adapter cable that plugs directly into the factory amp. You could keep the factory sub but I used that space to mount the amp and radio, the stock sub is terrible anyway.
- https://soundsgoodstereo.com/produc...ad-description-below-1?variant=45508080468180
- ABS plastic panel used to make the mounting brackets
- Mesh cable wrap - I like this a lot more than the hard plastic cable protectors. Comes in various sizes.
- Ferrules and crimping tool
Sound deadening
- Sound deadening panels - Siless "hybrid" heat and sound panels
- Foam used on top of the panels
- Deadening around the speakers
GMRS radio, antenna and mount
- Midland MXT575
- Midland stubby antenna
- Midland upgraded handset
- Bulletproof Diesel 3rd brake light antenna mount
- RJ45 plug for the center console storage
- Ethernet cable
Misc
- Trim removal tools
- Cloth tape
- 3M VHB tape
- 6" RCA cable
- Antenna cable ends for shortening the antenna line
- Heat gun
- Heat gun nozzles for focusing the heat to bend the ABS panel
- Wire strippers
Door speakers and sound deadening install
The Focal 165 fit the rear doors and the Focal 690 fit the front. I didn't install the tweeters because I'd already taken down the headliner and didn't want to pull apart the A-pillars again. Taking the doors apart is easy, and the Siless "hybrid" sound deadening has a mylar layer instead of metal, so it's easy to install with your hands. Getting it into the door is a bit awkward but overall pretty easy.
I didn't take pics when I was doing the roof, it's a big hassle to take the headliner down, but it is worth it. I used flaberdoopin's video as a reference and that was really handy.
Here is a door finished with the deadening and then a layer of foam on top:
And this is with just the deadening and a test fit of the speaker
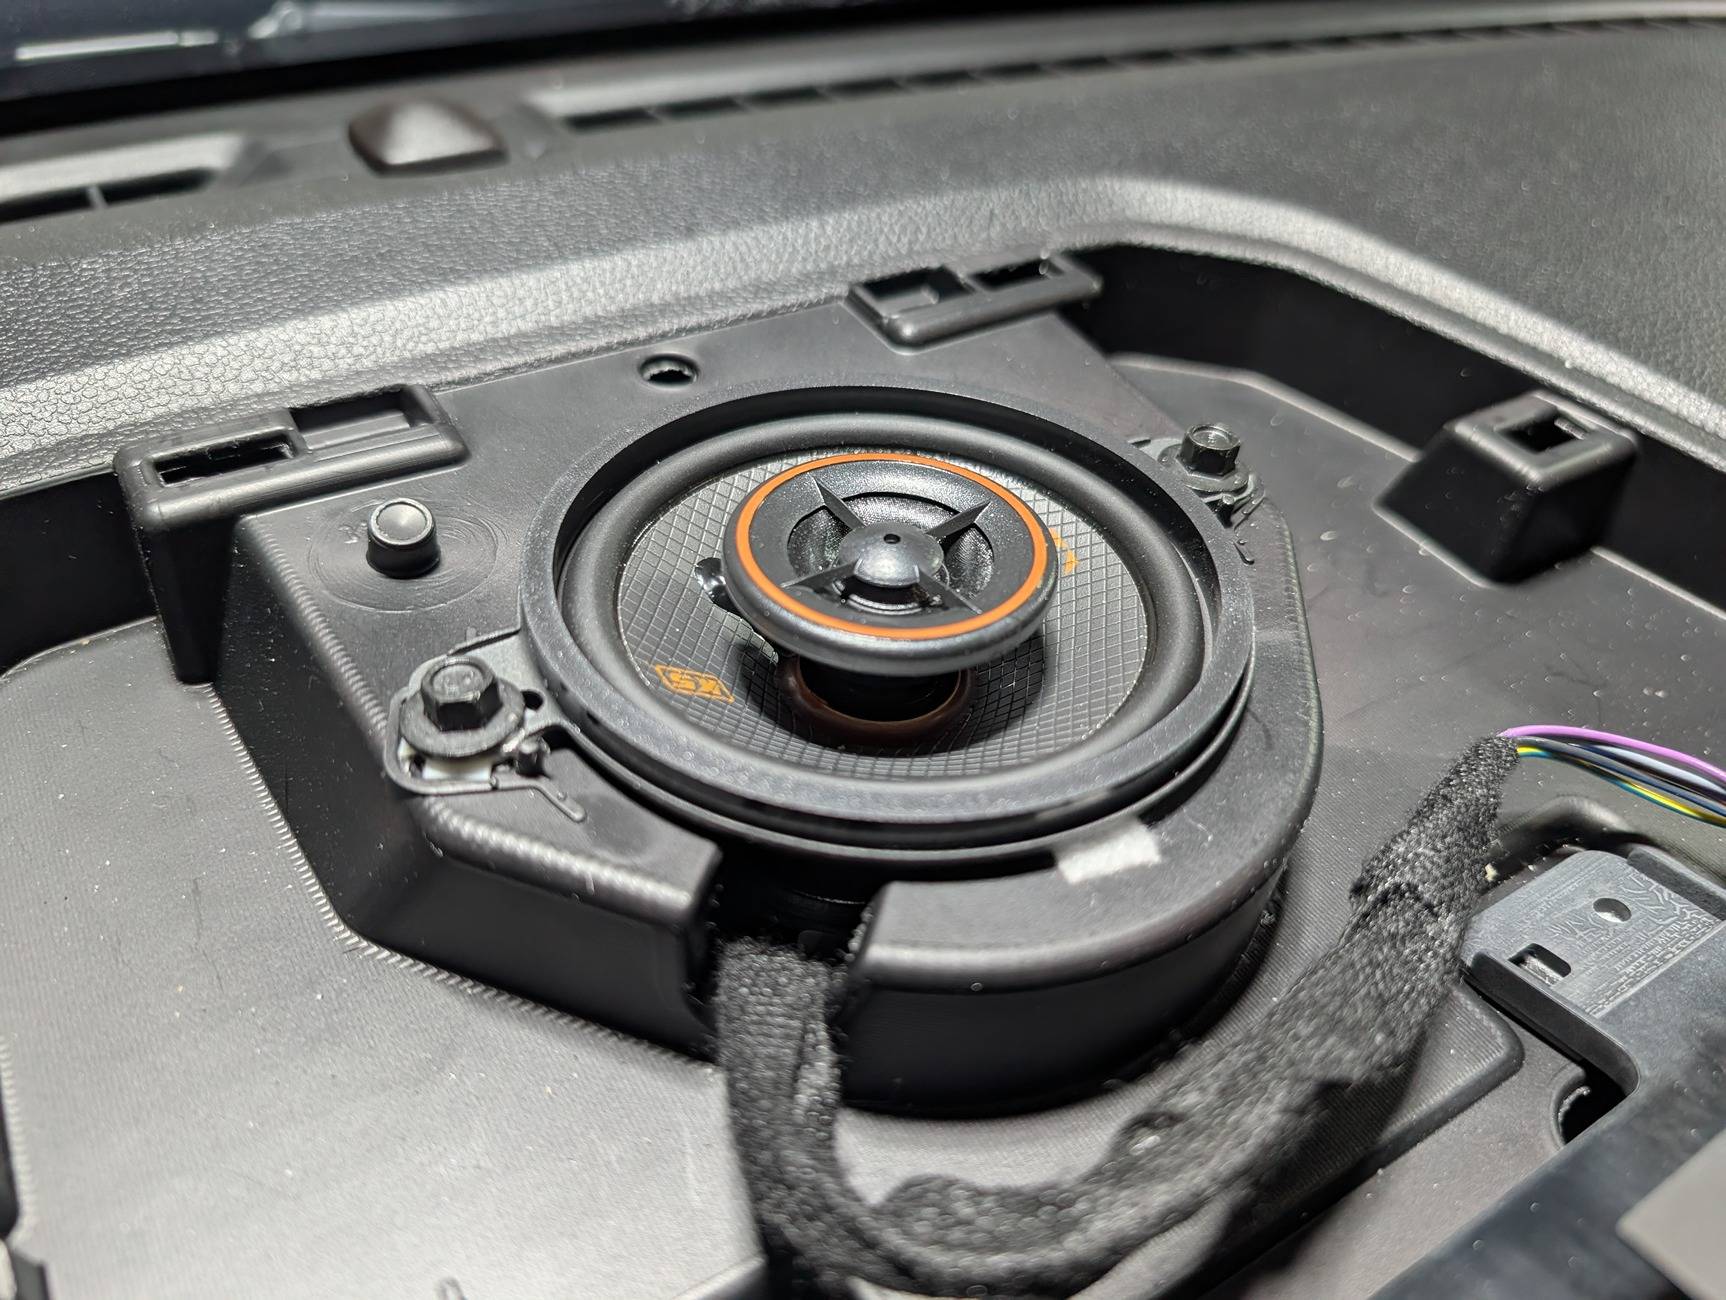
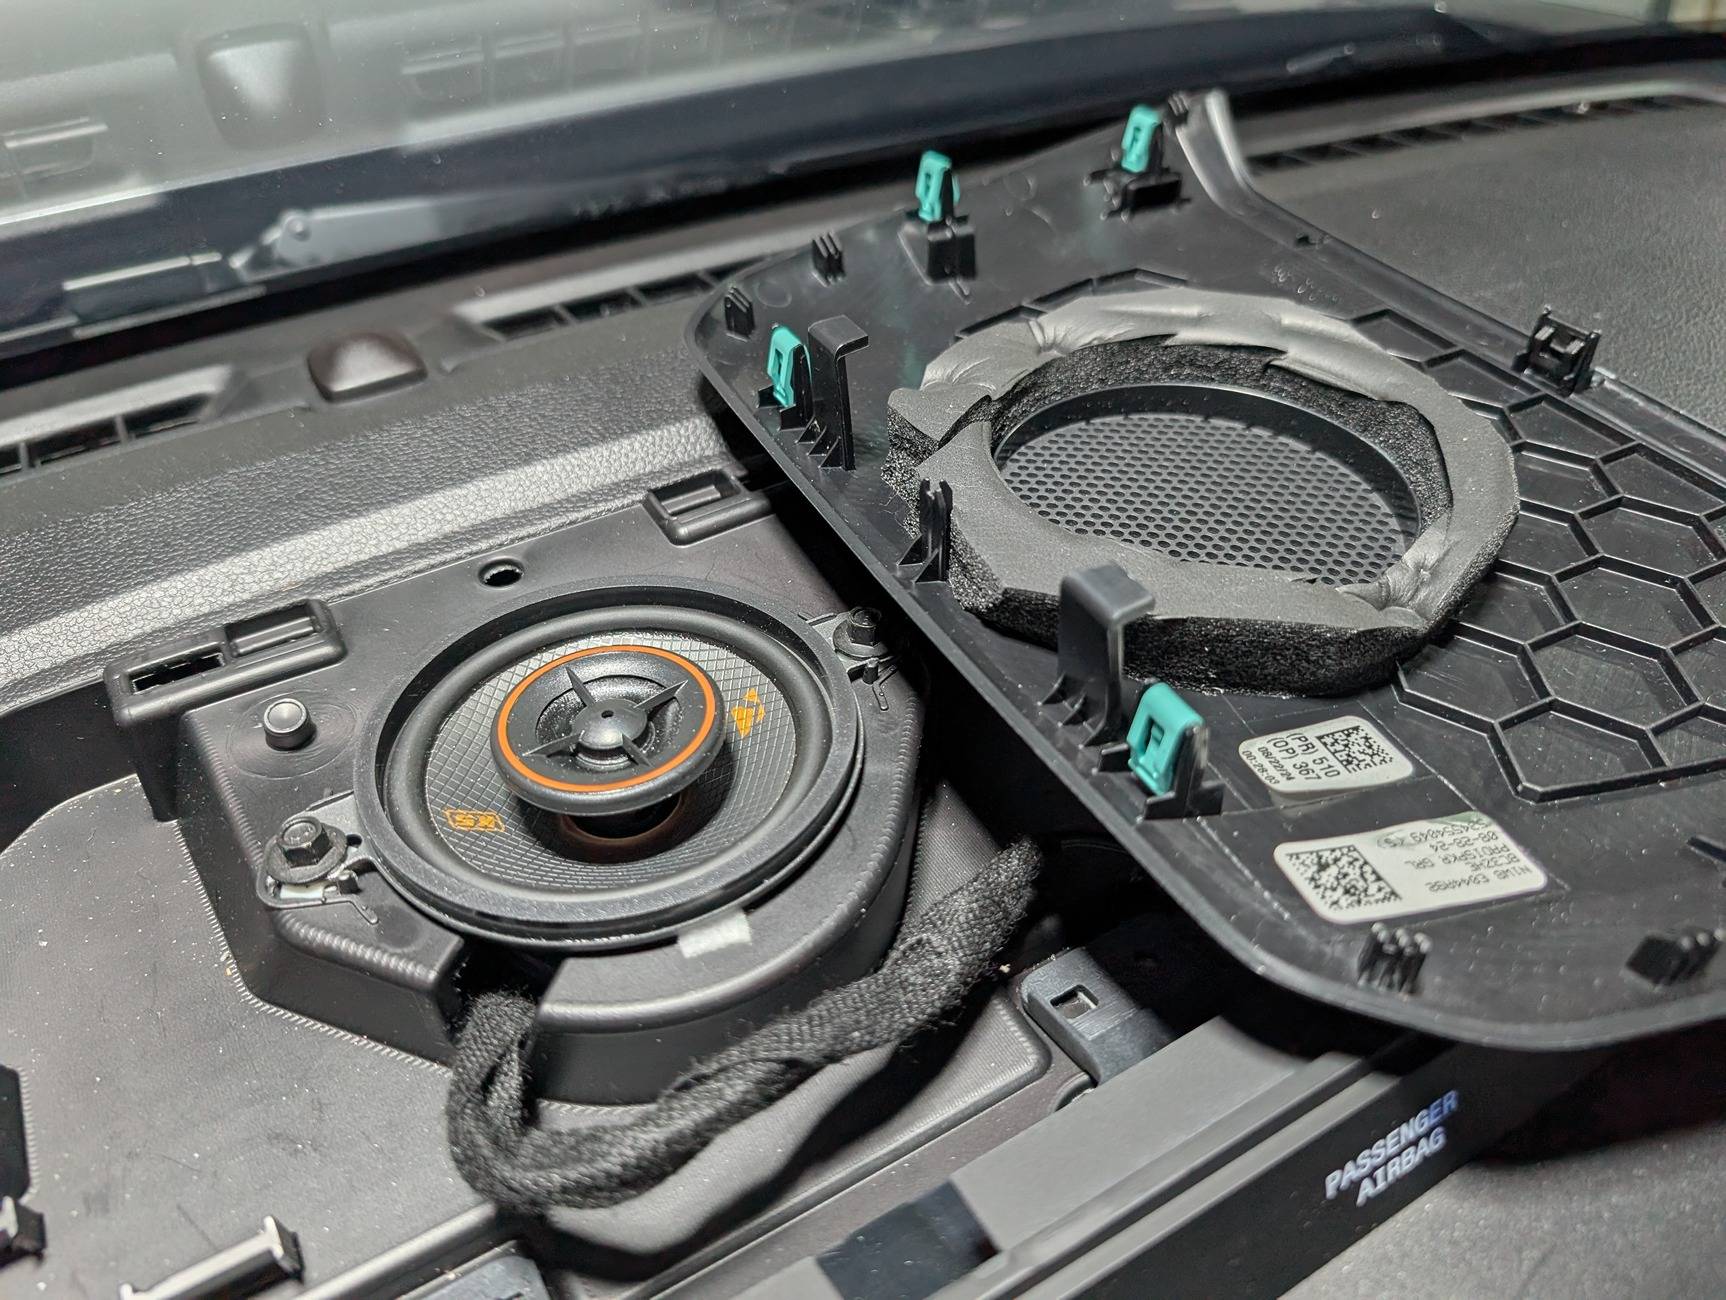
Center Channel Speaker
I replaced the center channel speaker on the dash with a Kicker KSC350. Thanks to @GLW for the recommendation and wire polarity.
On the wiring from the plug, the solid white wire is positive and the multi-color wire is ground. I just dismantled the stock speaker to re-use the plug. It's held to the stock speaker with a rivet that pulls through the plastic bracket. You could also just clip the existing cable and wire it in.
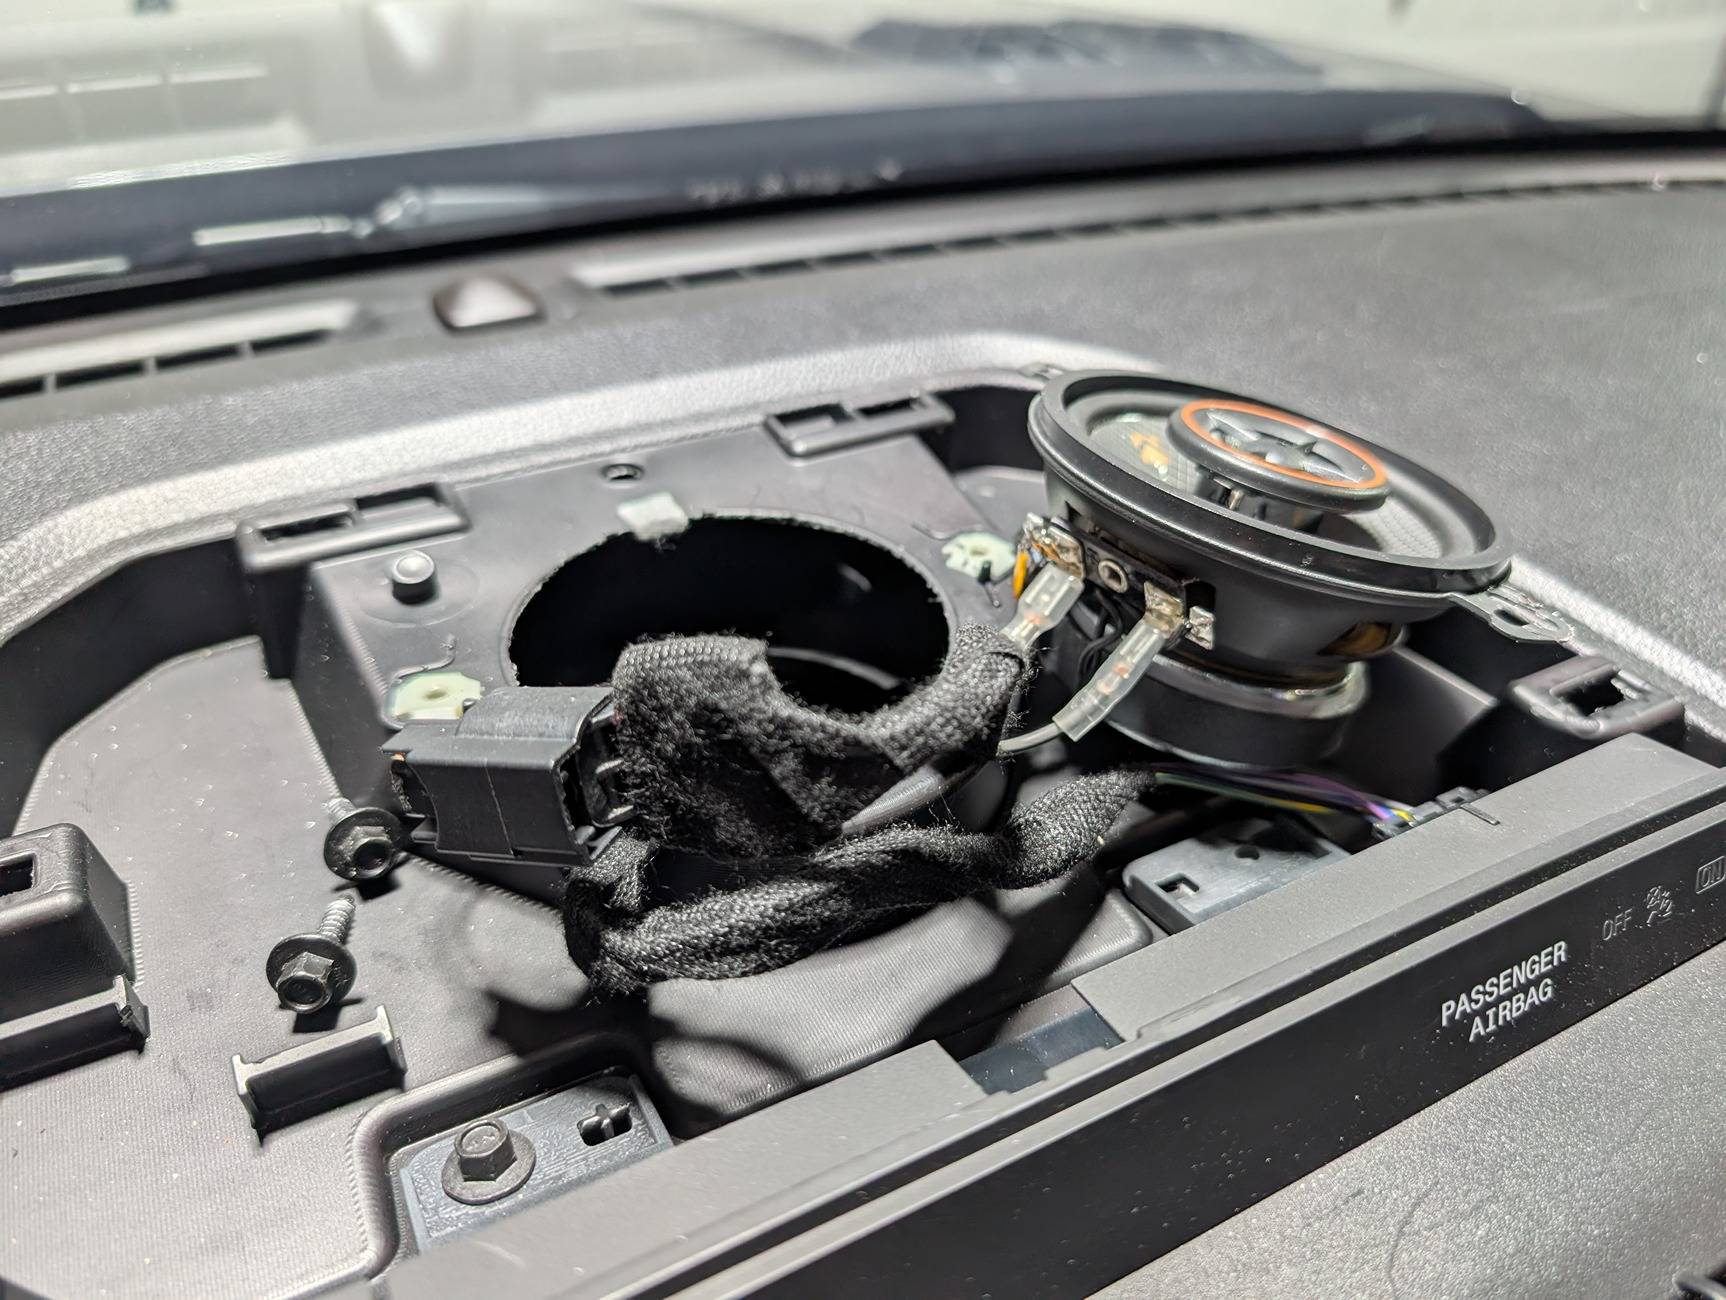
The speaker fits best with the contacts towards the front of the vehicle, this let the speaker sit down in the cavity.
I cut out some spare foam and put a ring on the center console speaker grille -- this did seem to help.
Subwoofer and GMRS radio install
First you have to take out the rear seat. There's two 13mm bolts on either side of the seat, right next to the back wall. There's some carpet to pull forward and then the bolts are visible. You need to disconnect the center seatbelt and then fish the belt receivers through the seat before removing it. Not too difficult but the seat is awkward to move around. There's a YouTube "Ranger rear seat delete" video that's helpful here, even though it's for a 5G ranger it's exactly the same on the 6G.
Here's the back with the seat removed, ready to get torn apart
Next remove the factory sub. There's three bolts, the top one is slightly smaller. I re-used these bolts but added nylon spacers and washers when I put the ABS mounting bracket in later.
I built a mounting bracket for the amp and radio to replace the stock sub using an 18x24 ABS panel.
I made a cardboard cutout of how to cut the ABS to make the bracket. If you want to recreate this, these are the measurements and the 10" x 14" part is just cut out from the right half of the main panel, then bolted together (pics below). Here's the measurements:

I cut out the ABS panel using a jigsaw and a plexiglass blade, it was very easy to cut. Then to bend the bottom part I used a heat gun and a metal shop drawer as a jig. You have to get the ABS up to temperature and then it bends easily, then hold it in place while it cools. Here's the unfinished panel testing the fit:
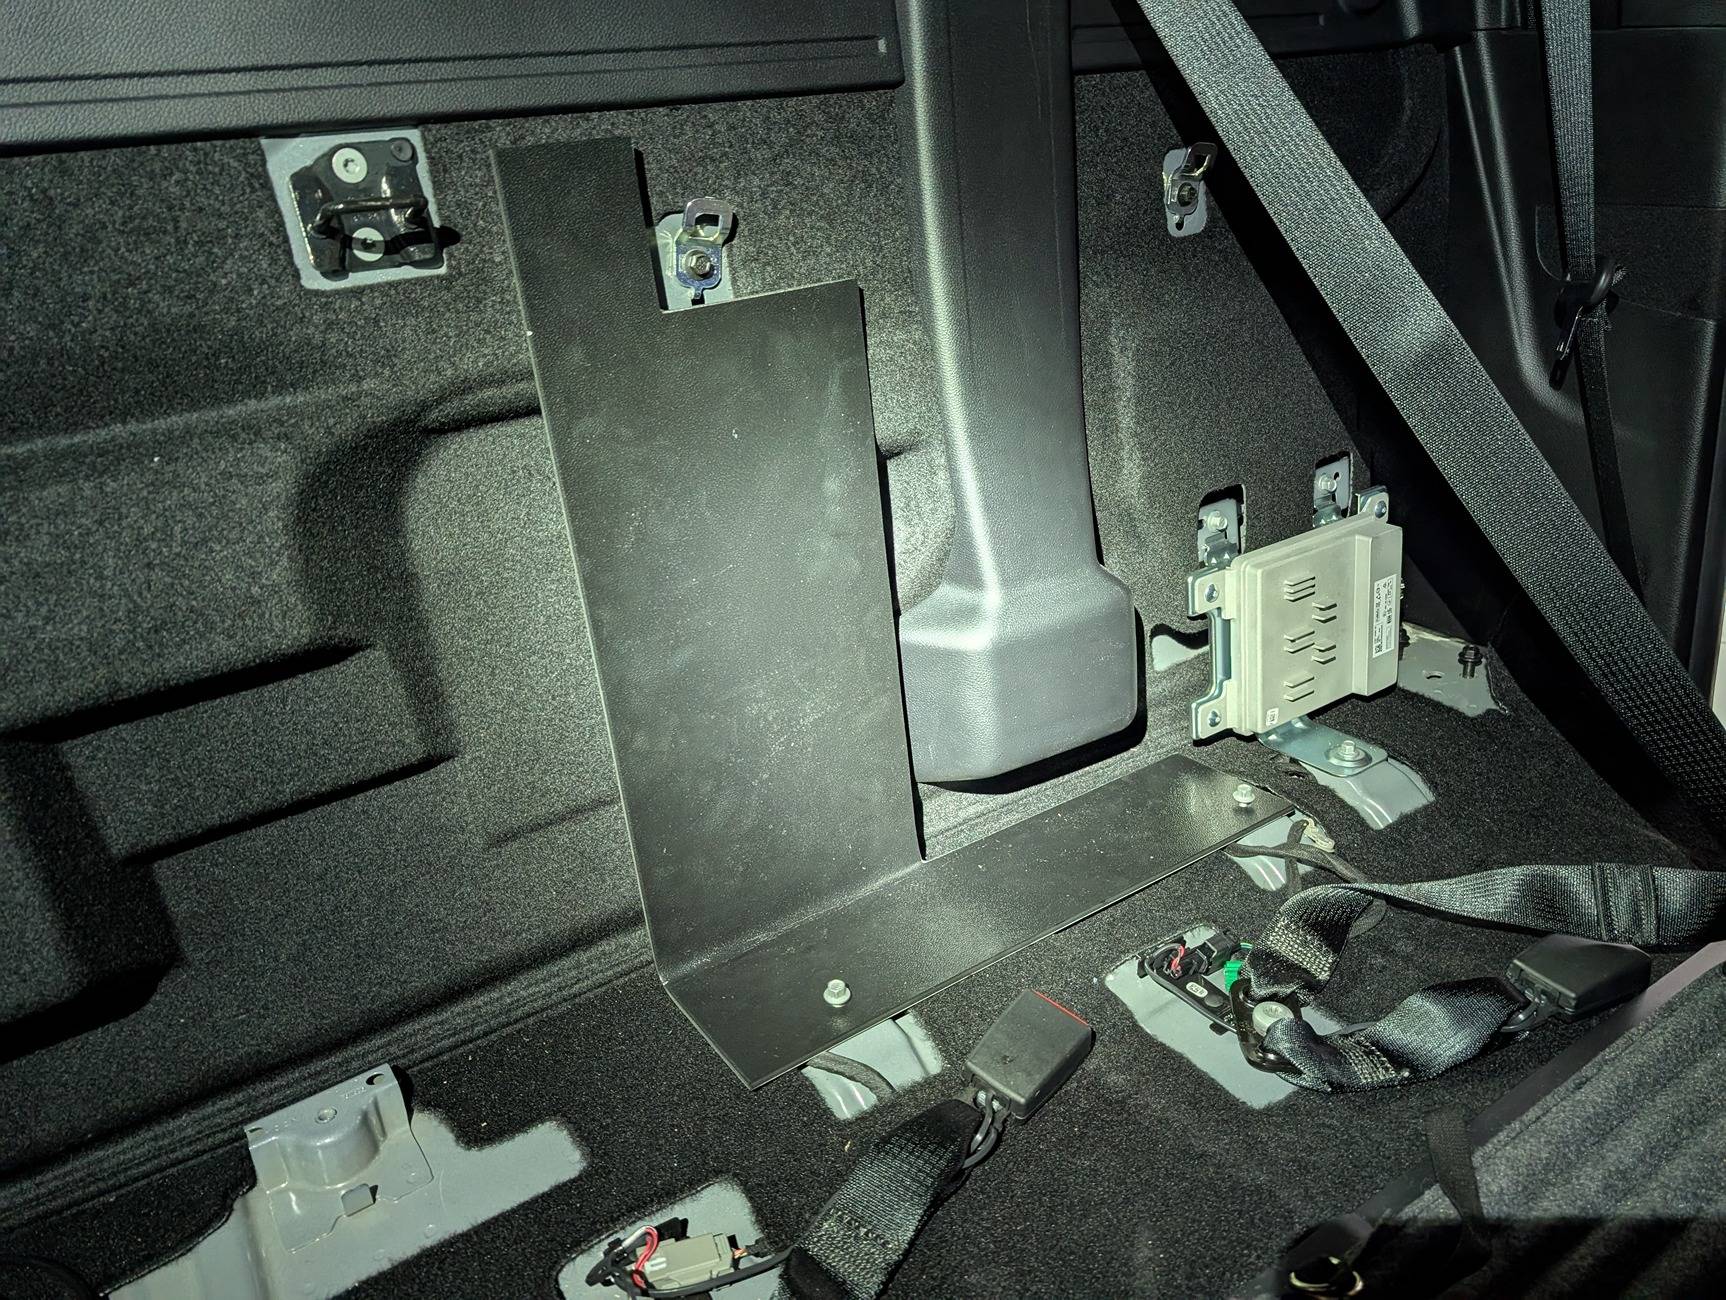
I cut it down some more to round the corners and so that the jack wouldn't interfere with it:
I bolted the spare section of ABS to this main one and then mounted the amp and radio. Amp on the bottom, GMRS on top and the KEYLOC on the bottom part. This way the Sounds Good Stereo adapter Y-cable fits easily, all plugs worked as-is, everything just snapped together. I taped off the stock subwoofer input just to keep it clean but the stock sub is gone.
The KEYLOC adapter cable has three bare wires. Yellow needs to be wired to fuse #35 (or some other ignition-switched source). Black is ground. Blue is a remote trigger for the amp to turn on.
Wiring into the battery and aux switch
Next, some wiring to the amp, KEYLOC and GMRS radio. On the driver's side of the engine bay, right on the back there is this grommet with two "wings" that you can pull out. This leads into the driver's footwell, behind some sound deadening fabric above and to the left of the brake pedal.
Run the amp power cable through this as well as a power lead to the GMRS radio. I used aux switch #2, which is the blue/orange one near the battery. Cable in and protected by some flex loom, zip tied to the cable.
On the battery there's an extra terminal, I used another piece of ABS plastic to make a fuse platform for the amp power line. The spare terminal is an M6, picked up a flange nut at the hardware store.
To power the KEYLOC, I used an add-a-fuse on fuse number 35 in the fusebox behind the headlight controls under the steering wheel:
At this point there's a power lead from Aux #2 under the hood for the GMRS radio, an ignition-switched power lead from fuse #35 for the KEYLOC, and the main power lead for the amplifier from the battery.
Sound deadening for the back seat and wall
Back to sound deadening, I removed the amp bracket and pulled down the carpet in the back and put sound deadening in. The carpet on the back wall is run through by the center seatbelt so you can't really remove it - I just folded it in half when working on one side or the other.
Driver's side back wall with the factory amp removed
Passenger side:
Now with some sound deadening on the passenger side
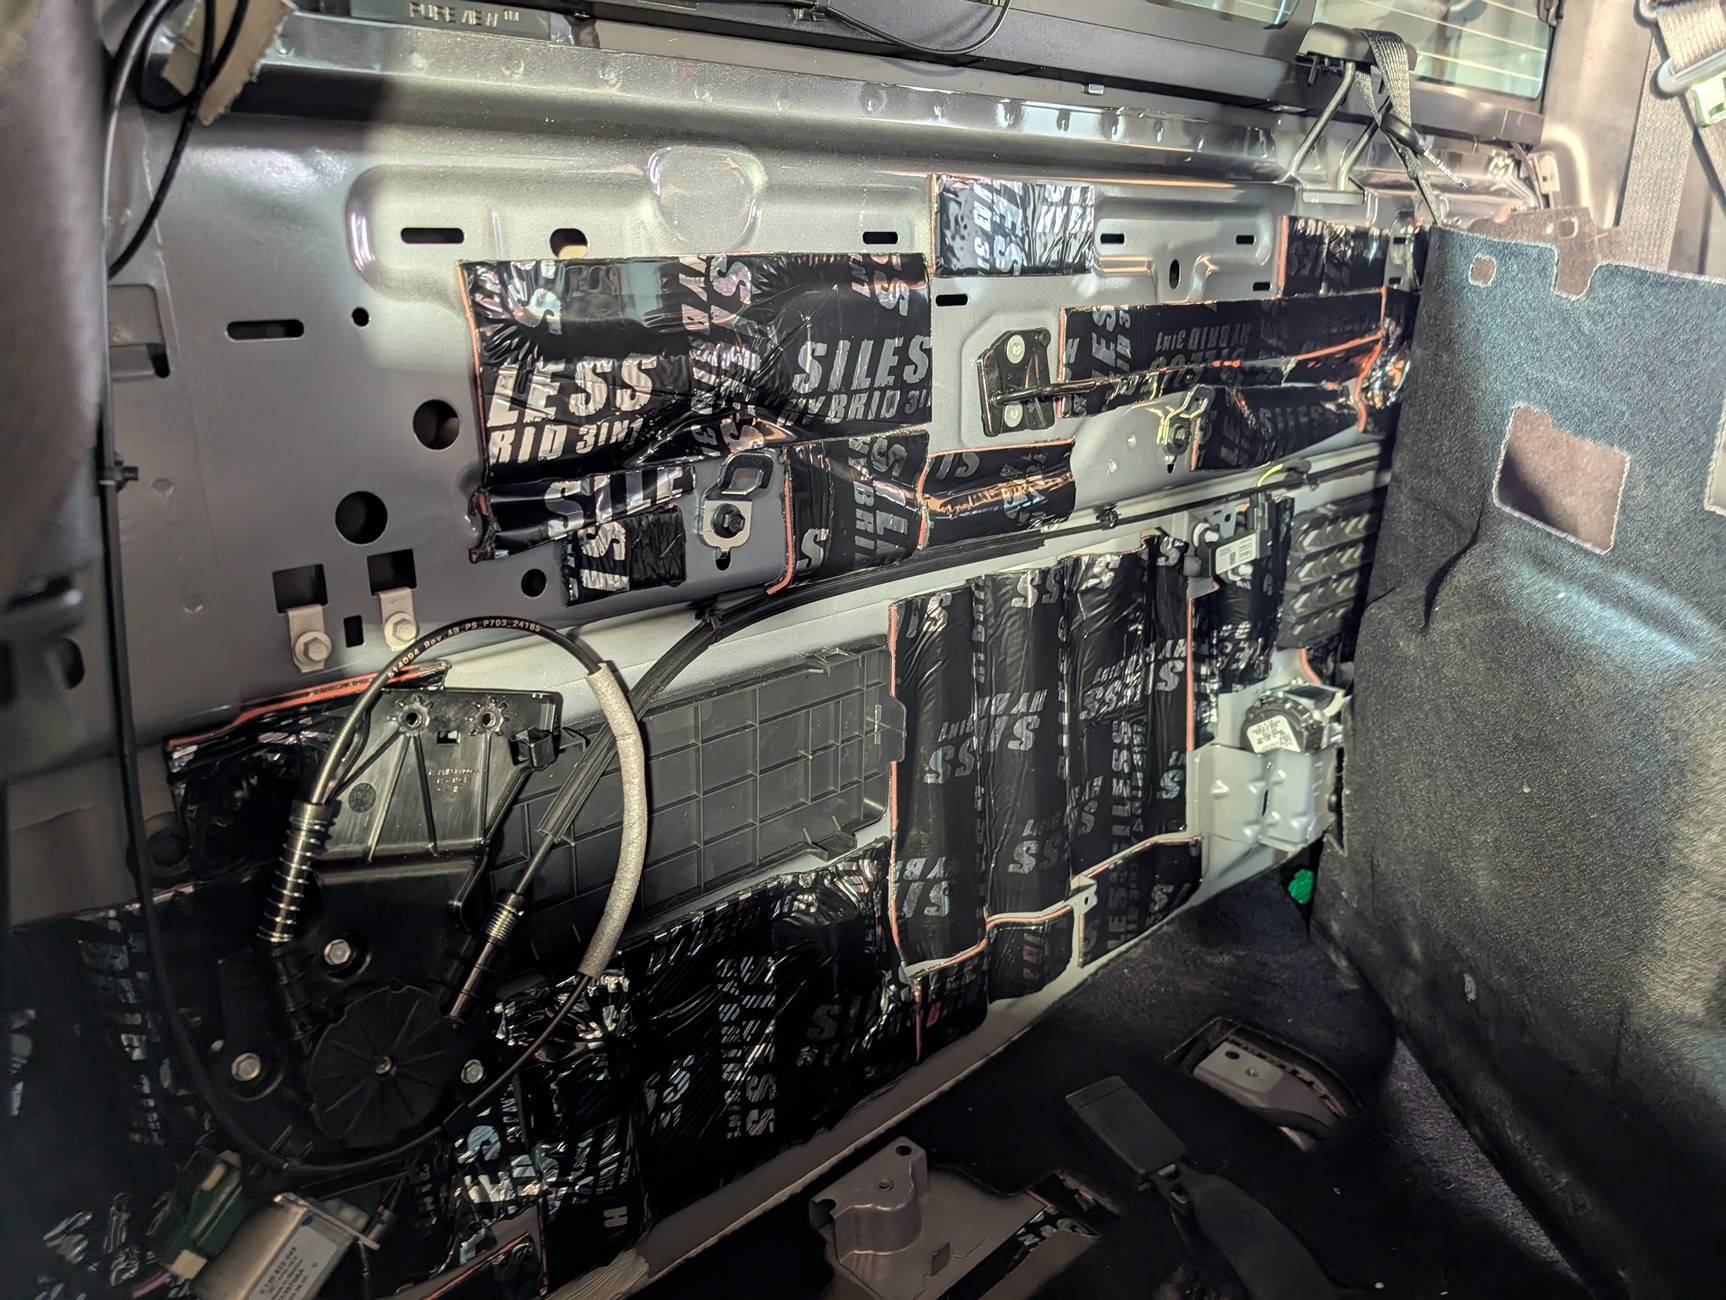
And on the driver's side. This is a bit of a mess but there's a lot of holes that are used to align the carpet and other parts so I just put blocks in to cover most of it.
And the floor under the back seats. I should have run the ethernet cable from the center console storage at this point, would have been better. Instead I tore this apart again later, so if you plan ahead, run that cable now.
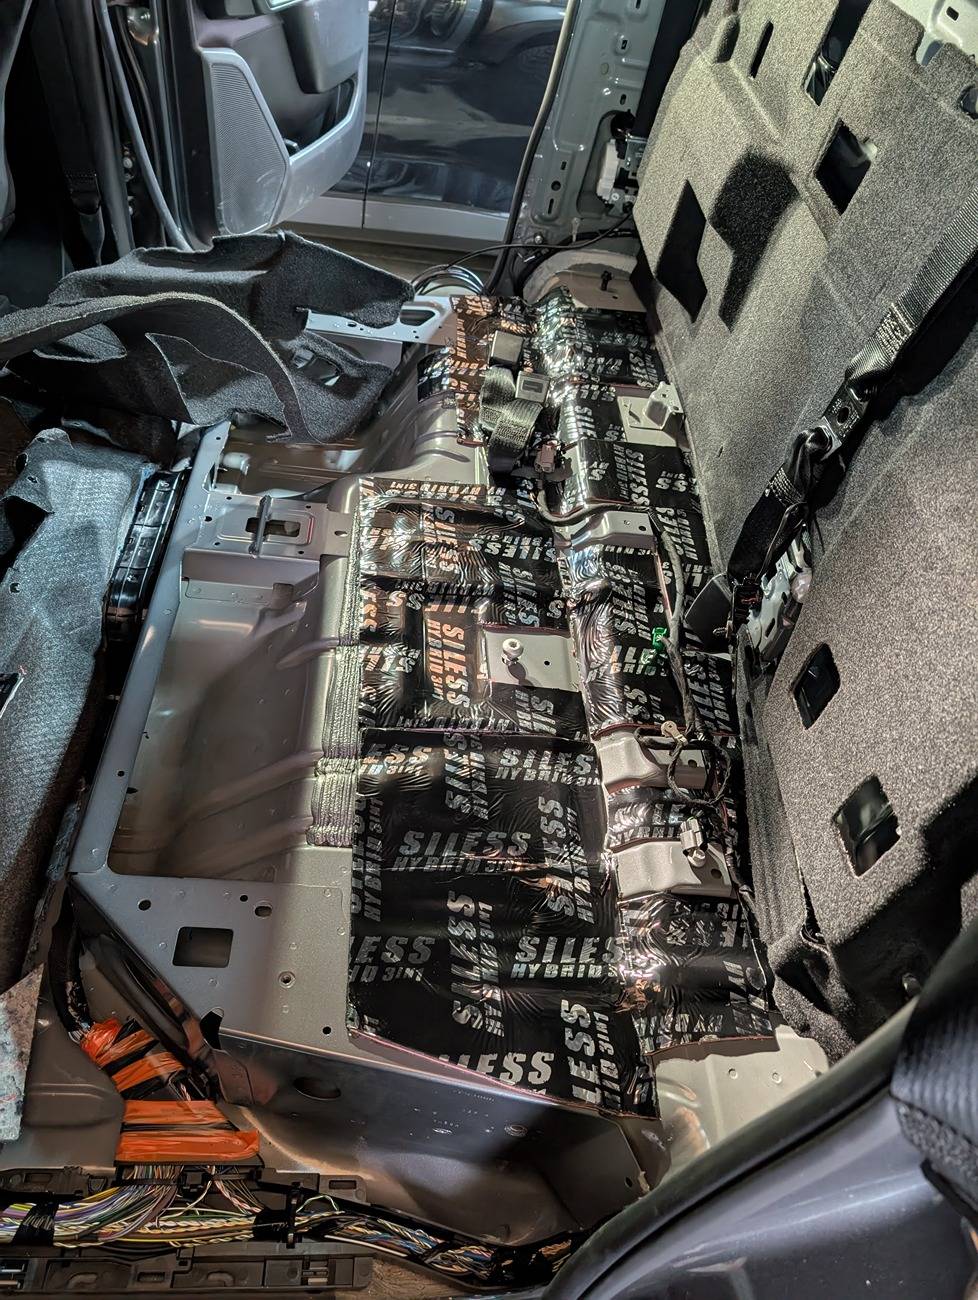
With a layer of foam on top:
Wiring to the battery
I ran the power cables in the channel on the driver's side right next to the door. You have to remove the door seal and then pop off the plastic door sill panels and the bottom of the B-pillar cover. It was fairly easy to run the cables but took some time to get it past the B-pillar. There's not much room but it was enough to fit the cables. I used a 4G cable for the amp which is overkill for a 250 watt amp but I'd rather have a lot more cable than needed. The GMRS and KEYLOC cables are 16g wires.
For the GMRS radio and the KEYLOC, I grounded them to the grounding point on the bracket that holds the stock amp. It's behind the carpet on the right side and held on with a bolt, it's where the factory amp is grounded.
For the amp, I ran a ground to the latch point and used a wire brush drill bit to scuff off the paint to make sure the amp has a good grounding point. I may go back and shorten the power and ground cables but I'm not sure. Going to wrap everything with the flexible cable wrap just to protect it a bit. I took the time to put ferrules on each wire and crimped them with a crimping tool.
GMRS radio antenna and handset socket
I used a Bulletproof Diesel 3rd brake light antenna mount. It's clean and the antenna cable runs into the cab from the headliner, this takes a while to mount and I did this part when doing the sound deadening in the roof because I wanted to get the cable into the cab and under the headliner to run down the C-pillar.
The instructions are very clear but there's a lot of steps since you need to align it, drill some holes behind the light and then run the cable. Turned out really nice, looks like it was OEM.
I installed an RJ45 plug in the center console to replace the 12v connector there. This works well since it's raised off the bottom and there's a cable channel in the lid of this compartment. I don't think I'd ever use this 12v connector any way.
For this, I used a tapered drill bit to round out the existing hole (it's slightly too large to re-use directly but not large enough to work right). Then I cut yet another little piece of ABS plastic to fit that corner, used the taper bit again to make the right size hole for the RJ45 plug housing. Stuck the whole thing down with two layers of 3M VHB tape to keep it in place. Looks pretty good and the little cap on the plug keeps it clean when not in use.
To get into this compartment, you need to remove the trim around the gear shift, then remote 3 bolts and then pop the center console up. Then remove the 12v plug and unplug it from the wiring harness, I wrapped the plug in cloth tape and tucked it away. From here you can run a standard ethernet cable to the back wall under the sound deadening fabric and carpet. I used a nice monoprice Cat6 cable just because it's very durable.
Finishing up
Finally time to button up the carpeting and install the sub. The stealthbox fits perfectly in the storage compartment once you have removed the plastic liner and is a high quality box made of fiberglass, filled with batting and covered with carpet. I wrapped all the cables with the mesh cable loom, tucked all the wires in and wrapped various parts with fabric tape.
Here's a pic with the rear seat back in place. You need to keep that GMRS radio as close to the back wall as possible, and as low as possible (without making it impossible to remove the jack). The seat just barely latches when I "slam" it -- I'm going to try a couple things to make it work better, maybe some washers to space the black latch bracket forward a bit. But, the seat does latch and it all tucks in nicely.
Everything worked the first time, ha! This was a lot of work but getting it all done at once made it fit together and I didn't want to add the GMRS later, etc, because the space is so constrained behind that seat. Another option would be a different ABS panel above the factory amp, that might have a little more room to work with.
Amplifier Replaced -- AudioControl ACM 1.300
I went back and replaced the amplifier with an AudioControl ACM 1.300, it is much smaller than the JD250/1. Here you can see just a size comparison between the two. I modified the bracket a little more to have a cutout and give me more room to run cables near the jack.
The JD250/1 has the connections on the sides and the ACM 1.300 has them all on the bottom, so I still mounted the amp well above the floor. I think I could have got it closer, but even as is it allowed me to move the GMRS radio down by about 2 inches. This was enough that I don't need to have spacers in the back seat latch.
Much better setup now honestly, the ACM 1.300 is better for this install just because of the space. The connectors on the JD250/1 are better (hex head screws, larger sockets) but overall this is a better setup now.
And another pic with the cover plate on the amp.

Amplifier and KEYLOC Settings
I took the cover stickers off the KEYLOC and adjusted the OUTPUT gain down about 50% from where it was. I didn't adjust the INPUT gain, and I covered these up with wiring harness tape to keep dust out.
OUTPUT gain is now at about 8 o'clock.
And on the ACM 1.300, after adjusting the KEYLOC output gain, I was able to adjust the gain and thresholds. All of them are set at about 10 o'clock.
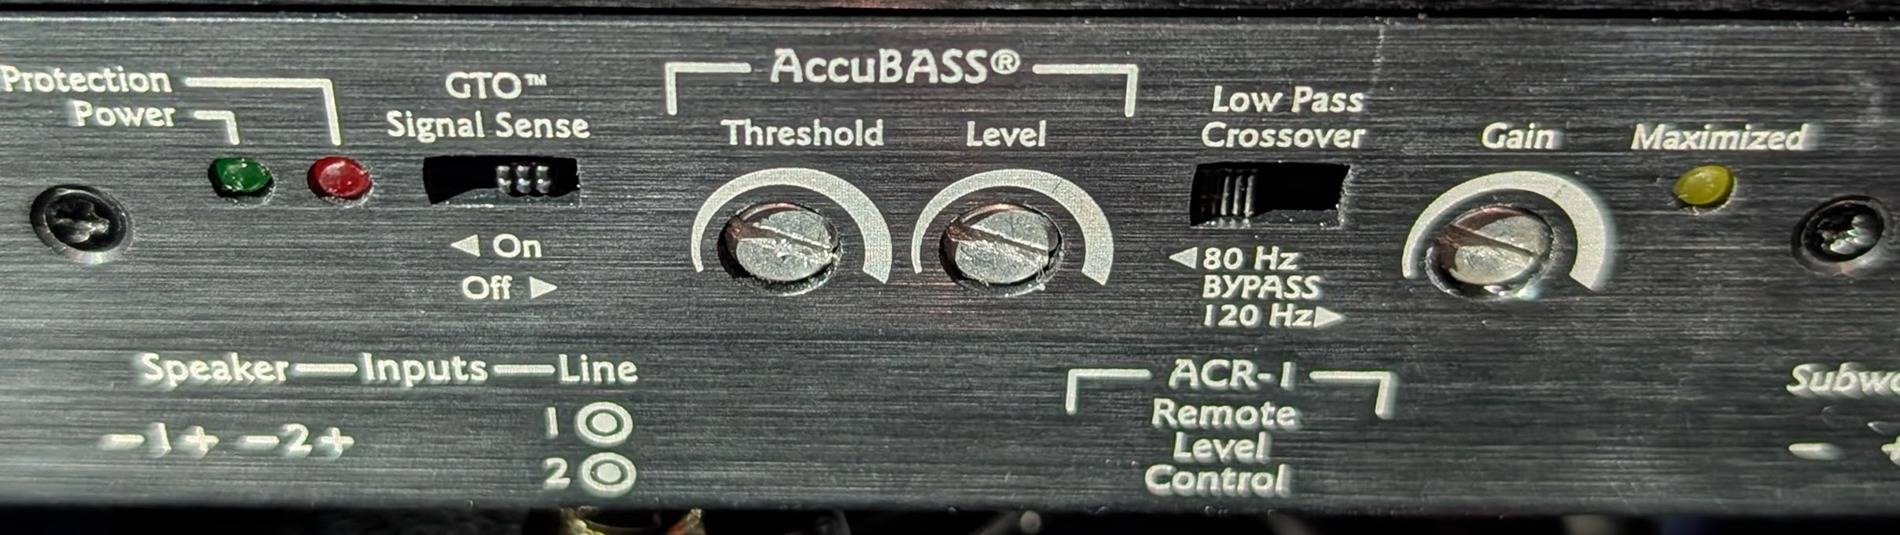
With these settings, I was able to re-adjust the settings in the truck. I've now got Treble at +2, Mids at +3 and Bass at -1. Sounds fantastic and doesn't bottom out or get muddy. Really happy with how it turned out.
Sponsored
Last edited: