
Sponsored
GLW
Well-Known Member
I did it on my RR. Lots of cutting small pieces to fit. Not hard just time consuming. I did not remove the back seat nor the safety belts, just worked around them. Having good lighting helps.
it was worth the effort.
I would like to do the roof but don’t have the guts to remove the headliner.
it was worth the effort.
I would like to do the roof but don’t have the guts to remove the headliner.
KayaPayaPigDog
Well-Known Member
- First Name
- Kyle
- Joined
- Mar 27, 2024
- Threads
- 25
- Messages
- 225
- Reaction score
- 466
- Location
- US
- Website
- www.youtube.com
- Vehicle(s)
- 2024 Ranger Raptor Shelter Green
- Occupation
- US Navy
now that you mention it, i think i need to get back into the sound deadening and do the back wall before it gets too hot and miserable to work. I'll probably order the material today and do this over the weekend and i'll make a quick video on how to access everything. Cheers.
pablo94sc
Well-Known Member
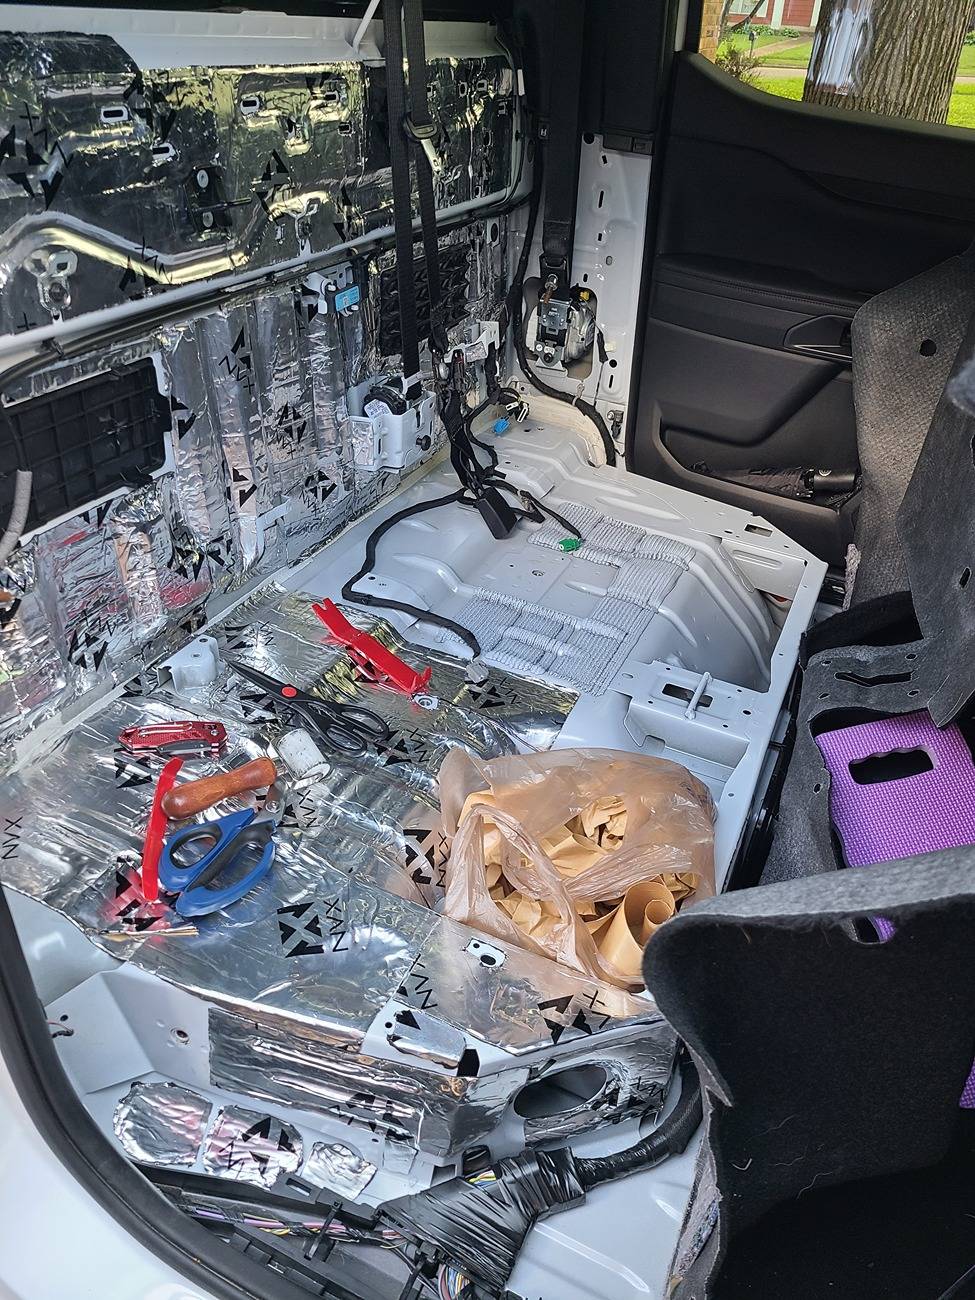
I have, and it took me almost a much time to do as all four doors. I don't have time for a full write-up now, so consider this the condensed version.Has anyone done it yet? I have done my doors, want to do the area behind the seat next. Is there a removal video around? Or can you walk me through the steps please?
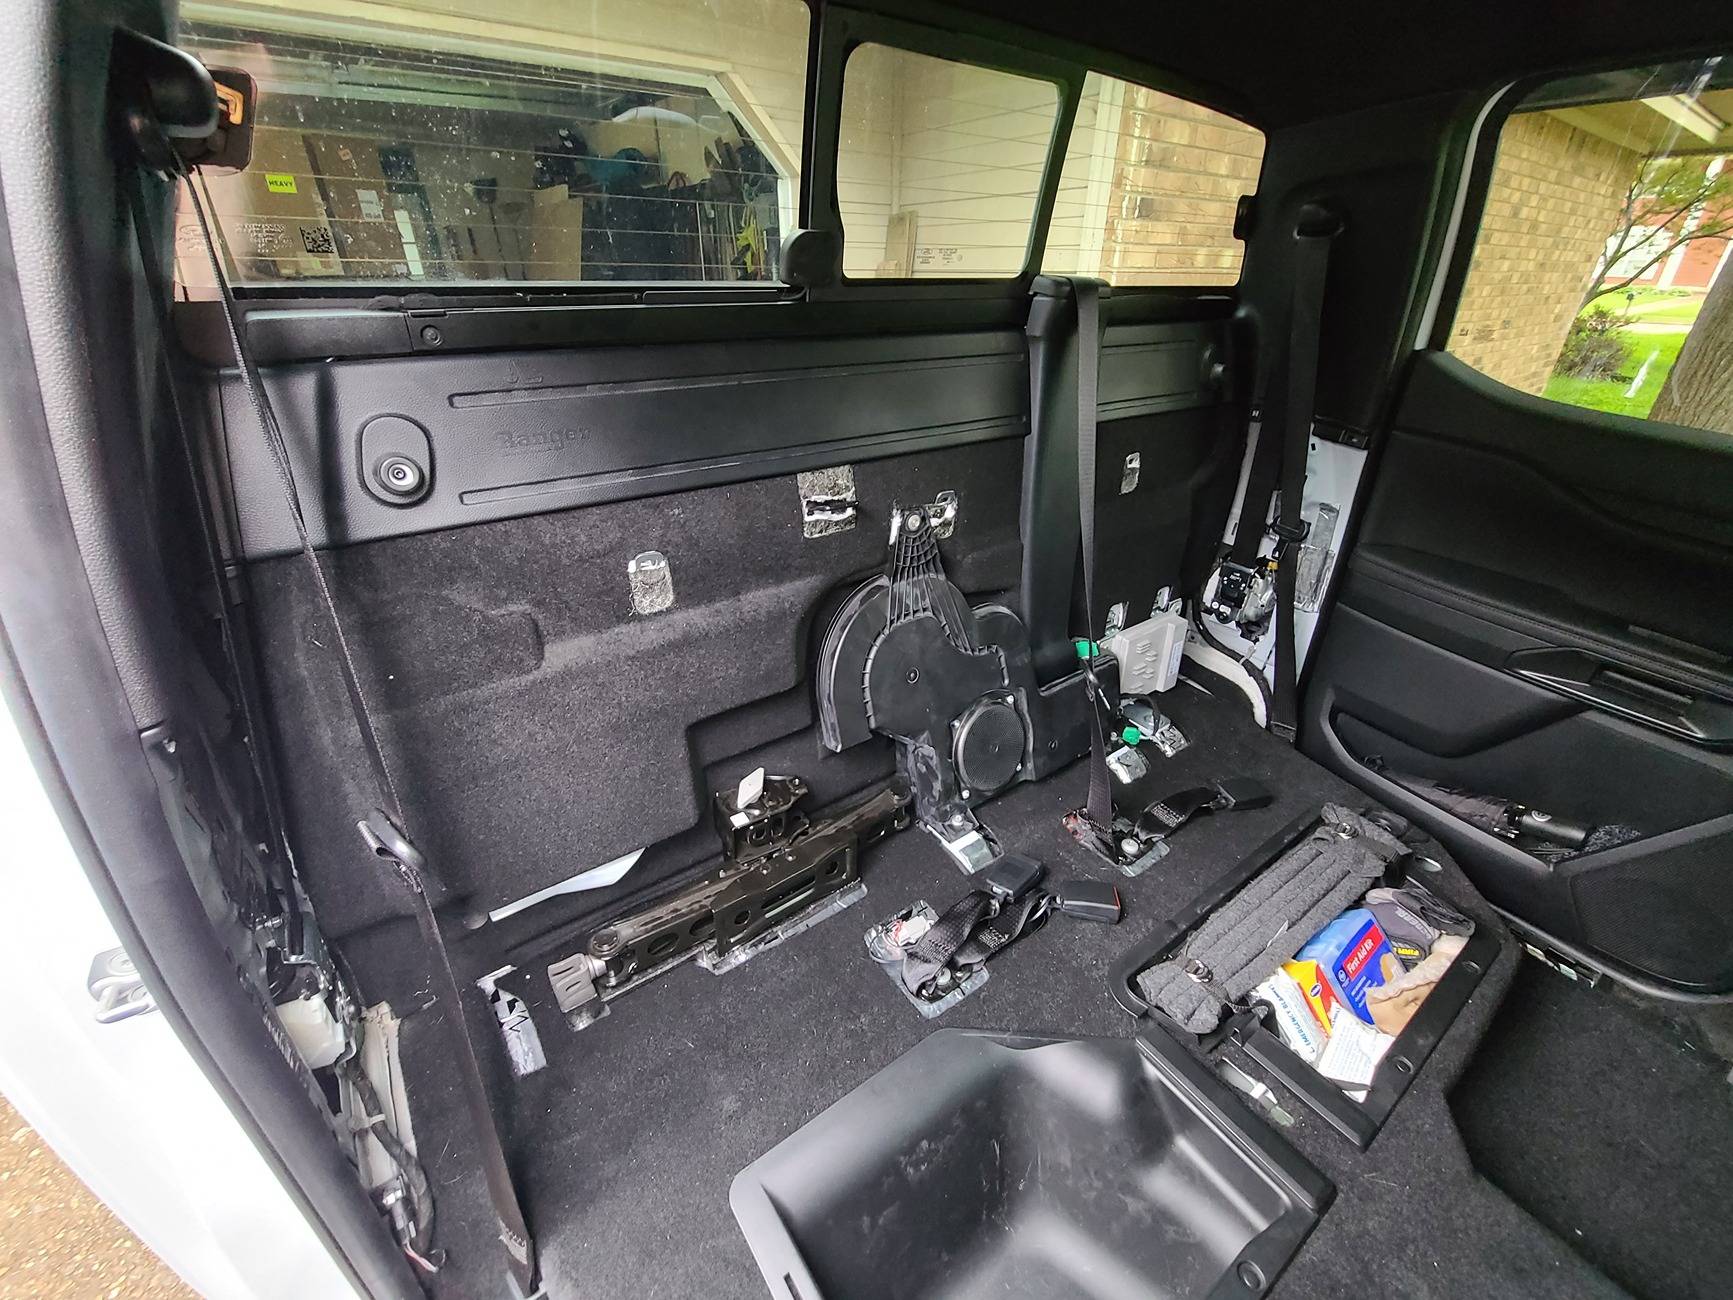
1. Fold seat down and disconnect all wires from their harnesses, then lift the bottom and unhook this harnesses.
2. Unbolt the seat belt buckles (x2, T50 bolts).
3. Unbolt the 4, T50 bolts for the seat.
4. Slip the buckles out from between the cushions. There is an elastic loop that they slip through. Remove the seat from the cab. I recommend a strap to keep the seat folded together and a helper here.
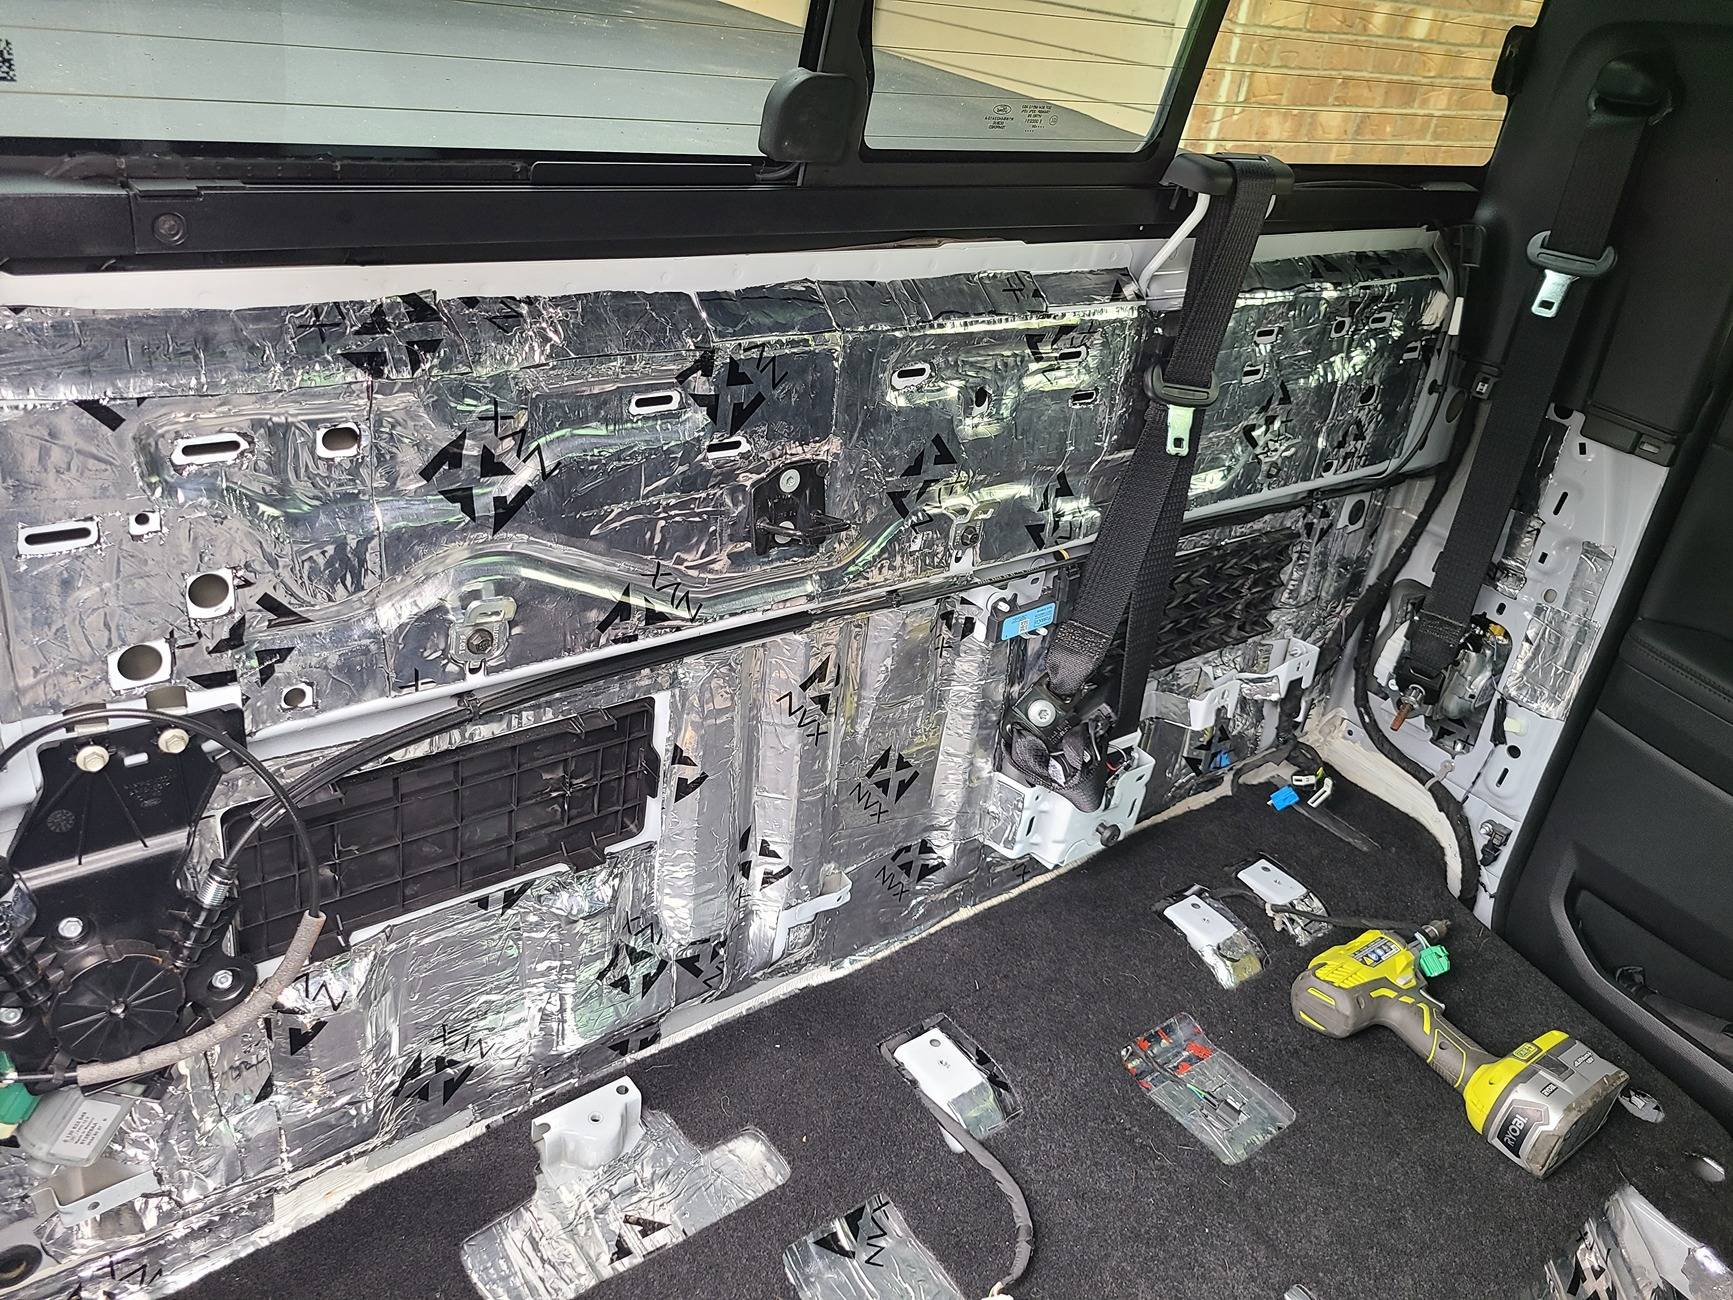
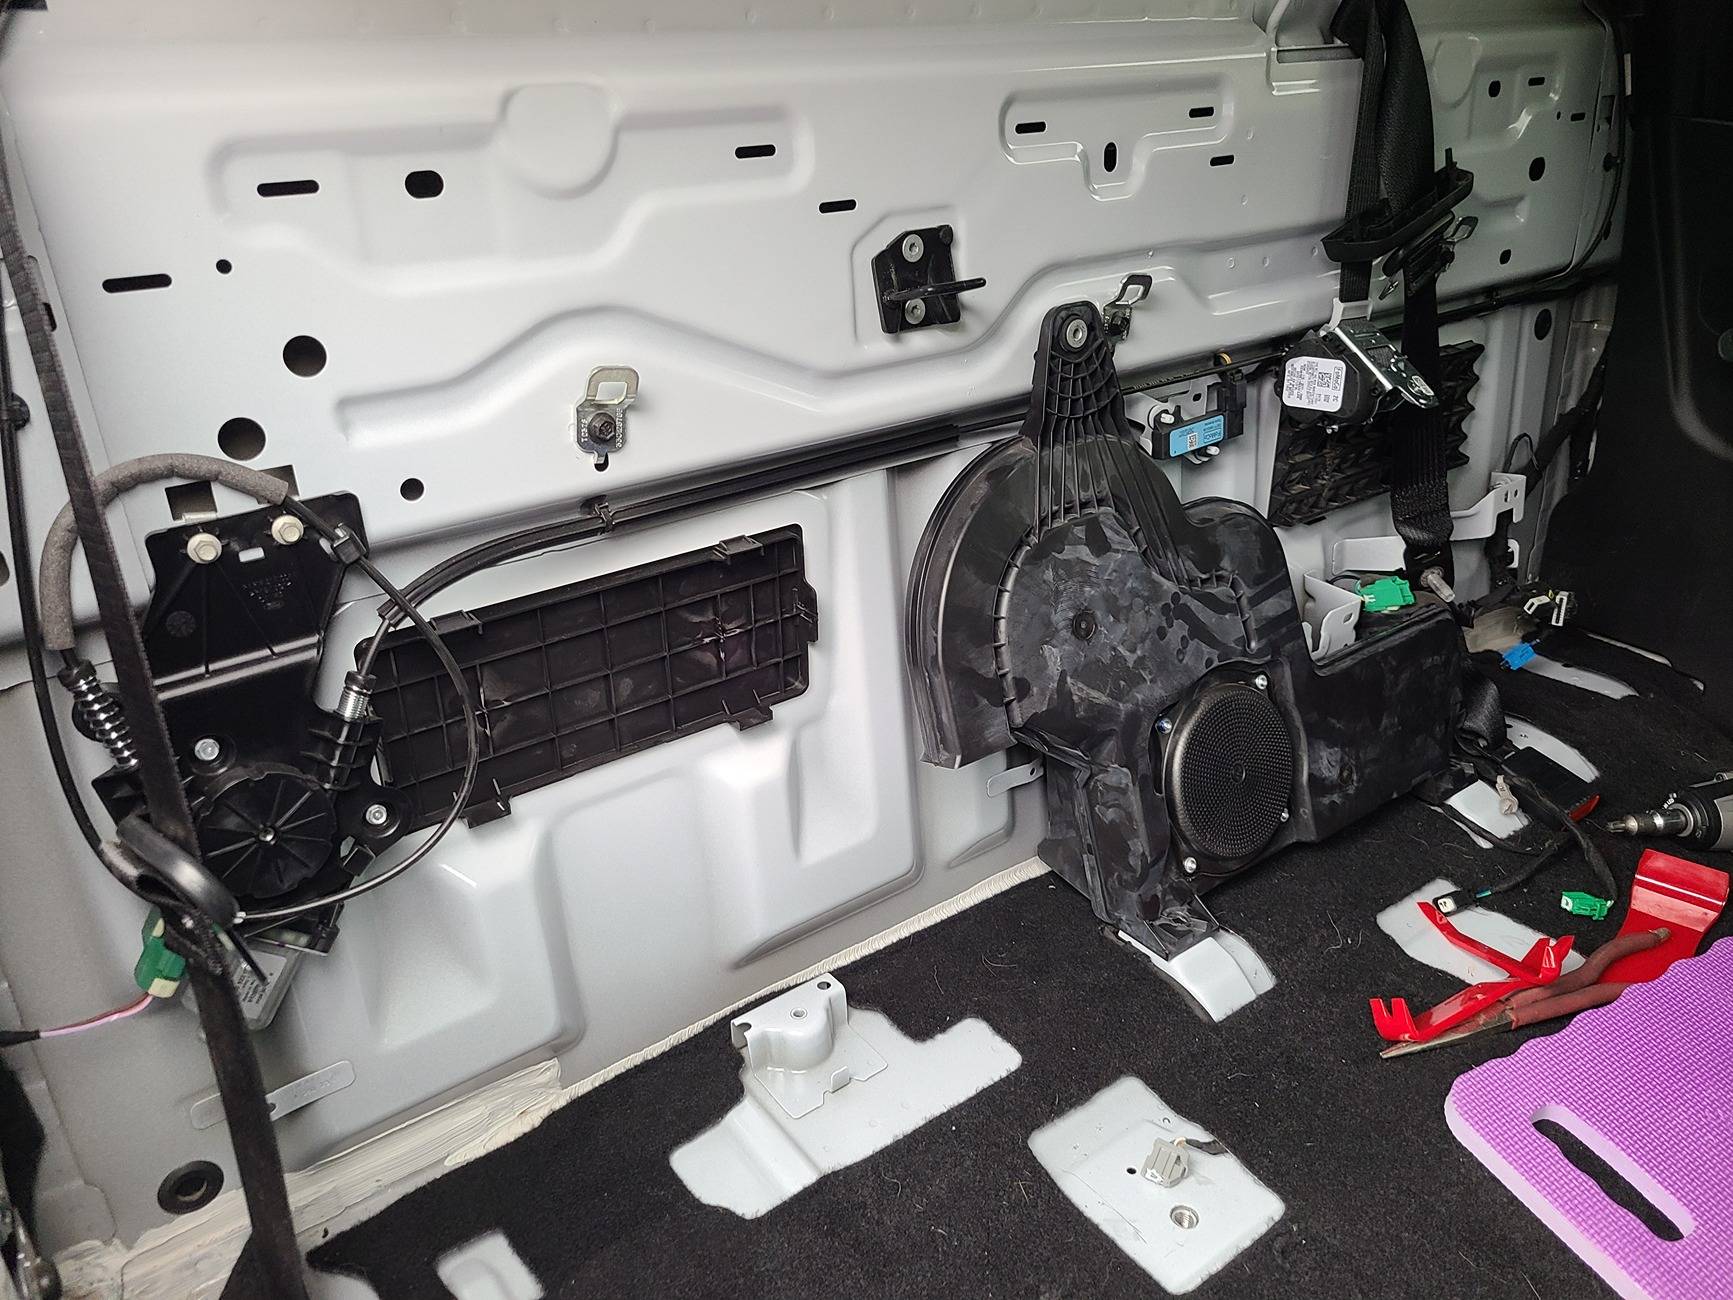
5. Remove the amp and sub. (8 and 10mm) Throw the factory sub in the trash or attic. You will hear the mud it makes much more clearly once you deaden the rear. It's in the pic below because I just tested it today.
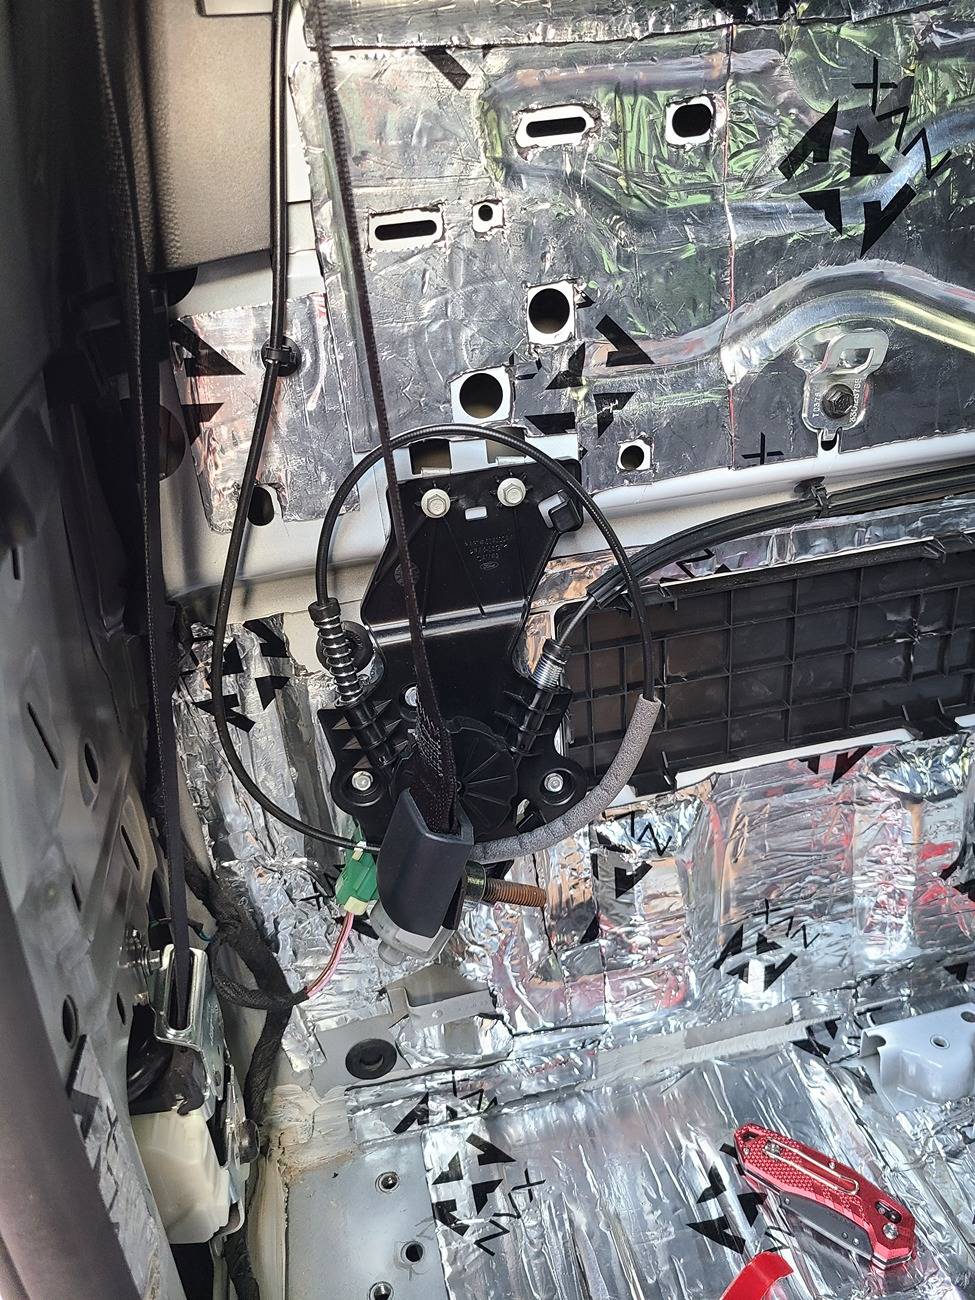
6. Pop the cap off the top of the center belt. Pry the belt cover off. Unbolt the belt retractor.
7. Remove the top panel under the window from the top, down. There are two lips on the bottom corners (for alignment) that will prevent bottom removal first.
8. Removal all the push pins. Take a break, go to the store and buy longer ones. You'll need them to reinstall. Good time to make sure you have sharp shears and extra blades for your knife. I used 5, but that's because I hate getting blades out of the home depot 50-pack dispenser pack I got.
9. Curse the day you decided to do this.
10. Unbolt outside rear belts from the side of the floor tub. Let those hang.
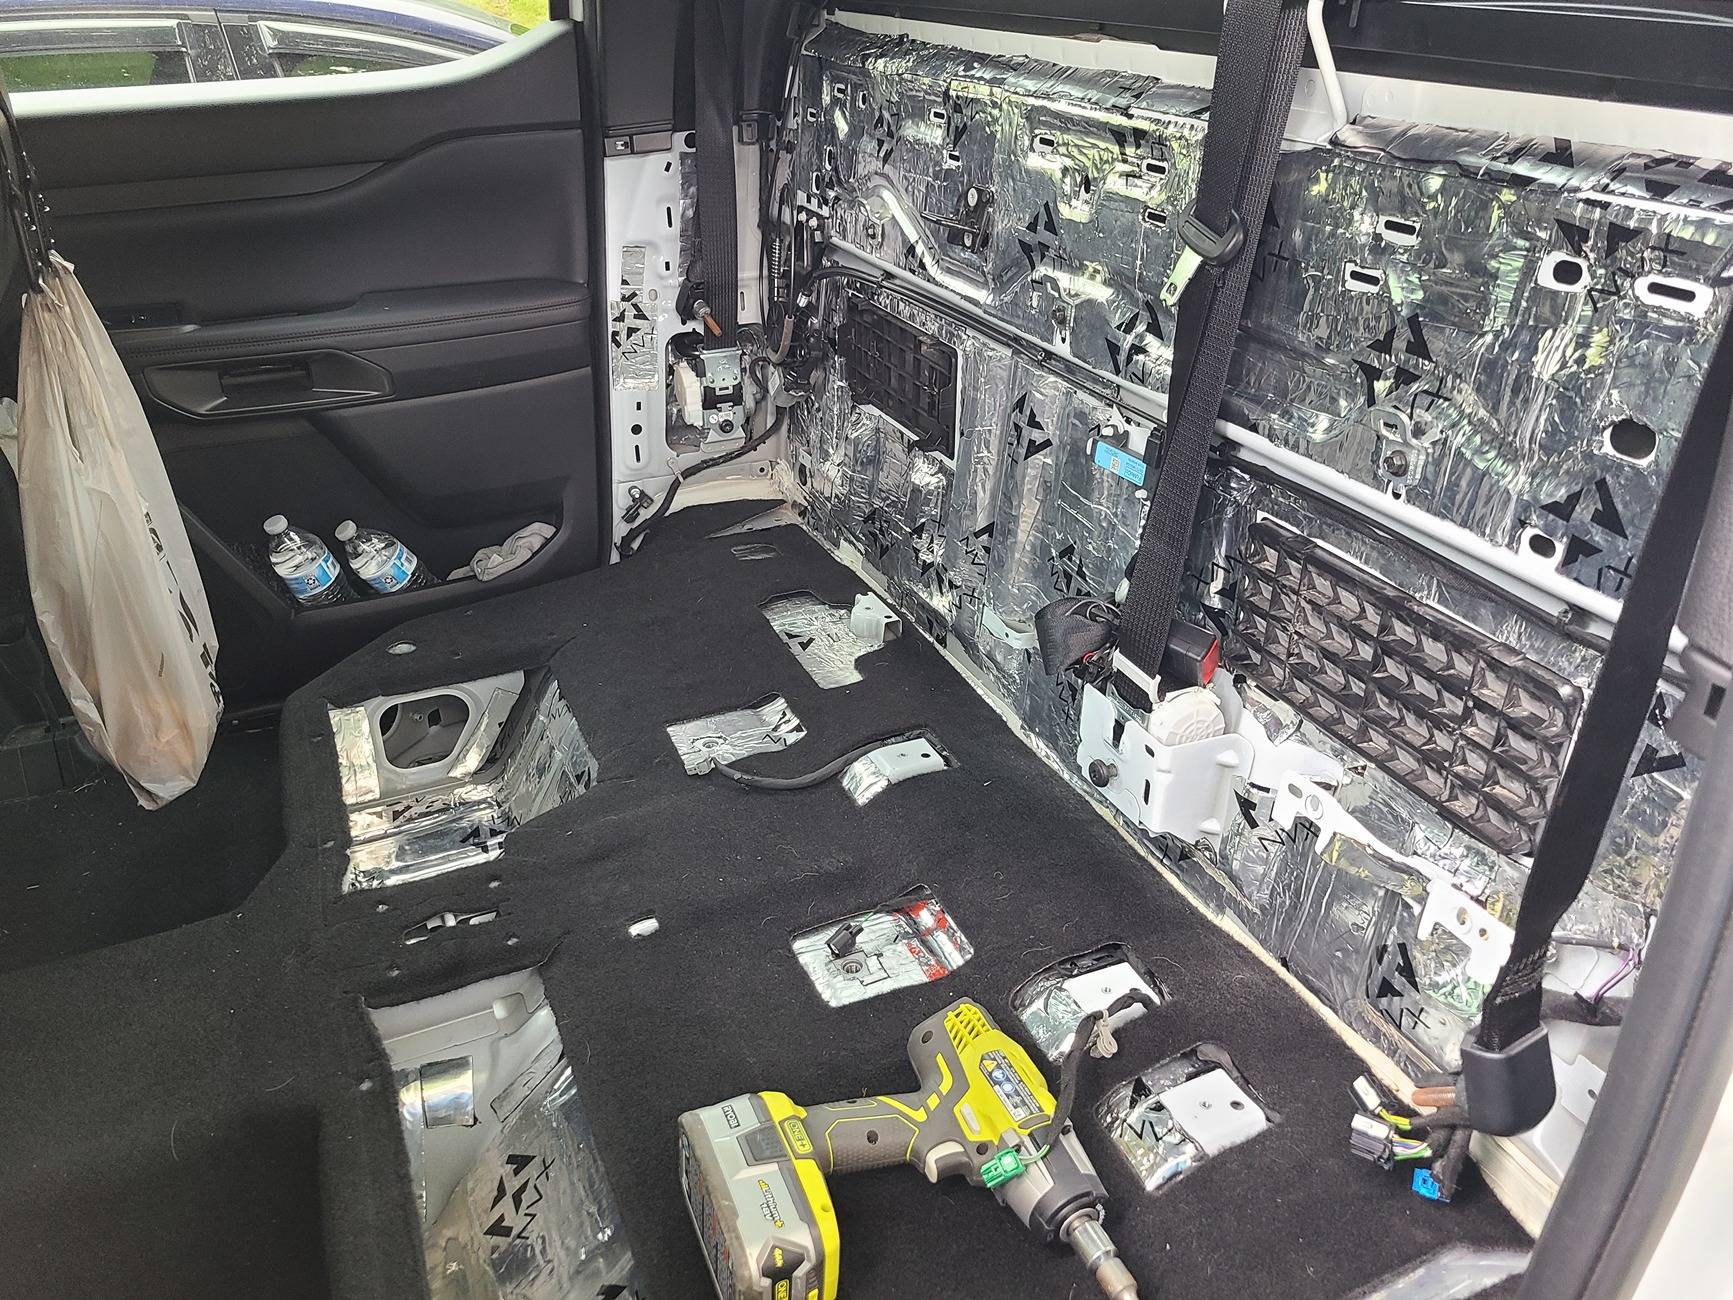
11. Pull up the floor trim under the door seal, working up to the side of the cab.
12. Pull the push pins in the carpet. Unbolt the DS tub. Set those aside.
13. Slice the crap out of your fingers because, " Oh, this is easier than the doors" and you stop being cautious.
14. Install your deadening.
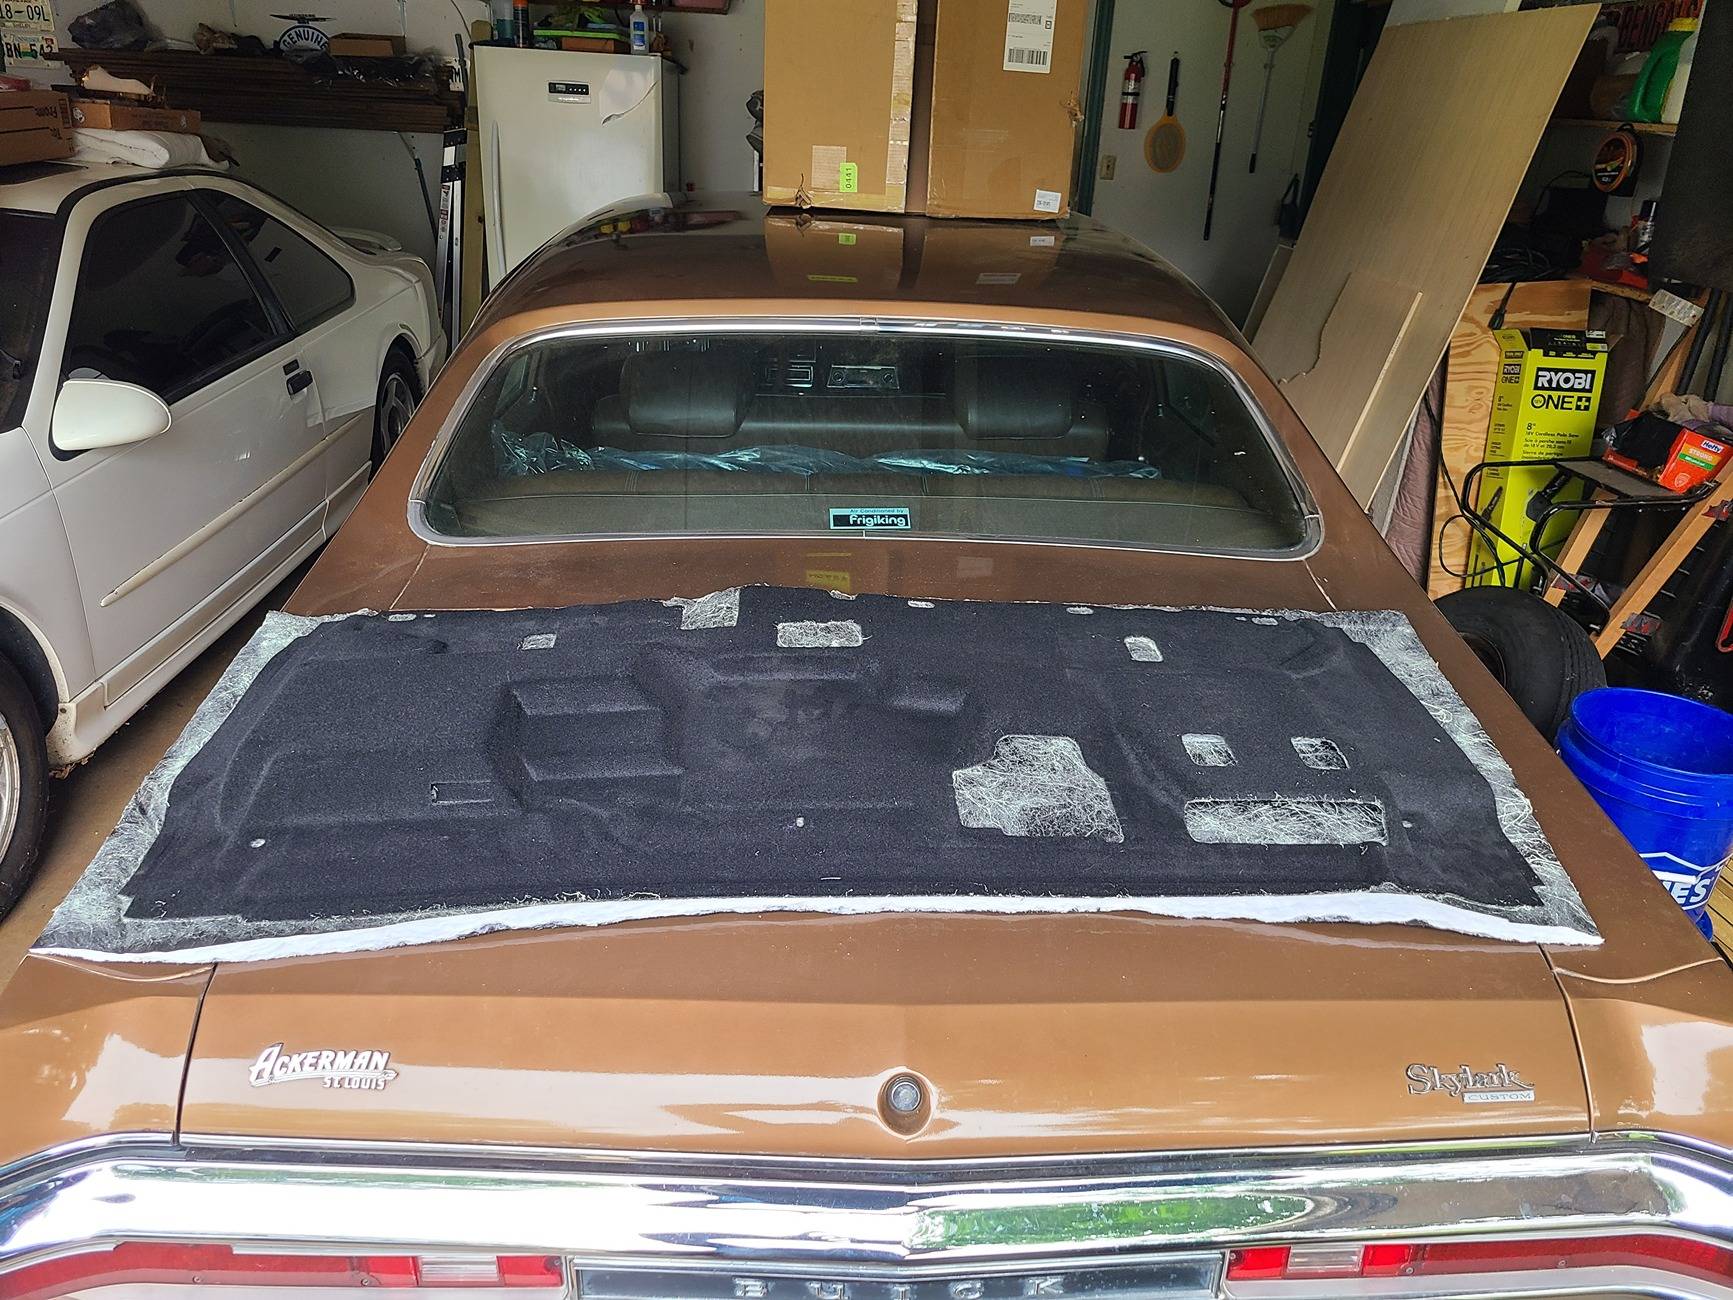
I added 1/2" 3M thinsulate to my rear card. See attached. It will help absorb high freq and add some extra insulation.
Seat won't go back in until I can install 1/2" fiber mat under the carpet and I determine if relocation brackets can be made.
Last edited:
pablo94sc
Well-Known Member
Get longer push pins! Order yourself some 3M AU4002-5 for the door cards and rear card. If you're going to do it, you might as well go full tilt! You'll thank me for the extra insulation when your wife kicks you out of the house for all the time and money you've put into the raptor. ?now that you mention it, i think i need to get back into the sound deadening and do the back wall before it gets too hot and miserable to work. I'll probably order the material today and do this over the weekend and i'll make a quick video on how to access everything. Cheers.
Sponsored
OP
OP
fordgt
Well-Known Member
- Thread starter
- #6
Wow, thank you!I have, and it took me almost a much time to do as all four doors. I don't have time for a full write-up now, so consider this the condensed version.
1. Fold seat down and disconnect all wires from their harnesses, then lift the bottom and unhook this harnesses.
2. Unbolt the seat belt buckles (x2, T50 bolts).
3. Unbolt the 4, T50 bolts for the seat.
4. Slip the buckles out from between the cushions. There is an elastic loop that they slip through. Remove the seat from the cab. I recommend a strap to keep the seat folded together and a helper here.
5. Remove the amp and sub. (8 and 10mm) Throw the factory sub in the trash or attic. You will hear the mud it makes much more clearly once you deaden the rear. It's in the pic below because I just tested it today.
6. Pop the cap off the top of the center belt. Pry the belt cover off. Unbolt the belt retractor.
7. Remove the top panel under the window from the top, down. There are two lips on the bottom corners (for alignment) that will prevent bottom removal first.
8. Removal all the push pins. Take a break, go to the store and buy longer ones. You'll need them to reinstall. Good time to make sure you have sharp shears and extra blades for your knife. I used 5, but that's because I hate getting blades out of the home depot 50-pack dispenser pack I got.
9. Curse the day you decided to do this.
10. Unbolt outside rear belts from the side of the floor tub. Let those hang.
11. Pull up the floor trim under the door seal, working up to the side of the cab.
12. Pull the push pins in the carpet. Unbolt the DS tub. Set those aside.
13. Slice the crap out of your fingers because, " Oh, this is easier than the doors" and you stop being cautious.
14. Install your deadening.
I added 1/2" 3M thinsulate to my rear card. See attached. It will help absorb high freq and add some extra insulation.
Seat won't go back in until I can install 1/2" fiber mat under the carpet and I determine if relocation brackets can be made.


pablo94sc
Well-Known Member
Sure thing. I actually like helping people when it's not my job. Lol
Oh, I wanted to mention you can put deadener on the PS black panel. I put it in the outside. It's not going to do much, but why the heck not?
Also, now is a good time to fill the nooks and crannies with some sort of fiber or insulation for absorption.
Oh, I wanted to mention you can put deadener on the PS black panel. I put it in the outside. It's not going to do much, but why the heck not?
Also, now is a good time to fill the nooks and crannies with some sort of fiber or insulation for absorption.
KayaPayaPigDog
Well-Known Member
- First Name
- Kyle
- Joined
- Mar 27, 2024
- Threads
- 25
- Messages
- 225
- Reaction score
- 466
- Location
- US
- Website
- www.youtube.com
- Vehicle(s)
- 2024 Ranger Raptor Shelter Green
- Occupation
- US Navy
Dude! You went all in! Thanks for the photos and info! I’m gonna do this for sure in the next few weeks!I have, and it took me almost a much time to do as all four doors. I don't have time for a full write-up now, so consider this the condensed version.
1. Fold seat down and disconnect all wires from their harnesses, then lift the bottom and unhook this harnesses.
2. Unbolt the seat belt buckles (x2, T50 bolts).
3. Unbolt the 4, T50 bolts for the seat.
4. Slip the buckles out from between the cushions. There is an elastic loop that they slip through. Remove the seat from the cab. I recommend a strap to keep the seat folded together and a helper here.
5. Remove the amp and sub. (8 and 10mm) Throw the factory sub in the trash or attic. You will hear the mud it makes much more clearly once you deaden the rear. It's in the pic below because I just tested it today.
6. Pop the cap off the top of the center belt. Pry the belt cover off. Unbolt the belt retractor.
7. Remove the top panel under the window from the top, down. There are two lips on the bottom corners (for alignment) that will prevent bottom removal first.
8. Removal all the push pins. Take a break, go to the store and buy longer ones. You'll need them to reinstall. Good time to make sure you have sharp shears and extra blades for your knife. I used 5, but that's because I hate getting blades out of the home depot 50-pack dispenser pack I got.
9. Curse the day you decided to do this.
10. Unbolt outside rear belts from the side of the floor tub. Let those hang.
11. Pull up the floor trim under the door seal, working up to the side of the cab.
12. Pull the push pins in the carpet. Unbolt the DS tub. Set those aside.
13. Slice the crap out of your fingers because, " Oh, this is easier than the doors" and you stop being cautious.
14. Install your deadening.
I added 1/2" 3M thinsulate to my rear card. See attached. It will help absorb high freq and add some extra insulation.
Seat won't go back in until I can install 1/2" fiber mat under the carpet and I determine if relocation brackets can be made.
pablo94sc
Well-Known Member
Thanks. I might be tackling the rest of the cab next week, which will entail the roof (eek) and hanging insulation in the door cards. And properly fixing whatever is rattling in the DS door. Pretty sure it's the rearward window channel. That might be a warranty repair. UghDude! You went all in! Thanks for the photos and info! I’m gonna do this for sure in the next few weeks!
pablo94sc
Well-Known Member
Update. I noticed a whistling sound occasionally from the rear cabin pressure vent when recirc is off. Gonna need to pull the carpeted panel and trim a bit of insulation away from the factory jute to correct. Good thing I haven't put the seat back in yet.
Might install some screen over the vent panel as well to help keep critters out. Better done on the outside of the cab, but not sure that's possible without pulling the bed.
Might install some screen over the vent panel as well to help keep critters out. Better done on the outside of the cab, but not sure that's possible without pulling the bed.
Sponsored
KayaPayaPigDog
Well-Known Member
- First Name
- Kyle
- Joined
- Mar 27, 2024
- Threads
- 25
- Messages
- 225
- Reaction score
- 466
- Location
- US
- Website
- www.youtube.com
- Vehicle(s)
- 2024 Ranger Raptor Shelter Green
- Occupation
- US Navy
Glad you found it. I always feel awkward posting my videos here because I don’t want people to think I’m just looking for views. I honesty just want to help out where I can but people take it different sometimes and I don’t want to cause a sceneflaberdoopin posted the video on his YouTube channel today.Thank you!
") cheers!
cheers!KayaPayaPigDog
Well-Known Member
- First Name
- Kyle
- Joined
- Mar 27, 2024
- Threads
- 25
- Messages
- 225
- Reaction score
- 466
- Location
- US
- Website
- www.youtube.com
- Vehicle(s)
- 2024 Ranger Raptor Shelter Green
- Occupation
- US Navy
No need to reel it in, I honestly really appreciate people sharing my videos, I just feel self conscious posting them here myself, it feels like shameless self promotion but I really do put a lot of time and effort into the videos so when others share them it makes me super happy! Thanks for the support! CheersDude your videos are so helpful, I’ve been shouting your praise everywhere! But if it makes you uncomfortable, I’ll reel it in.
OP
OP
fordgt
Well-Known Member
- Thread starter
- #15
Have you ever had occasion to get y dash apart. I need to get access to the plugs behind the infotainment screen.. looking for a video on how to do it.No need to reel it in, I honestly really appreciate people sharing my videos, I just feel self conscious posting them here myself, it feels like shameless self promotion but I really do put a lot of time and effort into the videos so when others share them it makes me super happy! Thanks for the support! Cheers
Sponsored
Similar threads
- Replies
- 9
- Views
- 2,848