ADVNTURR
Well-Known Member
- Joined
- Sep 6, 2024
- Threads
- 15
- Messages
- 155
- Reaction score
- 341
- Location
- Cleveland, OH
- Vehicle(s)
- '24 Ranger XLT 2.7L, '16 VW Golf R, '11 Nissan GT-R, '05 Nissan 350Z
- Thread starter
- #1
TLDR version: I made a custom bed rack for my truck

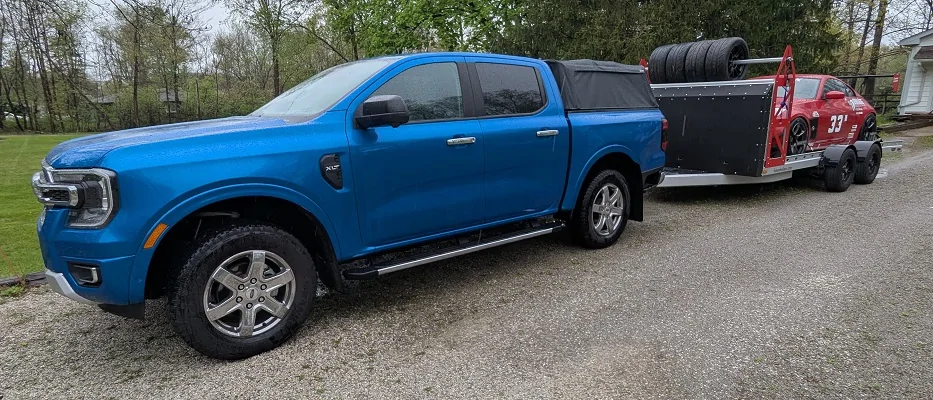
I picked up my ’24 XLT last year with the goal of using it to tow my track car, shuttle canoes and dogs around, take care of home projects, and hopefully do some overlanding eventually (including camping at race tracks). The towing part has been going really well and so has the dog toting, but for the canoes and overlanding I needed a rack.

I did a lot of looking at what was available and learned about all the pitfalls of Ford’s spectacular decision on the plastic rail caps and the J-Brace situation. Adding to the search complication, I have a Bestop Supertop 2 soft top/tonneau cover on my truck which basically eliminated everything off the shelf (Xtrusion Overland, KB Voodoo, and a few others have offerings for the Softopper brand but Xtrusion at least specifically says it won’t work with the Bestop version).
Since simply buying something wasn’t panning out, I decided to make my own and pull concepts from the brands I liked and try to keep it as versatile as possible with some compatibility for existing accessories. After taking some measurements, I started mocking everything up in CAD and then started making some 3D prints to make sure things matched up to my dimensions and ideas.


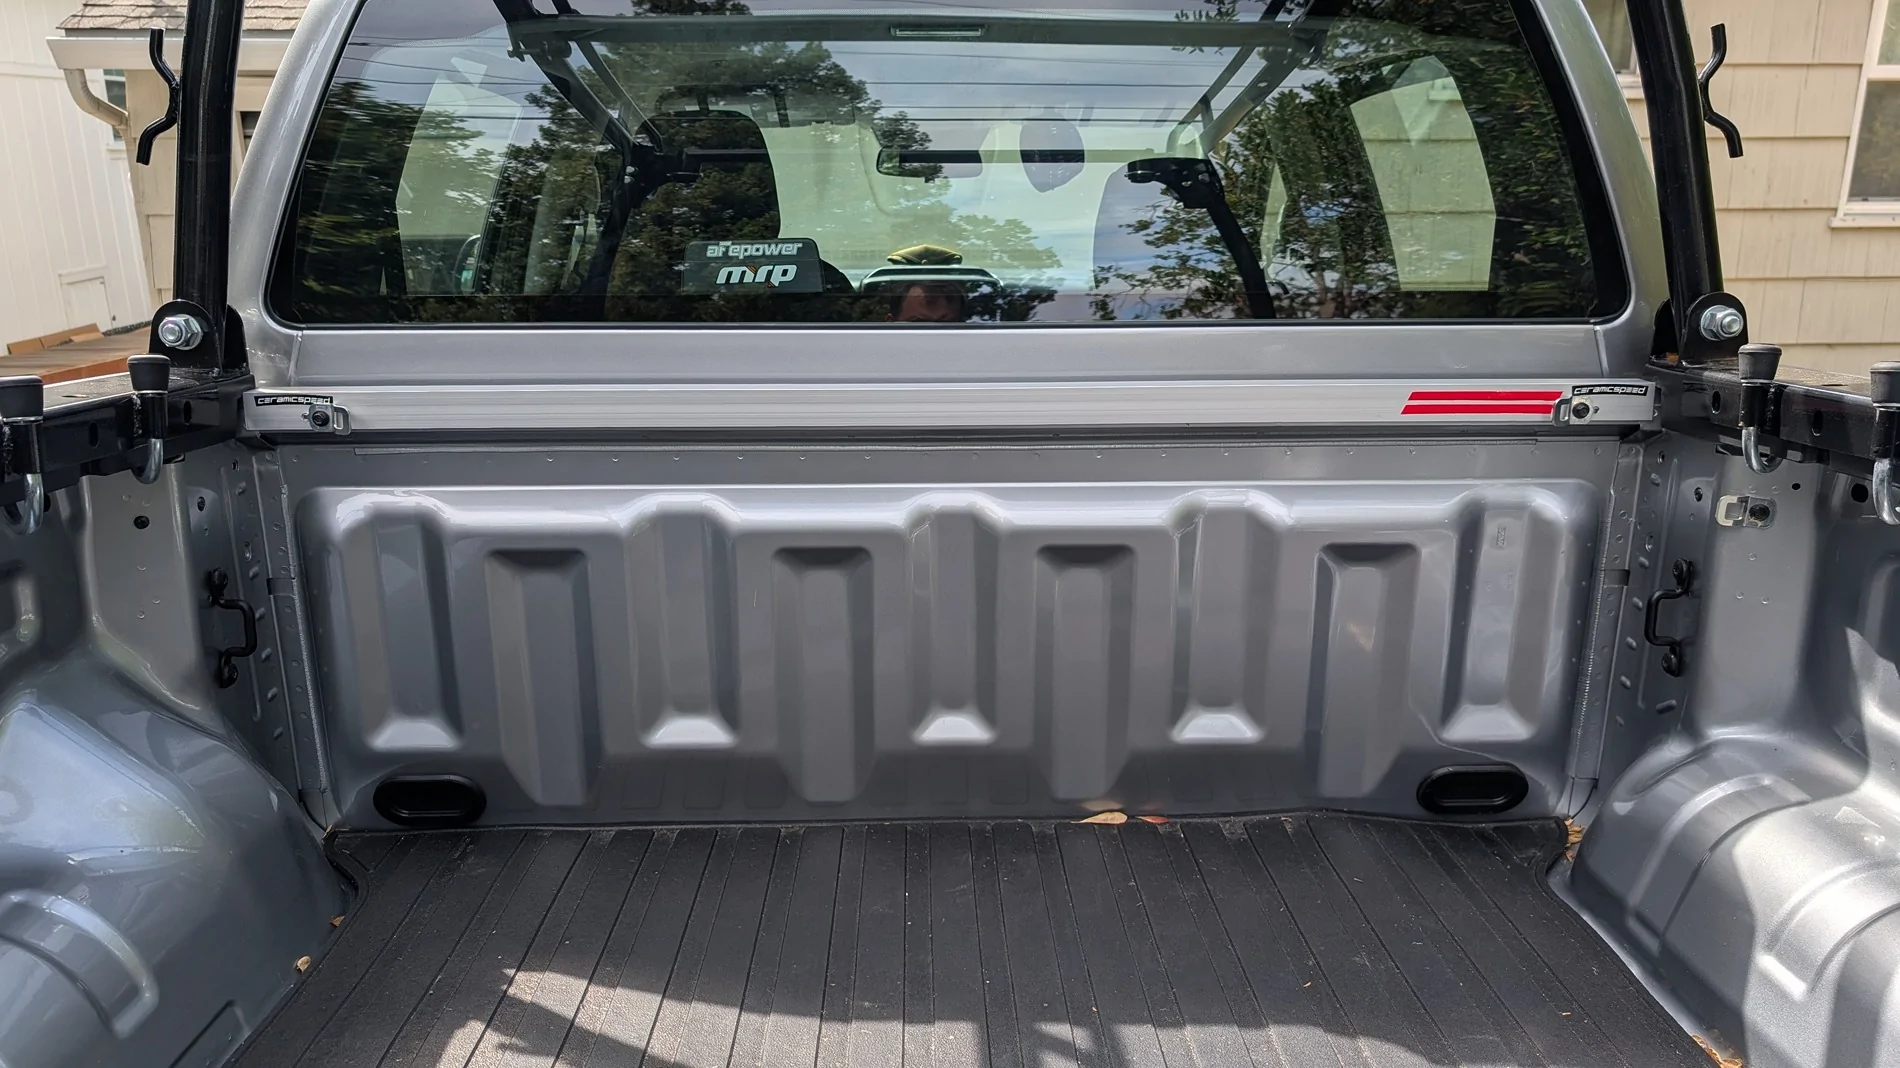
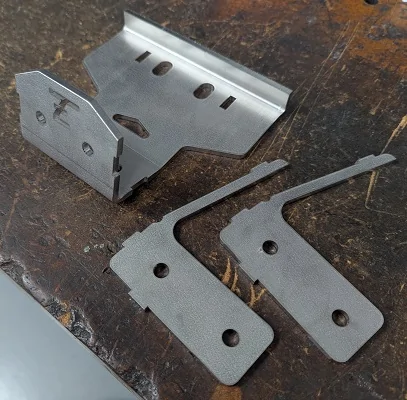
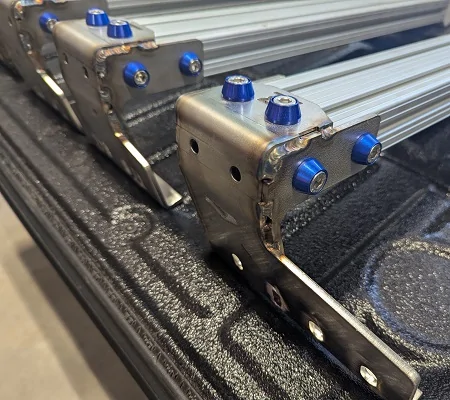
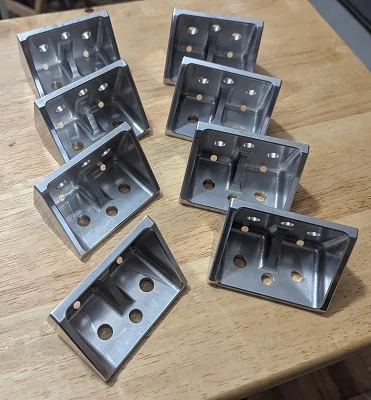
With the plastic rail cap issues and everyone trying to make pucks and such to support any useable load, I decided to go a different route and go under the caps and simply notch the caps as needed. With an order to Send-Cut-Send and some help from a friend for some SS welding I made up some mounts out of 3/16” 316SS


The brackets bolt directly to the top of the bed rail with the rear mounts centered over the “stake pocket” and the front mounts offset forward a bit to get a bit more span and to better center the rack on the bed. To help protect the bed rails and to help keep water/dust out I did put down a layer of PPF before bolting everything down and simply slit the film where I needed bolts or the rail cap clips to pass through


With the mounts in place I used a utility knife to trim and notch the rail caps so that they would snap back down. This obviously won’t be ideal if I choose to sell the truck in the future or upgrade to a fully integrated overlanding topper…but that’s a future problem. I did loose a few of the clips that hold the caps down, but with the Bestop rails clamping down on the caps, they’re not going anywhere.


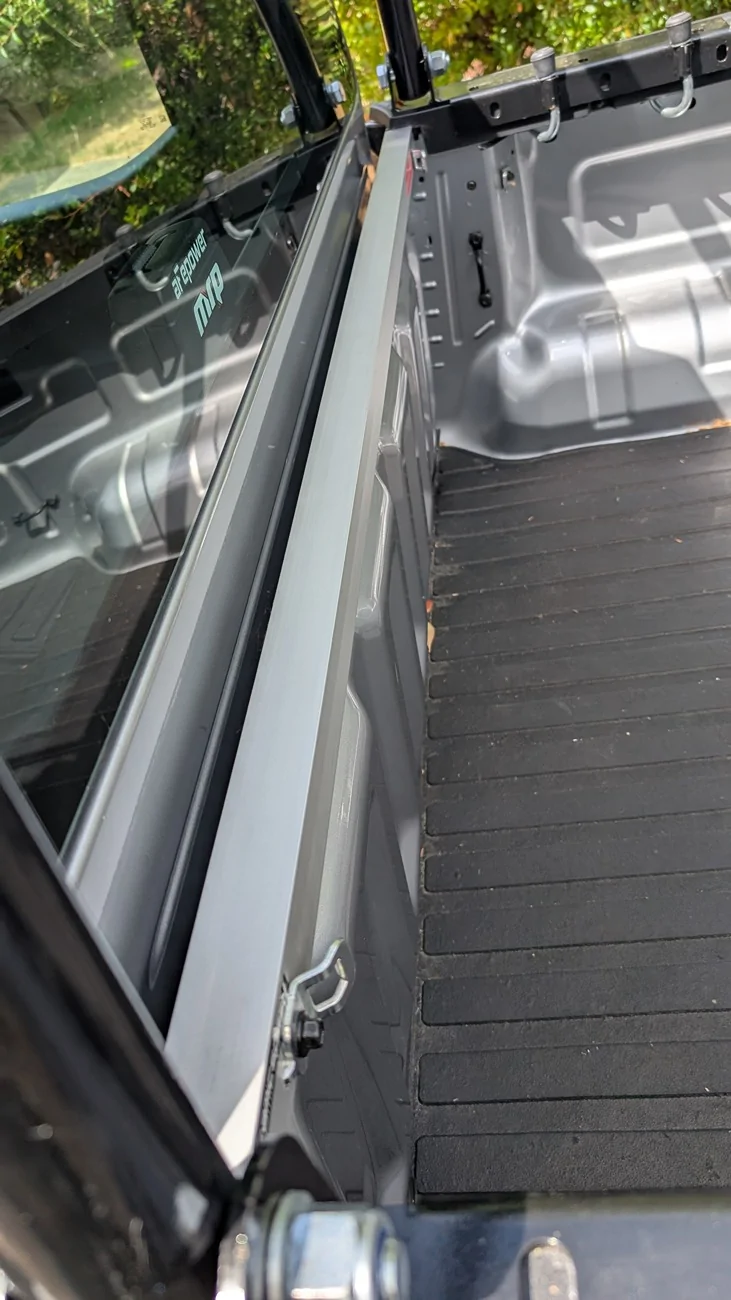
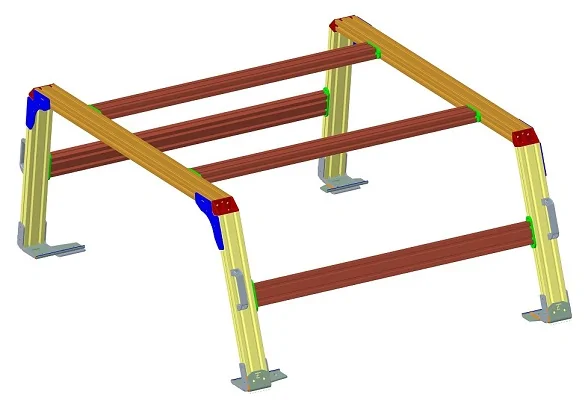
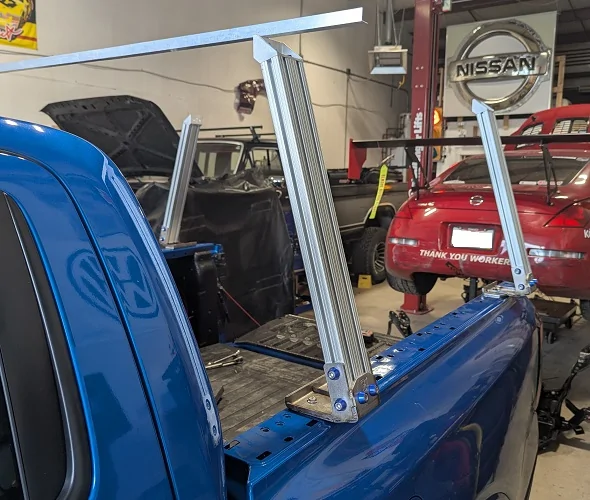
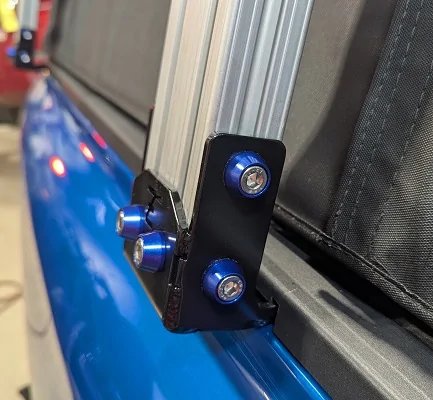
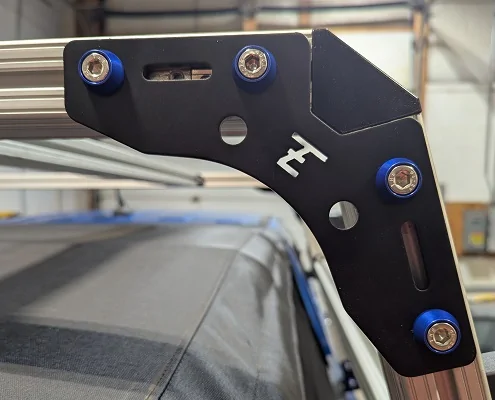
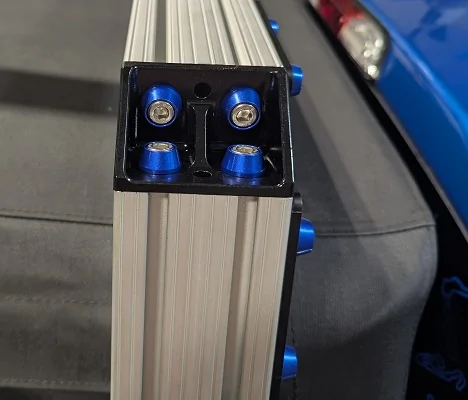
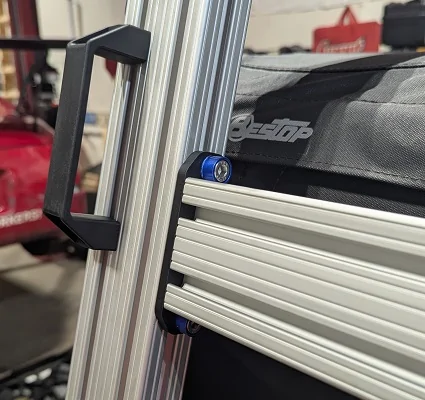
As may already be obvious, I chose to run an extruded aluminum profile for the bar work. Again, trying to be versatile and have compatibility with existing rack designs, I am using 80/20 brand in a mix of 1530 and 1530LT profiles (1.5” x 3”) and I chose to use the clear anodize as opposed to trying to go black since I hoped it’d compliment the chrome package on my truck. With the mounts taken care of I needed to take care of the upper corners so I had some billet aluminum brackets machined as well as some gussets cut. I also borrowed the Xtrusion stealth end bracket idea for the longitudinal bars and had some of those cut as well.

Once I had all the parts and everything was test fitted, I painted anything that wasn’t powder coated or anodized and splurged on some dress-up hardware from ZSPEC Design that I use for a lot of engine bay and other parts and bolted/Loctited/torqued everything down. A side note here, I built this entire rack using metric hardware, since the rest of the truck is metric, and I’m hoping to keep everything to just 2 hex sizes for additional accessories and periodic torque checks on all the cap screws.


Overall, I’m happy with the end result and it should give me a good platform to work from over the next several years. Did I save money by doing this? No, I ended up spending ~20% more than a similar Xtrusion rack but I have some spare parts for future accessories and I didn’t exactly try to save money with things like the dress-up hardware.
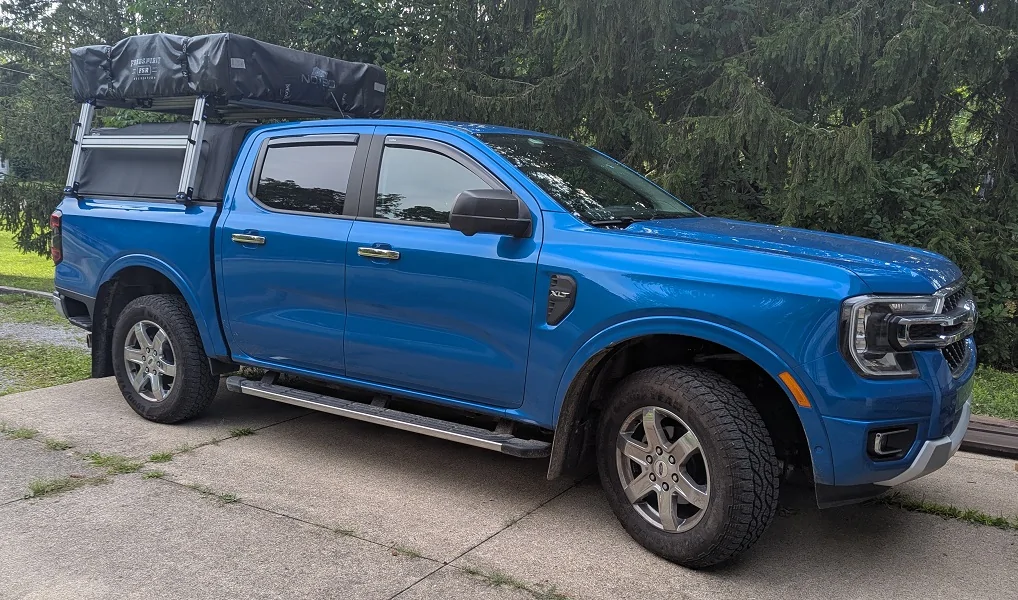
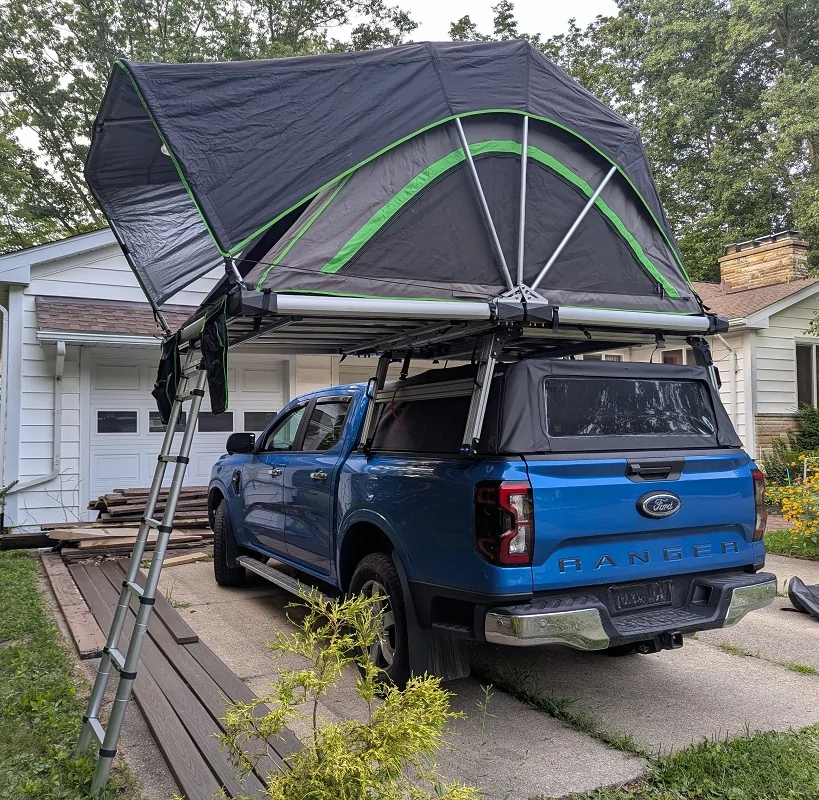
The rack does sit a bit high, but I am hoping this will allow canoes to clear the cab and it also makes it possible (but not easy) to fold the soft top forward or swap to the tonneau. With the extra height and width, the rack is going to catch a lot of wind which will make some noise and will have some effect on fuel economy, especially when I have a tent or canoe or other stuff on top. But, this isn’t my daily vehicle and it’s a rolling brick made by Ford, not a Rolls Royce, so it’s not like it was slipping silently down the highway to begin with.
For those inevitably concerned about my mounting method and that I’m going to destroy my bed rails and pry them open like a tin can, I promise that as long as I keep the hardware tight between the extrusion and the mount I am not prying out on the rails. I can unbolt the rack and jump on it and the mounts don’t move or flex off the rails (if I heavily load the center of the cross bars I actually start to pry inward slightly). I also intentionally made the mount bracket bases large to distribute the load better than the pucks most people are using and I have large plates under the rails to protect from wind loads pulling up on the rack when canoe(s) or a RTT and awning are on top.
Next step, finally install my J-Braces and mounting the RTT I bought off Marketplace and giving things a shakedown

I picked up my ’24 XLT last year with the goal of using it to tow my track car, shuttle canoes and dogs around, take care of home projects, and hopefully do some overlanding eventually (including camping at race tracks). The towing part has been going really well and so has the dog toting, but for the canoes and overlanding I needed a rack.
I did a lot of looking at what was available and learned about all the pitfalls of Ford’s spectacular decision on the plastic rail caps and the J-Brace situation. Adding to the search complication, I have a Bestop Supertop 2 soft top/tonneau cover on my truck which basically eliminated everything off the shelf (Xtrusion Overland, KB Voodoo, and a few others have offerings for the Softopper brand but Xtrusion at least specifically says it won’t work with the Bestop version).
Since simply buying something wasn’t panning out, I decided to make my own and pull concepts from the brands I liked and try to keep it as versatile as possible with some compatibility for existing accessories. After taking some measurements, I started mocking everything up in CAD and then started making some 3D prints to make sure things matched up to my dimensions and ideas.
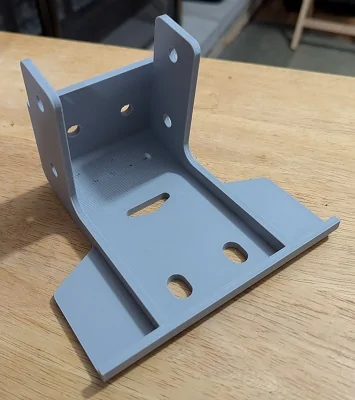
With the plastic rail cap issues and everyone trying to make pucks and such to support any useable load, I decided to go a different route and go under the caps and simply notch the caps as needed. With an order to Send-Cut-Send and some help from a friend for some SS welding I made up some mounts out of 3/16” 316SS
The brackets bolt directly to the top of the bed rail with the rear mounts centered over the “stake pocket” and the front mounts offset forward a bit to get a bit more span and to better center the rack on the bed. To help protect the bed rails and to help keep water/dust out I did put down a layer of PPF before bolting everything down and simply slit the film where I needed bolts or the rail cap clips to pass through
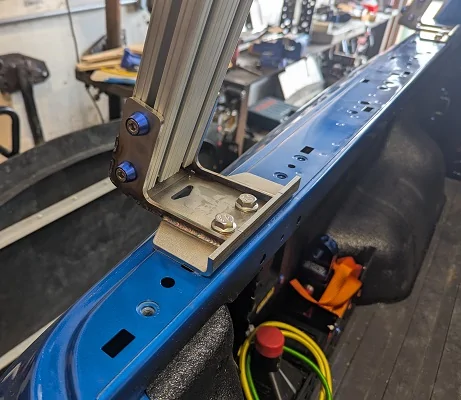
With the mounts in place I used a utility knife to trim and notch the rail caps so that they would snap back down. This obviously won’t be ideal if I choose to sell the truck in the future or upgrade to a fully integrated overlanding topper…but that’s a future problem. I did loose a few of the clips that hold the caps down, but with the Bestop rails clamping down on the caps, they’re not going anywhere.

As may already be obvious, I chose to run an extruded aluminum profile for the bar work. Again, trying to be versatile and have compatibility with existing rack designs, I am using 80/20 brand in a mix of 1530 and 1530LT profiles (1.5” x 3”) and I chose to use the clear anodize as opposed to trying to go black since I hoped it’d compliment the chrome package on my truck. With the mounts taken care of I needed to take care of the upper corners so I had some billet aluminum brackets machined as well as some gussets cut. I also borrowed the Xtrusion stealth end bracket idea for the longitudinal bars and had some of those cut as well.
Once I had all the parts and everything was test fitted, I painted anything that wasn’t powder coated or anodized and splurged on some dress-up hardware from ZSPEC Design that I use for a lot of engine bay and other parts and bolted/Loctited/torqued everything down. A side note here, I built this entire rack using metric hardware, since the rest of the truck is metric, and I’m hoping to keep everything to just 2 hex sizes for additional accessories and periodic torque checks on all the cap screws.

Overall, I’m happy with the end result and it should give me a good platform to work from over the next several years. Did I save money by doing this? No, I ended up spending ~20% more than a similar Xtrusion rack but I have some spare parts for future accessories and I didn’t exactly try to save money with things like the dress-up hardware.
The rack does sit a bit high, but I am hoping this will allow canoes to clear the cab and it also makes it possible (but not easy) to fold the soft top forward or swap to the tonneau. With the extra height and width, the rack is going to catch a lot of wind which will make some noise and will have some effect on fuel economy, especially when I have a tent or canoe or other stuff on top. But, this isn’t my daily vehicle and it’s a rolling brick made by Ford, not a Rolls Royce, so it’s not like it was slipping silently down the highway to begin with.
For those inevitably concerned about my mounting method and that I’m going to destroy my bed rails and pry them open like a tin can, I promise that as long as I keep the hardware tight between the extrusion and the mount I am not prying out on the rails. I can unbolt the rack and jump on it and the mounts don’t move or flex off the rails (if I heavily load the center of the cross bars I actually start to pry inward slightly). I also intentionally made the mount bracket bases large to distribute the load better than the pucks most people are using and I have large plates under the rails to protect from wind loads pulling up on the rack when canoe(s) or a RTT and awning are on top.
Next step, finally install my J-Braces and mounting the RTT I bought off Marketplace and giving things a shakedown
Sponsored