T-Wrecks
Well-Known Member
- First Name
- Mark
- Joined
- Aug 23, 2019
- Threads
- 20
- Messages
- 152
- Reaction score
- 76
- Location
- Roberts, WI
- Vehicle(s)
- 25 XLT FX4
- Thread starter
- #1
Rant on: Trucks are for hauling stuff, not people! I hate Ford for dropping the 6' bed in my 19 SC. Trucks were ruined by wannabes that should have bought an SUV. Rant off.
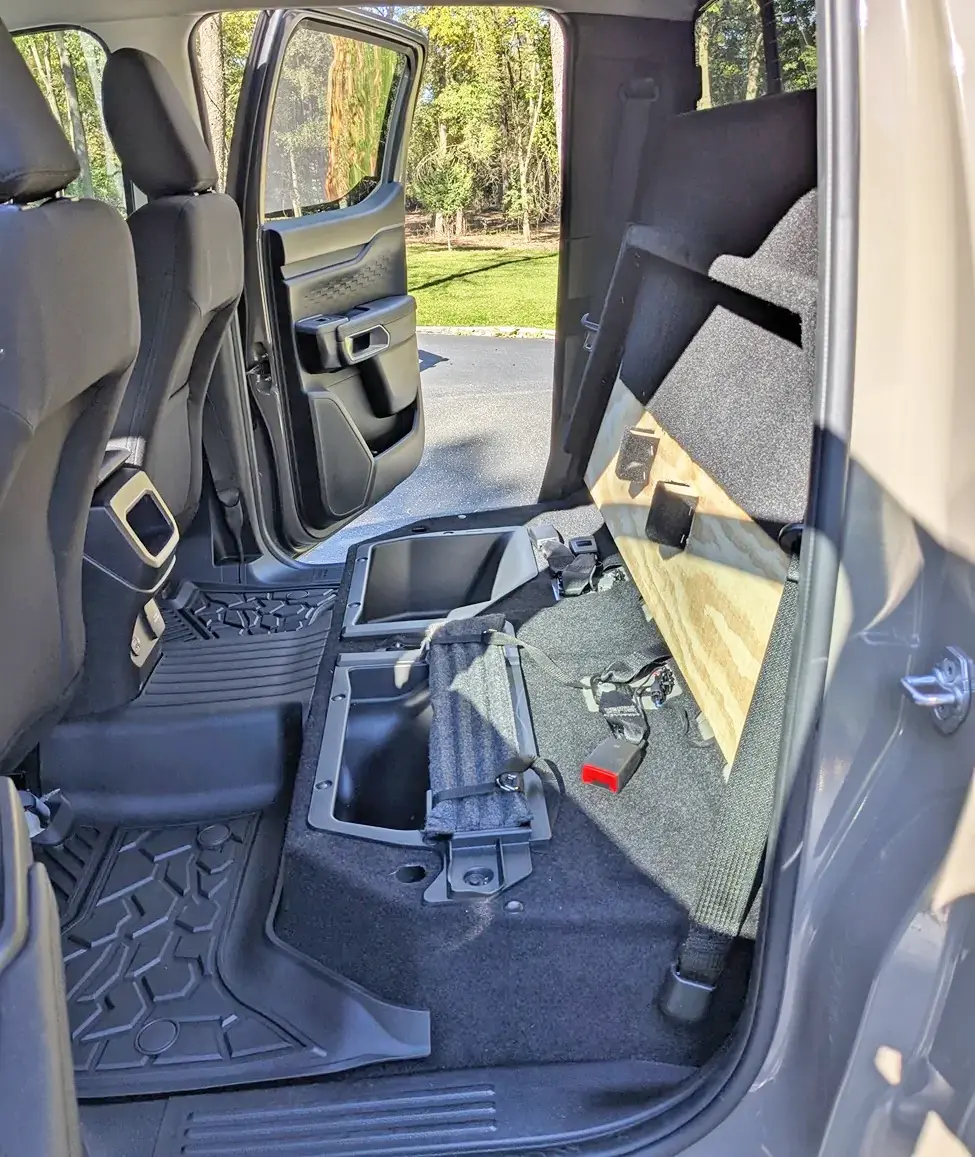
But I really wanted the new 6G Ranger despite the tiny 5' bed which is not good for hauling kayaks and bikes but I'll (have to) get used to it. The good news is the total cargo capacity of the CC is the same as the old SC, its just more goes inside the truck. So to maximize space and make loading/unloading easier a rear seat delete was the first thing on my list.
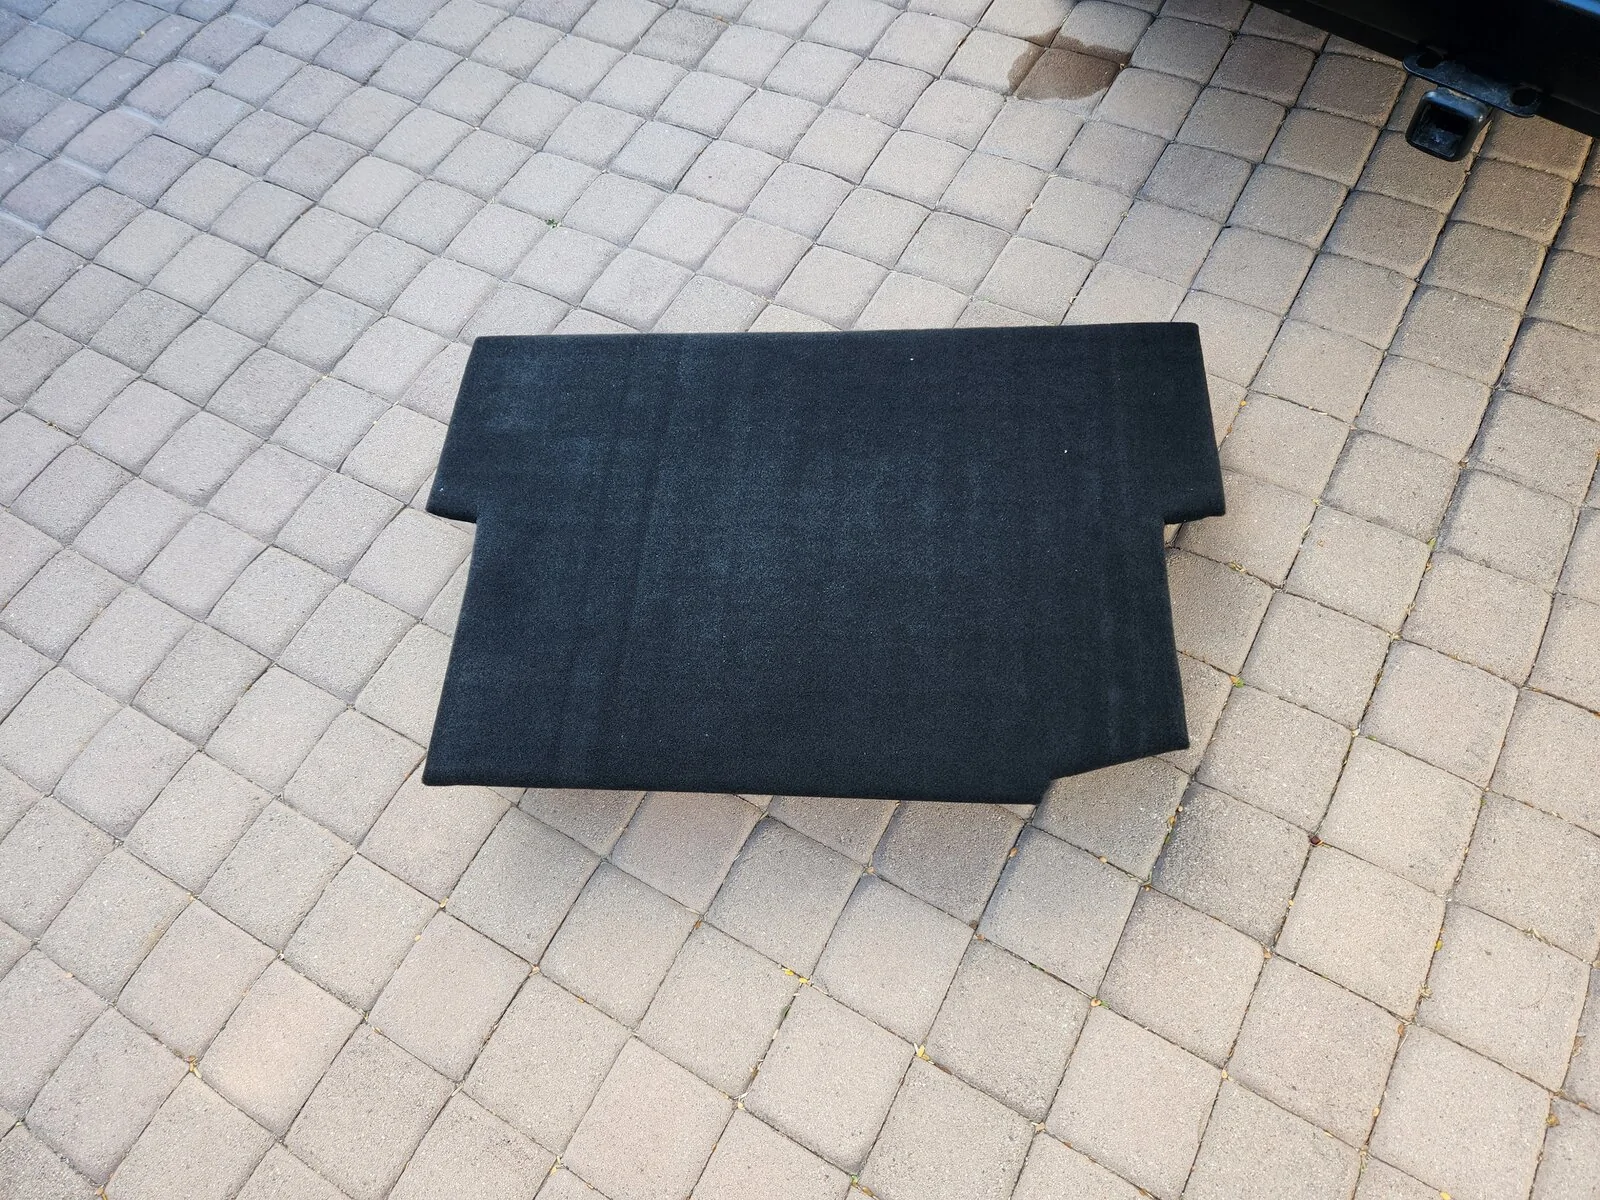
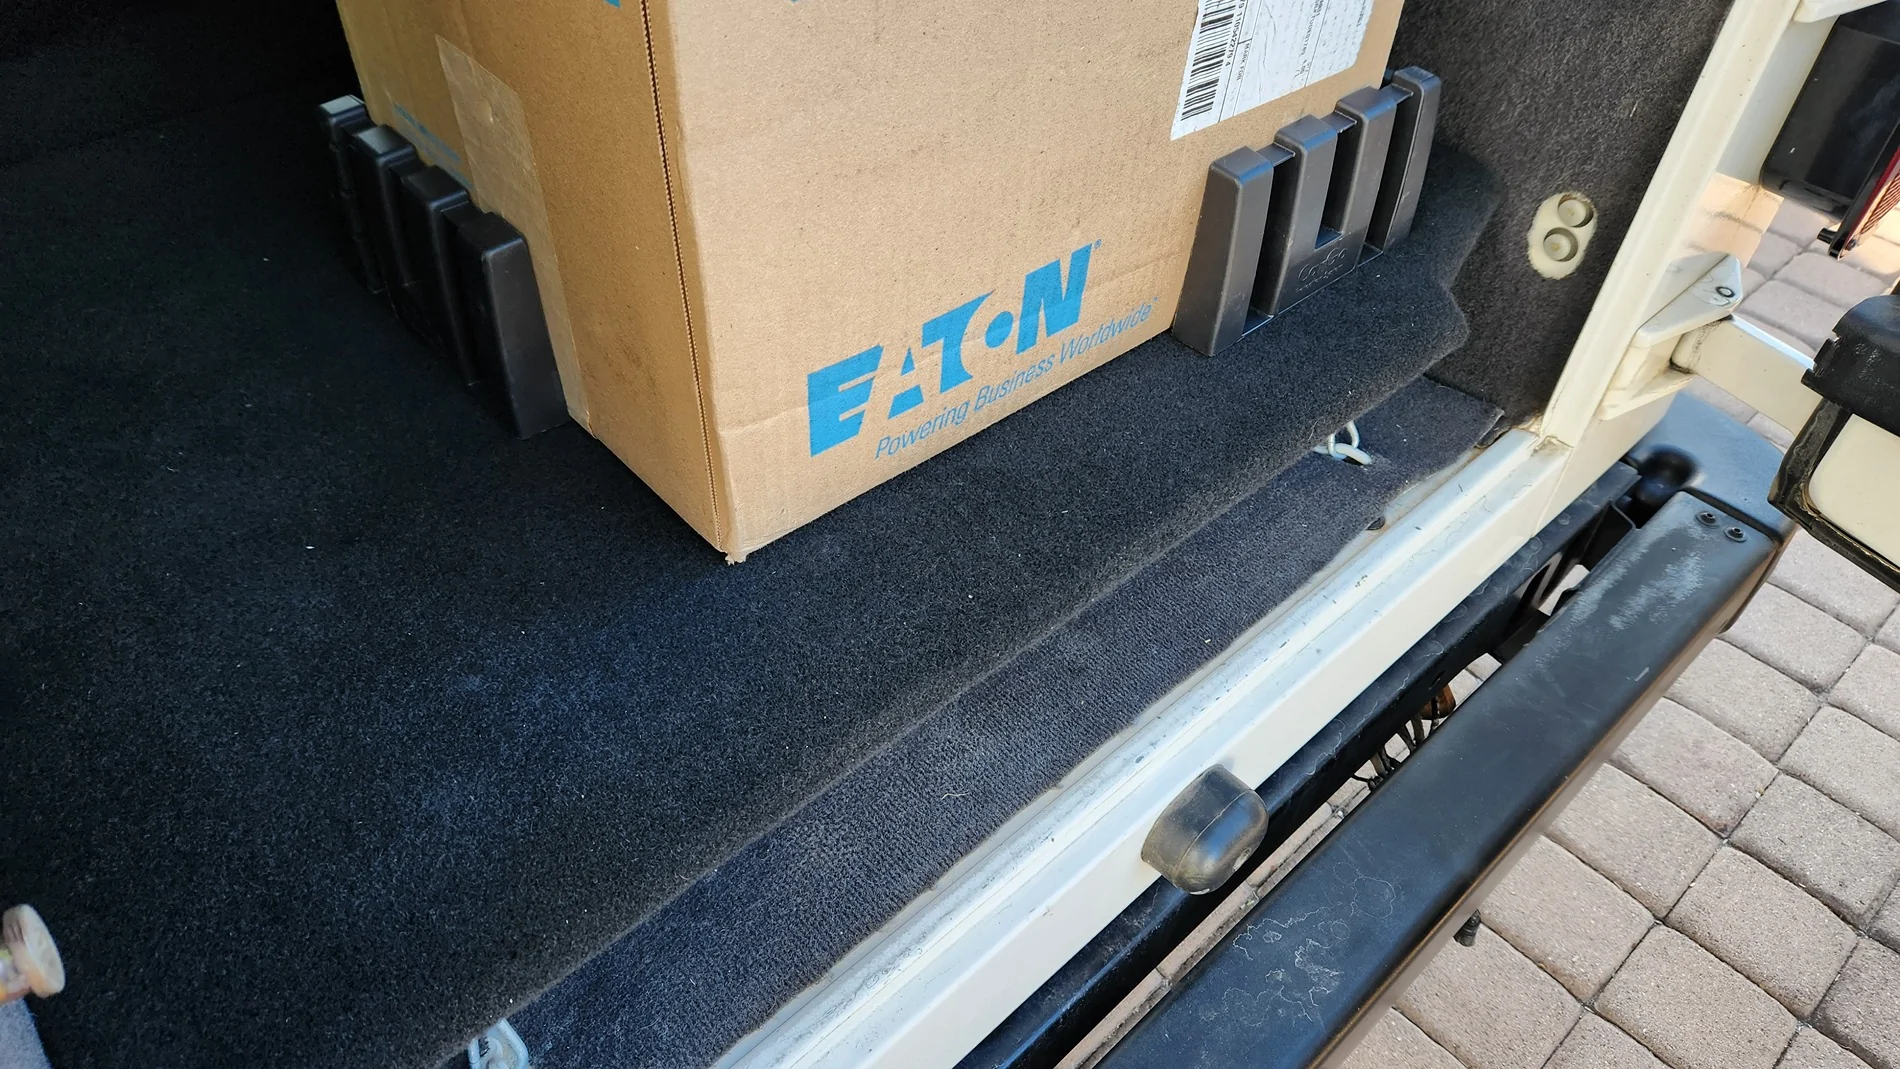
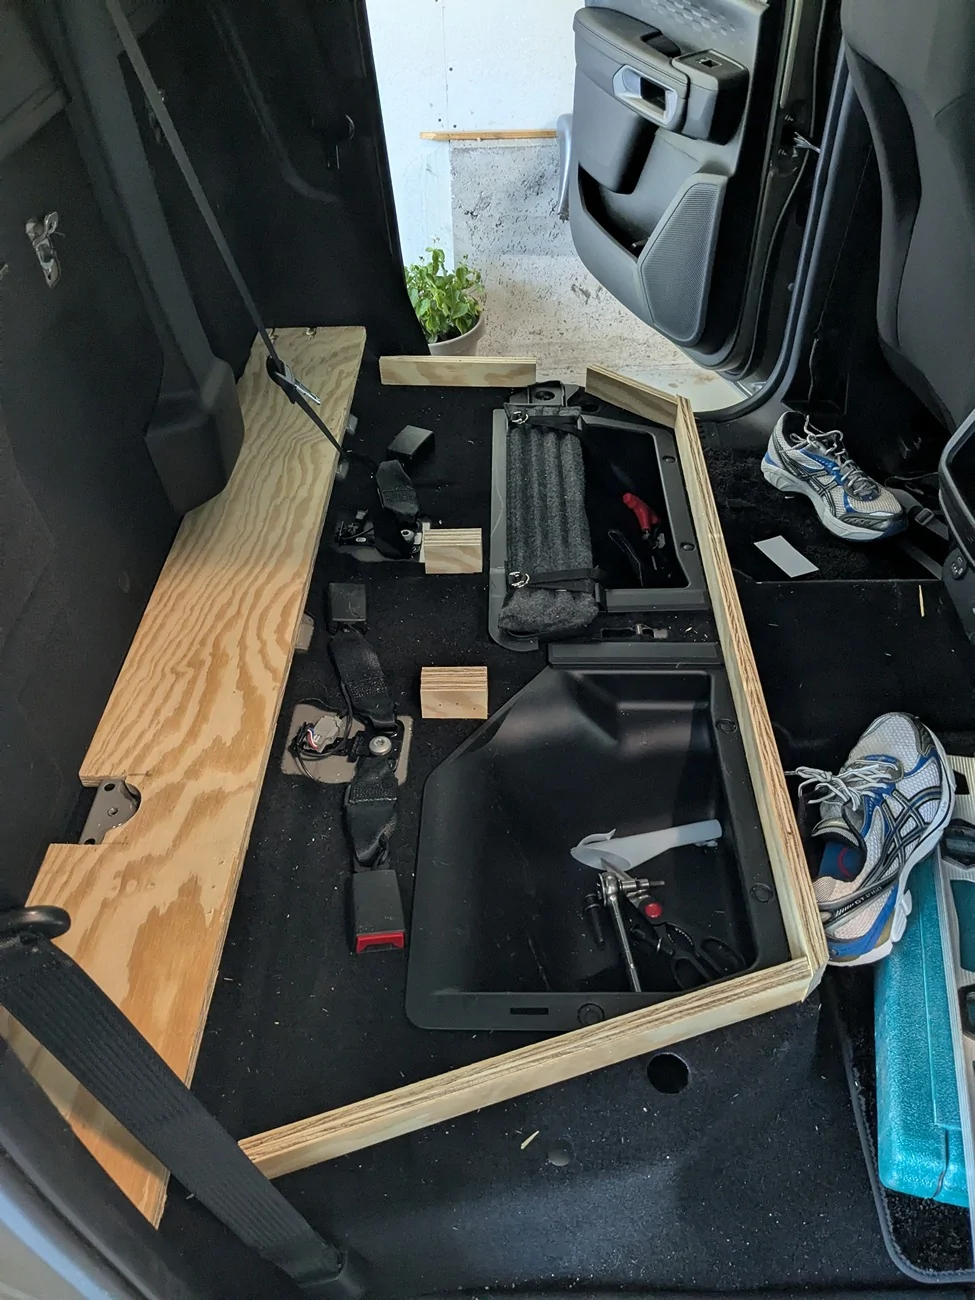
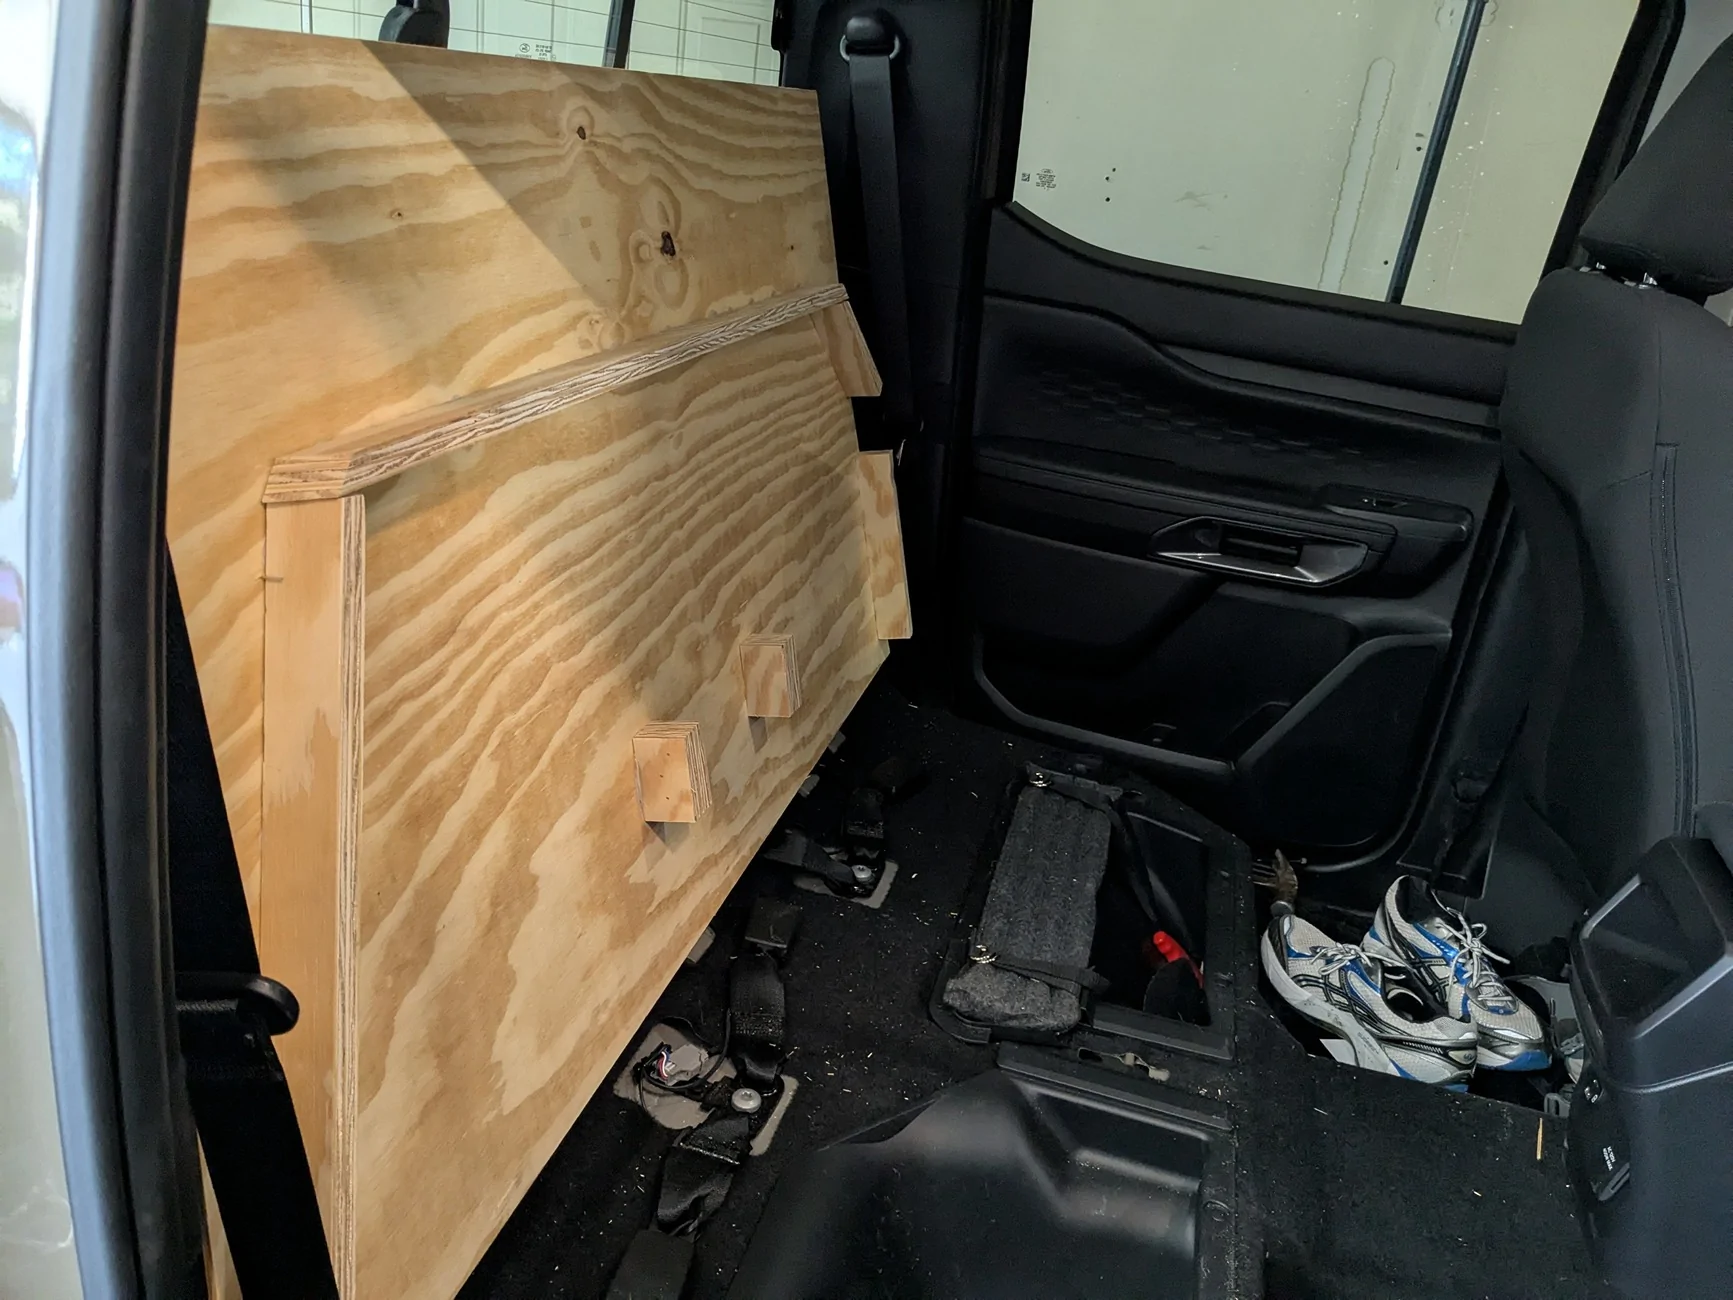
Within 2 hours of bringing my new Ranger home I had the rear seat out. It's just 4 bolts and it comes right out after monkeying with some elastic seat belt retainers. I haven't seen a 6G specific DIY seat delete but it's not hard to figure out (I did this on my old SC too). Using a 4' straight edge ruler I was able to find the highest point under the seat area, it's 3 raised squares along the back wall that's visible in the picture with just the short plywood piece minus the jack mount, which was cut out to get it as low as possible. I used 3/4" CDX plywood and instead of making doors to access the under seat storage I added a hinge so the whole thing lifts up, which also provides easy assess to the floor. The plywood is pretty stout so it doesn't require legs for the cantilevered part over the floor. You can see the attached underside spacers needed to support the plywood. To avoid any squeaks I glued and then nailed them with a brad nailer.
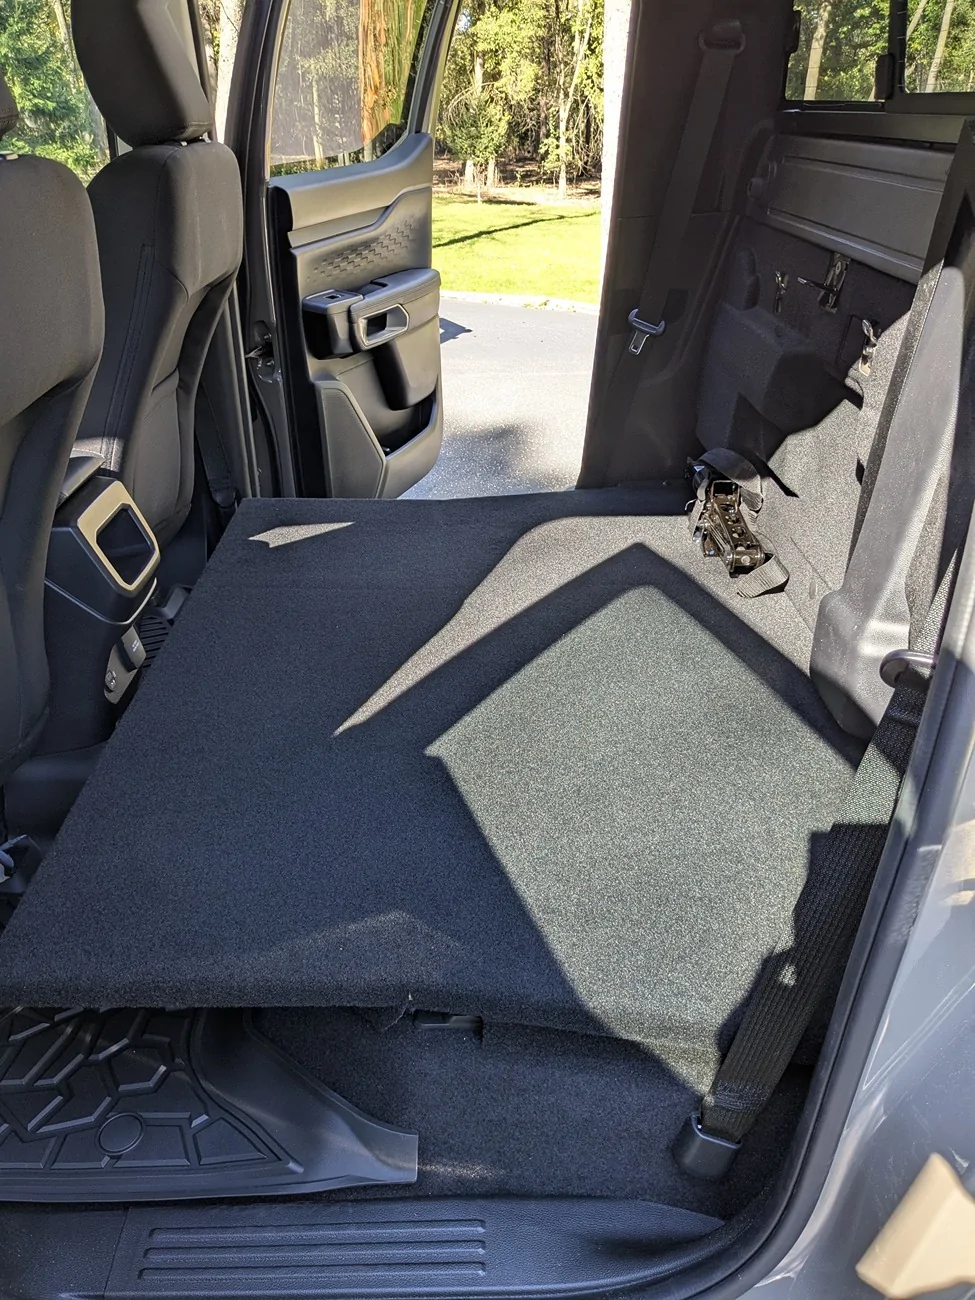
Tip, don't try and measure the locations for the seat bolt holes, use a template! I spent almost as much time trying to get those right than it took for everything else. It helped that I only had to work with the short section but was still a PITA. I used black auto/marine carpet from Menard's and 3M 77 spray adhesive with a few staples on the underside. Don't be shy with the adhesive.
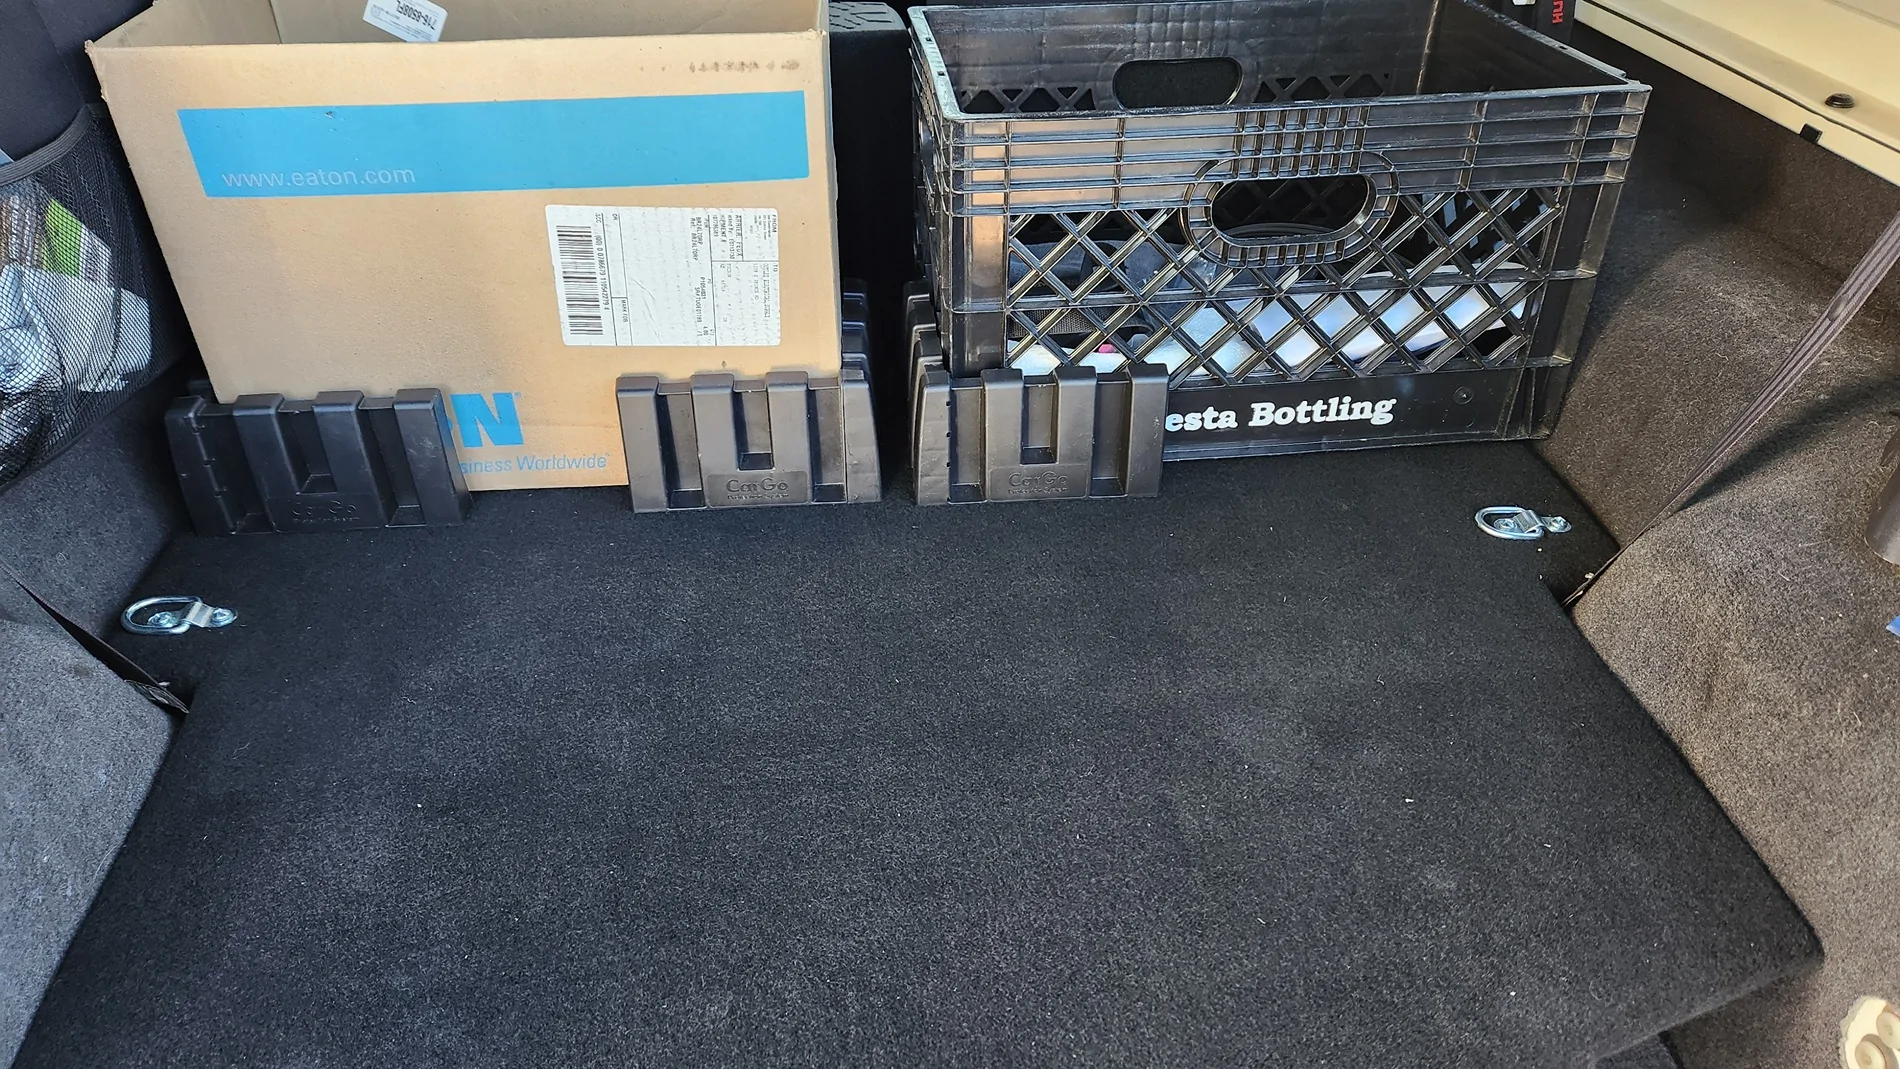
I was planning on a plywood back wall too but now I'm just going to hang a moving blanket there and call it good. Not adding a back wall allows for maximum space too. I placed the jack upright and slid it under the back wall overhang so it's pretty much out of the way. It's secured with a boat battery strap but it needs stronger anchors. Not that I'll ever need to but this platform comes out as easy as the seats, just 4 bolts. There's no noticeable increase in road noise either but I might add some insulation to the back wall later. I think the total cost for materials was $75.
All the stuff I had in my SC under seat storage fits, even my 4 way folding tire wrench that's too long but fits under the plywood. My dog loves it too. I'm going to add some anchor points for securing coolers and plastic bins back there in case of an accident, or "gasp" a rollover.


But I really wanted the new 6G Ranger despite the tiny 5' bed which is not good for hauling kayaks and bikes but I'll (have to) get used to it. The good news is the total cargo capacity of the CC is the same as the old SC, its just more goes inside the truck. So to maximize space and make loading/unloading easier a rear seat delete was the first thing on my list.
Within 2 hours of bringing my new Ranger home I had the rear seat out. It's just 4 bolts and it comes right out after monkeying with some elastic seat belt retainers. I haven't seen a 6G specific DIY seat delete but it's not hard to figure out (I did this on my old SC too). Using a 4' straight edge ruler I was able to find the highest point under the seat area, it's 3 raised squares along the back wall that's visible in the picture with just the short plywood piece minus the jack mount, which was cut out to get it as low as possible. I used 3/4" CDX plywood and instead of making doors to access the under seat storage I added a hinge so the whole thing lifts up, which also provides easy assess to the floor. The plywood is pretty stout so it doesn't require legs for the cantilevered part over the floor. You can see the attached underside spacers needed to support the plywood. To avoid any squeaks I glued and then nailed them with a brad nailer.
Tip, don't try and measure the locations for the seat bolt holes, use a template! I spent almost as much time trying to get those right than it took for everything else. It helped that I only had to work with the short section but was still a PITA. I used black auto/marine carpet from Menard's and 3M 77 spray adhesive with a few staples on the underside. Don't be shy with the adhesive.
I was planning on a plywood back wall too but now I'm just going to hang a moving blanket there and call it good. Not adding a back wall allows for maximum space too. I placed the jack upright and slid it under the back wall overhang so it's pretty much out of the way. It's secured with a boat battery strap but it needs stronger anchors. Not that I'll ever need to but this platform comes out as easy as the seats, just 4 bolts. There's no noticeable increase in road noise either but I might add some insulation to the back wall later. I think the total cost for materials was $75.
All the stuff I had in my SC under seat storage fits, even my 4 way folding tire wrench that's too long but fits under the plywood. My dog loves it too. I'm going to add some anchor points for securing coolers and plastic bins back there in case of an accident, or "gasp" a rollover.
Sponsored
Last edited: