NJ Braptor
Member
- Joined
- Mar 4, 2025
- Threads
- 1
- Messages
- 18
- Reaction score
- 32
- Location
- New Jersey
- Vehicle(s)
- 2025 Ranger Raptor
- Thread starter
- #1
LAST UPDATE: Super happy with how this turned out! There is a slight rattle on the rear window in heavy bass, but I've realized that with the rear seat folded down that goes away and sounds MUCH better anyway. Happy to answer any questions.
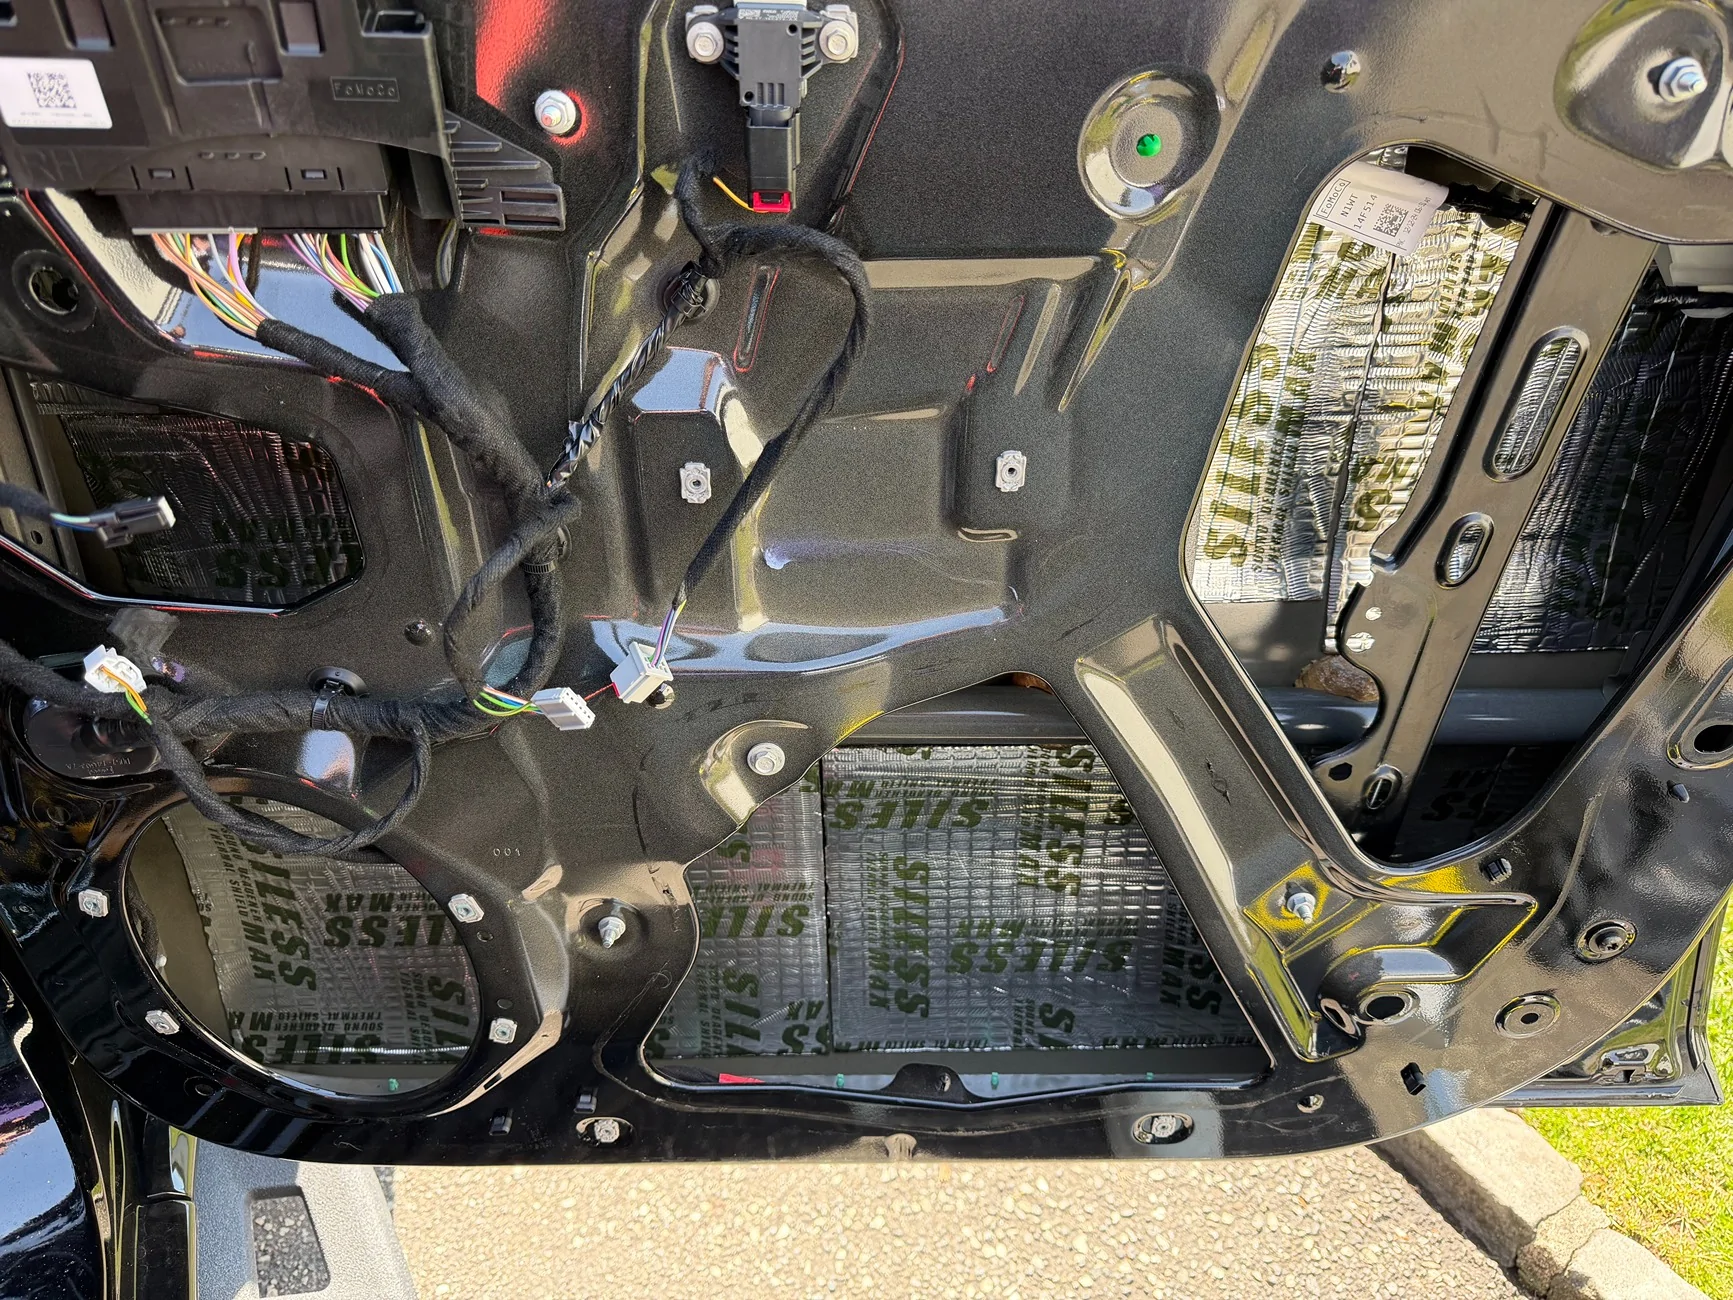
Just installed sound deadening in all 4 doors and swapped speakers while I was in there. Shout out to flaberdoopin for the videos of the disassembly. The first one took a bit longer than anticipated as the trim brackets Crutchfield sent were a wonky fit (ended up using the packaged screws but also Gorilla Glue to be sure). I mounted the speakers to the trim plates first, then installed the plate+speaker into factory holes. That said, I finished all four doors - sound material and speakers - in about 3.5 hours. The last door took maybe 30 minutes bc I was a pro by then.
The JL speakers definitely sound better than stock, but the sound deadener its absolutely worth the time invested. Check the video below and you'll see how much of a difference it made.
Next week I plan to install a Kicker hideaway 10 with the Sounds Good KEYLOC.
In case anyone's interested, here's the parts list I used [updated to include all parts and tools]:
Siless, first layer (see pic)
Siless, second layer - This one is probably twice the thickness and clearly made the biggest difference.
I only used half of each box to complete all 4 doors, so plan for leftover material unless you can find a smaller box / maybe pick up on marketplace. Honestly, the difference in sound and 'feel' of the doors opening/closing are substantial enough that I plan to do the headliner next week. Its a PIA to take down but with leftover material and seeing the difference it makes, its a no brainer for me.
Rollers - must use
Trim tools - these were cheap, and I snapped a couple, but they got the job done in the end.
Fronts - came with the harness and trim plates. Harness was plug and play.
Rears - same as above. The harnesses for the rears were a tad short, and thus a tight fit around the trim plate. If they were 2mm longer they'd be great.
Various parts and tools:
Ring terminals
Inline fuse (may not need)
Strippers
Distro block - splits power to KEYLOC and Sub
fuses
quality zip ties
Inline fuse (tucked under hood near battery, used double sided tape)
Loom for power wire under hood
Fish tape for wire pulling
Kicker KISL RCAs
Velcro tape to secure the KEYLOC to the truck floor (only need hook side, carpet holds it)
Power wire (this was easy to work with and seems to be of high quality)
Connectors
Heat Gun
Torx set (you'll need a larger one for the seat removal that I already had laying around)
Extension rods
ABS plastic sheets for the sub mount - this was not super easy to work with, but it came out ok and I'm glad I used it.
Egg crate for between the mount and rear cavity
I left the tweeters and center as stock. The stock amp seems to power these decently. I'm sure an upgraded amp would be awesome, but as of now I'm going to keep it. We'll see if the Kicker sub changes my mind.
Hope this is helpful to anyone considering doing the same mod.

REAR DOOR WITHOUT SOUND MATERIAL, FRONT FULLY INSTALLED. WOW.
______UPDATE:
Install complete. It was a beast for sure, but mostly bc I kept having to go back to the hardware store for more tools & parts. The Hideaway, KEYLOC, and 8AWG power cable I ended up running were all different gauges, so fitting everything together clean and tight was more difficult than expected. The Kicker hideaway harness uses fairly flimsy wiring, but so far thats my only complaint. The KEYLOC from Sounds Good was plug and play, true to their word. Harness was clean and wrapped nicely.
The Hideaway sub doesnt have RCA inputs so I had to splice the RCA out (from KEYLOC) into the factory Kicker harness. Again, different AWG, making for a tricky connection even with the Kicker add-on kit.
Overall though, I'm impressed with the sound quality for the price. Not regretting passing up the JL Stealthbox at all.
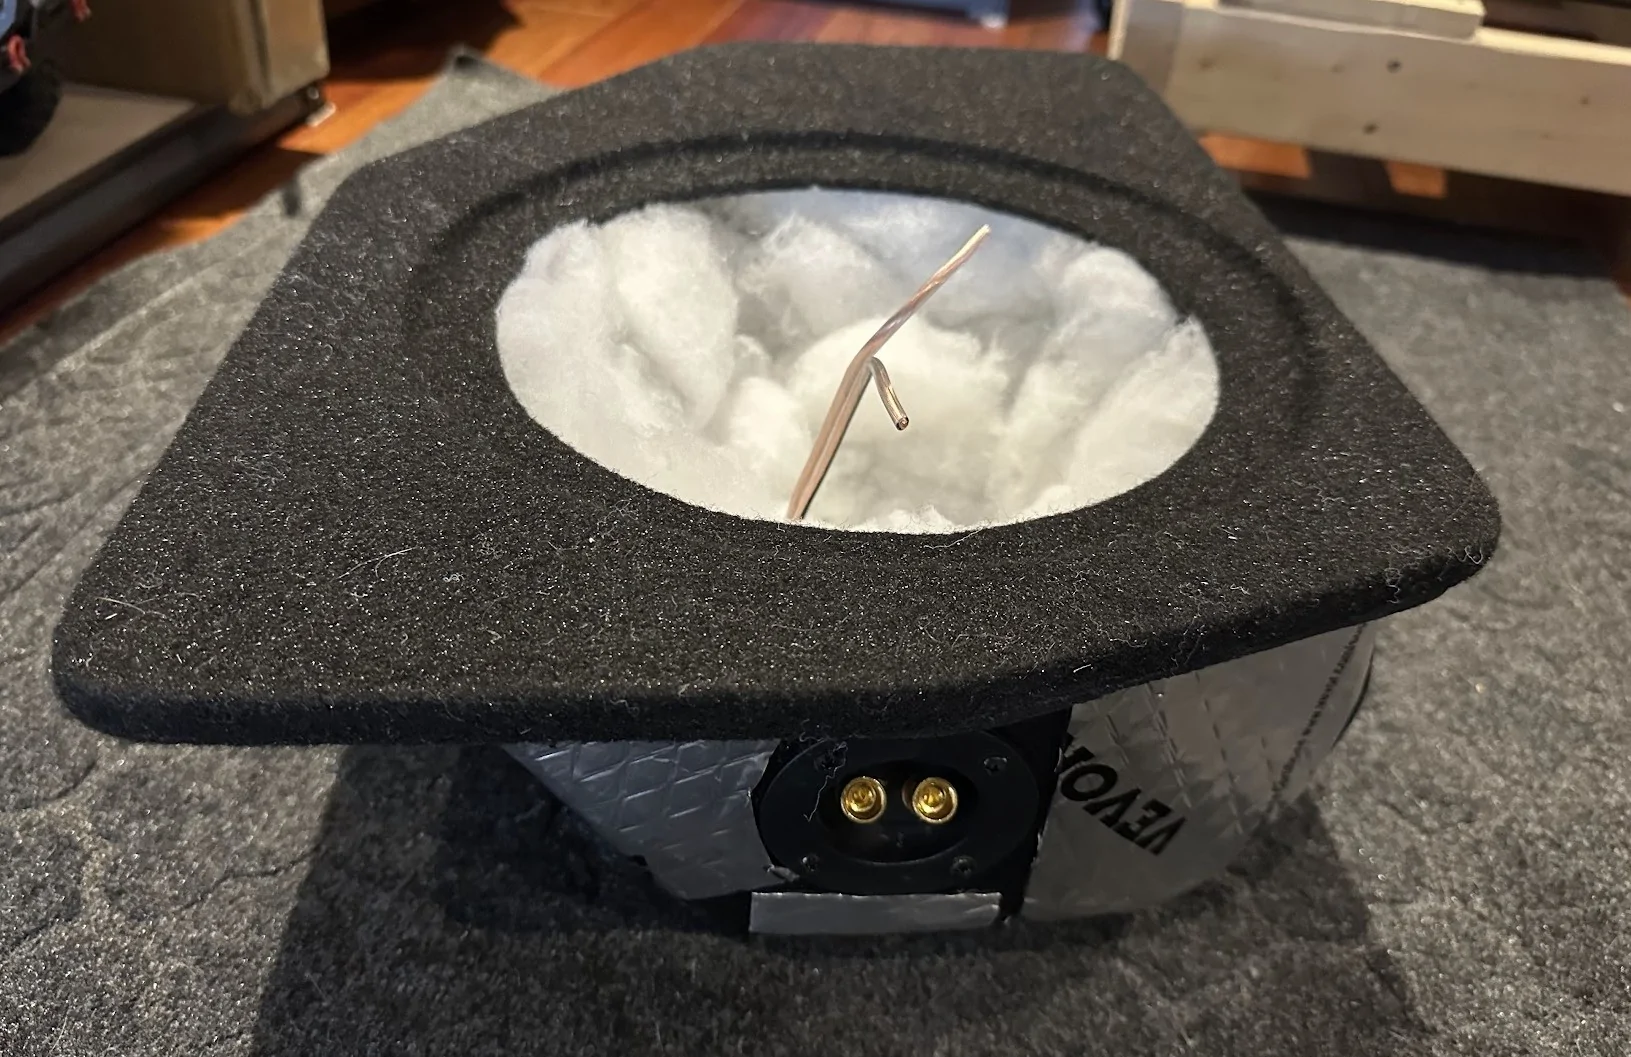
I made a custom mount using ABS for the sub, added some egg crate material behind. The back of the rear seats seems to keep everything pretty tightly pinched - no rattles, as I was expecting.
For the power distribution block and the KEYLOC mounting I just used the hook side of some velcro tape, which seems to hold well enough against the factory Ford carpet.
Hope this was helpful to the forum. Overall I think I spent around $1,100 or so for: Sound deadening material, JL speakers (4 doors), Kicker 10 Hideaway, distro. block, KEYLOC, various wires, parts, fuses, etc.
Well worth it. The time invested was significant, but if I had all the parts at the ready I'd estimate 12-15 hours. Pulling the trim, rolling the sound material, running the cables, removing & replacing rear seat...all that added more time than I had planned. Luckily I'm between jobs so I was able to chop it up across a few days.
Just installed sound deadening in all 4 doors and swapped speakers while I was in there. Shout out to flaberdoopin for the videos of the disassembly. The first one took a bit longer than anticipated as the trim brackets Crutchfield sent were a wonky fit (ended up using the packaged screws but also Gorilla Glue to be sure). I mounted the speakers to the trim plates first, then installed the plate+speaker into factory holes. That said, I finished all four doors - sound material and speakers - in about 3.5 hours. The last door took maybe 30 minutes bc I was a pro by then.
The JL speakers definitely sound better than stock, but the sound deadener its absolutely worth the time invested. Check the video below and you'll see how much of a difference it made.
Next week I plan to install a Kicker hideaway 10 with the Sounds Good KEYLOC.
In case anyone's interested, here's the parts list I used [updated to include all parts and tools]:
Siless, first layer (see pic)
Siless, second layer - This one is probably twice the thickness and clearly made the biggest difference.
I only used half of each box to complete all 4 doors, so plan for leftover material unless you can find a smaller box / maybe pick up on marketplace. Honestly, the difference in sound and 'feel' of the doors opening/closing are substantial enough that I plan to do the headliner next week. Its a PIA to take down but with leftover material and seeing the difference it makes, its a no brainer for me.
Rollers - must use
Trim tools - these were cheap, and I snapped a couple, but they got the job done in the end.
Fronts - came with the harness and trim plates. Harness was plug and play.
Rears - same as above. The harnesses for the rears were a tad short, and thus a tight fit around the trim plate. If they were 2mm longer they'd be great.
Various parts and tools:
Ring terminals
Inline fuse (may not need)
Strippers
Distro block - splits power to KEYLOC and Sub
fuses
quality zip ties
Inline fuse (tucked under hood near battery, used double sided tape)
Loom for power wire under hood
Fish tape for wire pulling
Kicker KISL RCAs
Velcro tape to secure the KEYLOC to the truck floor (only need hook side, carpet holds it)
Power wire (this was easy to work with and seems to be of high quality)
Connectors
Heat Gun
Torx set (you'll need a larger one for the seat removal that I already had laying around)
Extension rods
ABS plastic sheets for the sub mount - this was not super easy to work with, but it came out ok and I'm glad I used it.
Egg crate for between the mount and rear cavity
I left the tweeters and center as stock. The stock amp seems to power these decently. I'm sure an upgraded amp would be awesome, but as of now I'm going to keep it. We'll see if the Kicker sub changes my mind.
Hope this is helpful to anyone considering doing the same mod.
REAR DOOR WITHOUT SOUND MATERIAL, FRONT FULLY INSTALLED. WOW.
______UPDATE:
Install complete. It was a beast for sure, but mostly bc I kept having to go back to the hardware store for more tools & parts. The Hideaway, KEYLOC, and 8AWG power cable I ended up running were all different gauges, so fitting everything together clean and tight was more difficult than expected. The Kicker hideaway harness uses fairly flimsy wiring, but so far thats my only complaint. The KEYLOC from Sounds Good was plug and play, true to their word. Harness was clean and wrapped nicely.
The Hideaway sub doesnt have RCA inputs so I had to splice the RCA out (from KEYLOC) into the factory Kicker harness. Again, different AWG, making for a tricky connection even with the Kicker add-on kit.
Overall though, I'm impressed with the sound quality for the price. Not regretting passing up the JL Stealthbox at all.
I made a custom mount using ABS for the sub, added some egg crate material behind. The back of the rear seats seems to keep everything pretty tightly pinched - no rattles, as I was expecting.
For the power distribution block and the KEYLOC mounting I just used the hook side of some velcro tape, which seems to hold well enough against the factory Ford carpet.
Hope this was helpful to the forum. Overall I think I spent around $1,100 or so for: Sound deadening material, JL speakers (4 doors), Kicker 10 Hideaway, distro. block, KEYLOC, various wires, parts, fuses, etc.
Well worth it. The time invested was significant, but if I had all the parts at the ready I'd estimate 12-15 hours. Pulling the trim, rolling the sound material, running the cables, removing & replacing rear seat...all that added more time than I had planned. Luckily I'm between jobs so I was able to chop it up across a few days.
Sponsored
Last edited: